Get *nix data into Splunk Cloud Platform
This topic guides you through the steps to get *nix data into Splunk Cloud Platform.
Administrator requirements
Splunk Cloud Platform administrators must meet the following prerequisites to get *nix data into Splunk Cloud Platform:
- On your *nix server, you need root access if you plan to collect from system or root-owned files and directories. However, note the following precautions if you run as a non-root user: see Run Splunk as a different or non-root user.
- Correct permissions to open the following port in your firewalls: 9997
- Knowledge of the location of your source files and which sourcetypes you want Splunk Cloud Platform to recognize.
If you don't know this information or have these permissions, work closely with your organization's *nix Administrator to complete these steps.
Customers are responsible for the setup, configuration, and maintenance of third-party services and resources, which includes payment. See Network connectivity and data transfer in the Splunk Cloud Platform Service Description.
Before you begin
To get *nix data into Splunk Cloud Platform, you need a solid understanding of Splunk concepts. The table lists these concepts and provides links to more information.
| Product | Concept | See |
|---|---|---|
| Splunk and Splunk Cloud Platform | indexes source types Inputs Data Manager Splunk apps and add-ons |
Fundamental Splunk and Splunk Cloud Platform concepts |
Overview
This topic takes you through the steps to get *nix data into Splunk Cloud Platform using Linux commands.
The specific commands and syntax for these examples are run on Amazon Linux 2 AMI; however, the syntax for other *nix systems may be slightly different. If you are using a different *nix system, use the equivalent syntax to follow the steps.
To get *nix data into Splunk Cloud Platform, complete the following high-level steps:
- Set up your Splunk Cloud Platform environment.
- Install and configure a Universal Forwarder on your host system.
On your *nix server, you need to install a Universal Forwarder that will forward data on to your Splunk Cloud Platform instance. - Download and install the credentials for the Universal Forwarder.
You will need to download and install the Splunk Cloud Platform credentials on the forwarder to allow it to send data to your Splunk Cloud instance. - Install and configure the Splunk Add-on for Unix and Linux on your Universal Forwarder.
On your Universal Forwarder, you will install an add-on to simplify the process of getting *nix data into Splunk, and you'll configure some source types to ensure your Splunk Cloud Platform instance can recognize the types of sources you need to analyze. - Verify that you can receive data from your *nix platform.
Test your configuration to ensure that it's working properly.
Step 1: Set up your Splunk Cloud Platform environment
Before you can get *nix data into your Splunk Cloud Platform instance, you must ensure the following:
- Confirm that you are assigned the
sc_adminrole on your Splunk Cloud Platform instance. - Request that Splunk Support install the following on your Splunk Cloud Platform instance, and ensure you allow adequate time to complete this task before you attempt to get data in:
- Splunk Add-on for Unix and Linux
- Splunk IT Service Intelligence or Splunk IT Essentials Work
- Splunk App for Content Packs, which contains the necessary content packs for Unix and Linux
- Create a test index in your Splunk Cloud Platform instance so that you can test your installation before going into production. Follow these instructions to create an index: Create a Splunk Cloud Platform Index.
Step 2: Install the Universal Forwarder in your *nix environment
If you have already installed a Universal Forwarder, you can skip this step.
Complete the following steps to install and configure the Universal Forwarder to send the data to Splunk Cloud Platform.
- Connect to your *nix machine, and log in as the root user so you can install a package.
- Go to Splunk.com and download the Universal Forwarder to a temporary directory (meaning,
/tmp). Select Copy wget link on the Universal Forwarder download page and use thewgetcommand to download the forwarder to your Linux environment. - To ensure you use the rpm as root, enter the following command:
sudo -i - Use the rpm program to install RPM files.
To install the Splunk RPM in the default directory /opt/splunkforwarder, enter the following command:rpm -i splunkforwarder-<…>-linux-2.6-x86_64.rpm - Log in as the Splunk user by entering the following command:
su - splunk - Go to the bin directory by entering the following command:
cd bin - Start your forwarder by entering the following command:
./splunk start - Enter a user name and password.
You should see the installation performing the steps of checking prerequisites, creating certs, checking conf files, and validating files against a hash. If the installation is successful, a message similar to the following displays:
All installed files intact.
Done
All preliminary checks passed.
Starting splunk server daemon (splunkd)...
Done
Step 3: Download the credentials file and install it on your Universal Forwarder
You can skip this step if you have already downloaded and installed the credentials package.
Complete the following steps to install the credential files on the Universal Forwarder.
- From your Splunk Cloud Platform instance, go to Apps > Universal Forwarder.
- Click Download Universal Forwarder Credentials.
- Note the location where the credentials file was downloaded. The credentials file is named
splunkclouduf.spl. - Copy the file to your
/tmpfolder. - Install the following app by entering the following command:
/opt/splunkforwarder/bin/splunk install app /tmp/splunkclouduf.spl - When you are prompted for a user name and password, enter the user name and password for the Universal Forwarder. The following message displays if the installation is successful:
App '/tmp/splunkclouduf.spl' installed - Restart the forwarder to enable the changes by entering the following command.
./splunk restart
Step 4: Install and configure the Splunk Add-on for Unix and Linux on your Universal Forwarder
Complete the following steps to download the Splunk Add-on for Unix and Linux from Splunkbase, install it on your forwarder, and enable the inputs.
- Go to Splunkbase, and download the Splunk Add-on for Unix and Linux.
- Copy the file (for example,
splunk-add-on-for-unix-and-linux_920.tgz) from the download location to the/tmpdirectory on the forwarder.You can use scp or another similar program. - Ssh/login to the forwarder instance.
- Sudo or su to the splunk user.
- Ensure that you are logged in as the splunk user using the following command:
whoami - Untar the file using the following command:
tar xfvz splunk-add-on-for-unix-and-linux_920.tgz - Move the files to the Splunk_TA_nix directory using the following command:
mv Splunk_TA_nix/ /opt/splunkforwarder/etc/apps/ - Go to the apps directory by entering the following command:
cd /opt/splunkforwarder/etc/apps - Add the following directory:
Splunk_TA_nix.
You can see the list of directories by using the following command:
ls -F - Go to the Splunk_TA_nix directory using the following command:
cd Splunk_TA_nix - Create a local directory using the following command:
mkdir local - Verify that the directory was created by entering:
ls -F - Copy the inputs.conf file from the default directory to your local directory by entering the following command:
cp default/inputs.conf local - Go to your local directory by entering:
cd local - Open the file using your preferred text editor. In this case, we used nano by entering the command:
nano inputs.conf - When you open the file for editing, you can see the inputs related to the *nix operating system. Note that each of the inputs is disabled and each input displays as
disabled = 1. - Change the inputs to read:
disabled=0. This enables the inputs. You may later decide to disable some of these inputs when you become more familiar with them. - Enter the proper command for your chosen text editor to save the changes. In nano, use the following command:
ctrl + o - Restart your forwarder to enable the changes. Go to the bin directory by entering:
cd bin. Then enter./splunk restart. - The forwarder will notify you when it has restarted.
Step 5: Verify that you can receive data from your *nix platform
Certain steps in this procedure use functionality available in the Splunk Content Pack for Unix Dashboards and Reports, one of the content packs that was installed in Step 1 by Splunk Support. See the Content Pack for Unix Dashboards and Reports manual.
Complete the following steps to verify you can receive data from your *nix platform.
- Open your Splunk Cloud Platform instance.
- Access the Settings - Unix dashboard to configure the correct index.
See Configure the Content Pack for Unix and Dashboards and Reports. - If you configured a test index, set the index value to your test index. Otherwise, enter
index = main. - Click Save.
- From Apps > Search and Reporting, enter the search term
index=*to do a search of incoming data. - In Selected fields > hosts field, select the host that corresponds to your *nix operating system.
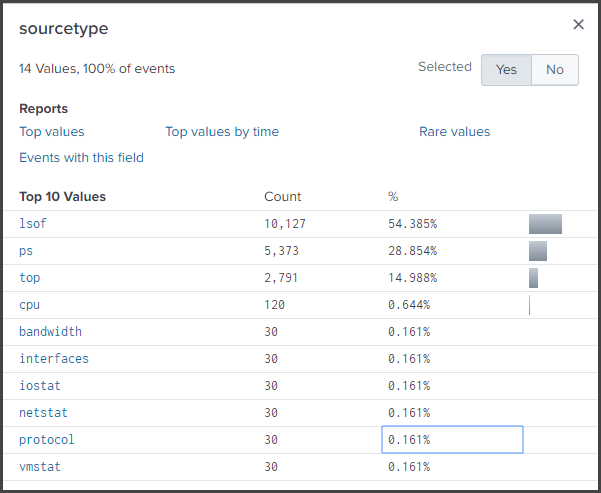
- From the Selected fields, choose sourcetype. A list of *nix sourcetypes like the following displays:

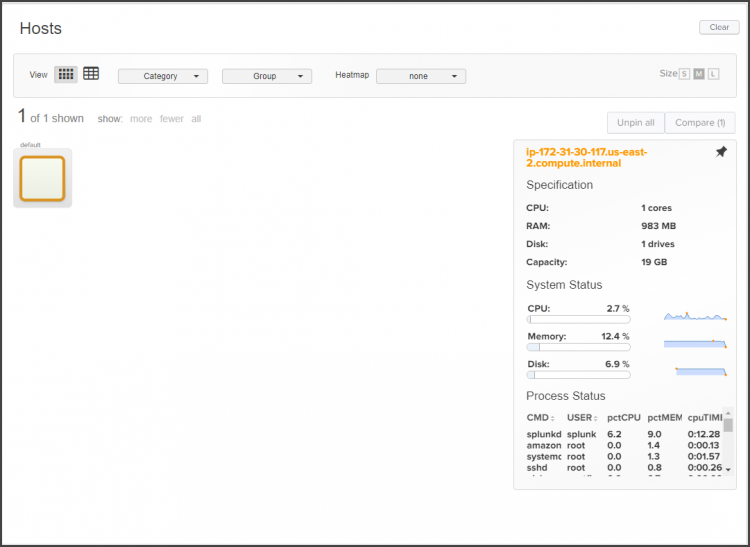
- Access the Hosts dashboard.
See Use the Hosts dashboard. - Your *nix host displays. If you click on it, statistics for your *nix system display:

What's next?
Now that you have configured your Splunk Cloud Platform instance to get data from your *nix system, you may want to use a deployment server to propagate the settings across multiple forwarders. The table lists additional topics of interest.
See also
| For more information about | See |
|---|---|
| deployment server: A tool for distributing configurations, apps, and content updates to groups of Splunk Enterprise instances, including forwarders. | About deployment server and forwarder management |
| Testing and troubleshooting data input | The Improve the data input process section in the Splunk Cloud Platform Getting Data In manual |
| Get Microsoft Azure data into Splunk Cloud Platform | Get Windows Data into Splunk Cloud Platform |
This documentation applies to the following versions of Splunk Cloud Platform™: 8.2.2112, 8.2.2201, 8.2.2202, 8.2.2203, 9.0.2205, 9.0.2208, 9.0.2209, 9.0.2303, 9.0.2305, 9.1.2308, 9.1.2312, 9.2.2403, 9.2.2406, 9.3.2408, 9.3.2411 (latest FedRAMP release)
 Download manual
Feedback submitted, thanks!