Configure streams to capture network data
Splunk Stream supports passive capture of network data for a variety of protocols. This page shows you how to create stream configurations that determine the characteristics of network data capture, which Stream forwarder (streamfwd binary) performs on the network interface.
What is a stream?
In Splunk Stream, a grouping of network event data is called a "stream." You can use the Configure Streams UI to create any number of unique streams for supported network protocols. Stream forwarder (streamfwd binary) retrieves your stream configurations, and captures data on the network interface based on those configurations.
When you create a stream, depending on the stream type, you can:
- Specify a network protocol and target protocol fields.
- Create filters to constrain data capture and minimize indexer requirements.
- Apply aggregation methods for statistical analysis of captured event data.
- Use content extraction rules to capture subsets of data.
- Use file extraction to capture files for analysis.
- Capture full network packets for detailed inspection.
Supported stream types
Splunk Stream supports these stream types:
| Stream Type | Description |
|---|---|
| Metadata stream | Captures network traffic metadata generated by network and system devices. |
| Packet stream | Captures full network packets based on specific target fields. Enables searches against raw packet data. Supports extraction of packet contents and download of raw packets for detailed inspection. |
| Ephemeral stream | Monitor ephemeral (time-limited) streams in Splunk apps that support ephemeral streams via Stream REST API. |
Where are stream configurations stored?
The streams that you configure using the Configure Streams UI are stored in the KV store. You cannot access them from the file system. You can, however, access individual stream configurations in the KV store using the Stream REST API. See /streams/{stream_id} in the Splunk Stream REST API reference.
Configure metadata streams
The Configure Streams UI provides a workflow wizard that walks you through the process of creating a new stream. When creating a new metadata stream, in addition to selecting a protocol and fields, you can apply aggregation and create filters for the specific stream.
Create new metadata stream
- In the Splunk App for Stream (
splunk_app_stream) main menu, click Configure > Configure Streams. The Configure Streams UI opens. - Click New Stream > Metadata Stream. The Create New Stream workflow appears.
- Under Basic Info, select a Protocol for your new stream. For example, http.
- Enter a Name and optionally enter a Description. Click Next.
- (optional) Under Aggregation, click Yes, Every. Then enter a time in seconds, for example, 60 seconds. This is the interval over which data aggregation occurs. For more information, see Use Aggregation on this page.
- Click Next.
- Under Fields, select the specific protocol attributes (fields) that you want to capture. For example, dest_ip, src_ip, bytes_in, bytes_out, and so on. If you have enabled aggregation for the stream, you can also optionally change the selected Aggregation type (Key or Aggregated) for any field. Click Next.
- (optional) Under Filters, click Create New Filter. The Create New Filter modal appears. Select the Field for which you want to create the filter, for example, http_method. Next, select the Comparison type. Then, enter the Value. Click Create. Your new filter allows data to pass through based on the condition defined in the filter. For more information on filters, see Create new filter on this page.
- Click Next.
- Under Settings, select the Index to which you want to send captured data. Then choose the Status for the new stream: Enabled, Disabled, or Estimate. Click Next.
- Select the checkbox for the specific forwarder groups to which you want to add this stream. Click Create Stream. This creates the new stream.
- Click Done. This sends your new stream configuration to the
streamfwdbinary onSplunk_TA_streamwhere data capture occurs.
Your new stream appears in the Configure Streams UI.
After you create a new metadata stream, you can modify the stream to apply additional stream capture rules, including aggregation methods and filters. You can also define content extraction rules to capture a subset of data from a protocol string. See Use Content Extraction on this page.
Set stream mode
To enable data capture for a particular stream, you must set the stream to the Enabled mode. You can set the stream mode in the Configure Stream UI at any time. Choose from the following three modes:
- Enabled: Enabled mode starts stream data capture and indexing, and generates index volume stats by default.
- Estimate: Estimate mode generates data index volume stats only for any stream, without sending data to indexers.
- Disabled: Disabled mode stops stream data capture and indexing, and stops the collection of index volume stats.
On the Configure Streams UI main page, select a mode for any stream:

How Estimate mode works
When you set a metadata stream to Estimate mode, the app generates index volume stats for the stream, without sending the actual data to your indexers. These index volume stats populate the Stream Estimate dashboard.
Use the Estimate mode and Stream Estimate dashboard to determine the amount of data that a particular stream will ingest. This can help you calculate your indexer requirements, fine-tune your stream capture configurations, and conserve indexer space.
For more information, see Stream Estimate in this manual.
Splunk Stream also collects index volume stats for all streams in the Enabled mode. All pre-built streams are in Estimate mode by default.
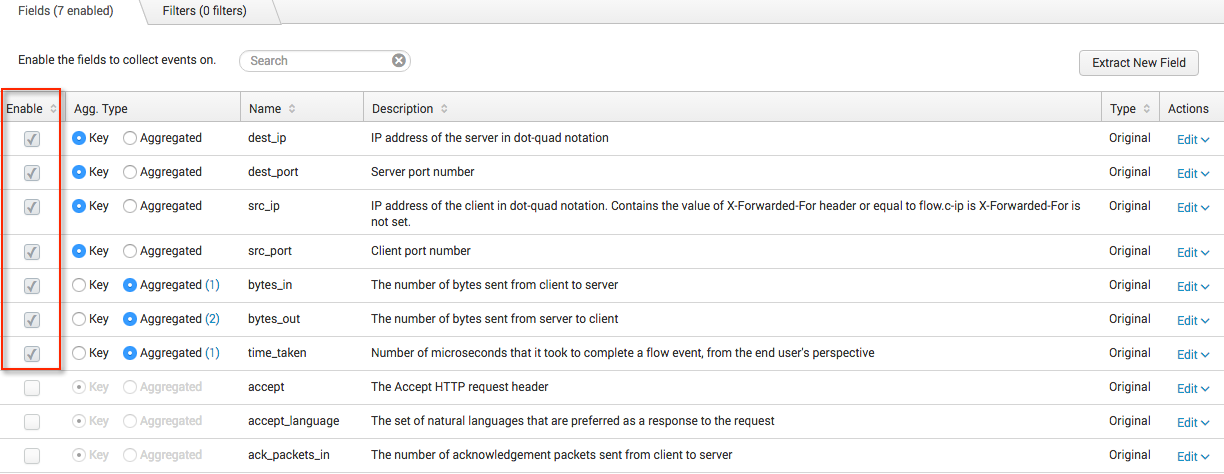
Select protocol fields
You can select the specific fields that you want to capture for any stream.
- On the Configure Streams main page, select the name of the network protocol that you want to capture.
The Protocol Events page for the selected protocol opens. - Select the Enable checkbox for the specific field(s) you want to add.
- Click Save.

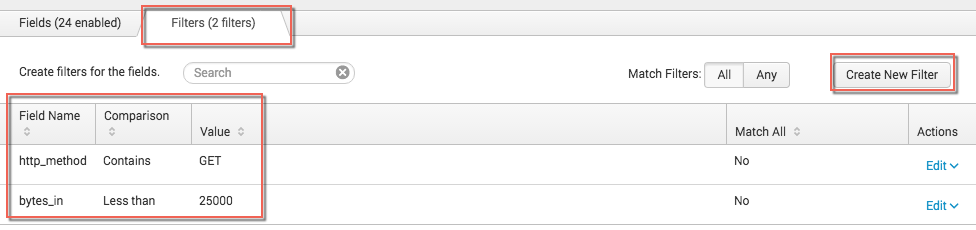
Create new filters
You can add filters to specific fields in a stream that allow data to pass through based on conditions that you define. You define conditions by setting up a comparison, such as "Less than," "Equals," Contains," and so on, between a field name and a specific value. Filter values can be either strings or numeric values.
For example, a filter might specify the condition that the "http_method" field contains the value "GET." If all (or any) http_method events match this condition, the stream event data passes through.
- In the Configure Streams UI, click on the name of the stream.
- Click the Filters tab.
- Click Create New Filter. The Create New Filter modal opens
- In the Field drop-down menu, select the name of the field to which you want to apply the filter. For example, "bytes_in."
- In the Comparison drop-down menu, select the type of comparison you want to use for your filter. For example, "Less than."
- Enter the Value that defines the condition of the comparison. For example, "25000."
- Click Save.
- For Match Filters, select All or Any. This applies to events that return multiple values for a field. If match is set to "All", then all values of the field must satisfy the condition for the filter to engage. If the match is set to "Any", then any value of the field that satisfies the condition causes the filter to engage.
- Click OK.
The app adds the filter to thestreamfwd.confconfiguration file, and the filter now appears in the list of filters for that stream.

Apply aggregation
You can apply aggregation methods for statistical analysis of captured events over specific time intervals. The app groups events into aggregation buckets, with one bucket allocated for each unique collection of Key fields. At the end of the time interval, the app emits an object that represents each bucket.
For example, you might enable aggregation over a 60 second interval, assign Key to the src_ip field, and apply the sum aggregate function to the bytes_in field. In this case, the app creates a bucket for each unique src_ip value it sees, and sums the number of bytes_in over a 60 second interval for each bucket.
Aggregation types
You must set each field that you enable for aggregation to one of the following two aggregation types:
- Key: Fields that have aggregation type "Key" are used for grouping data into buckets.
- Aggregated: Fields that have aggregation type "Aggregated" can have one or more aggregate functions applied to them. For a complete list of aggregate functions, see Stream aggregation methods in this manual.
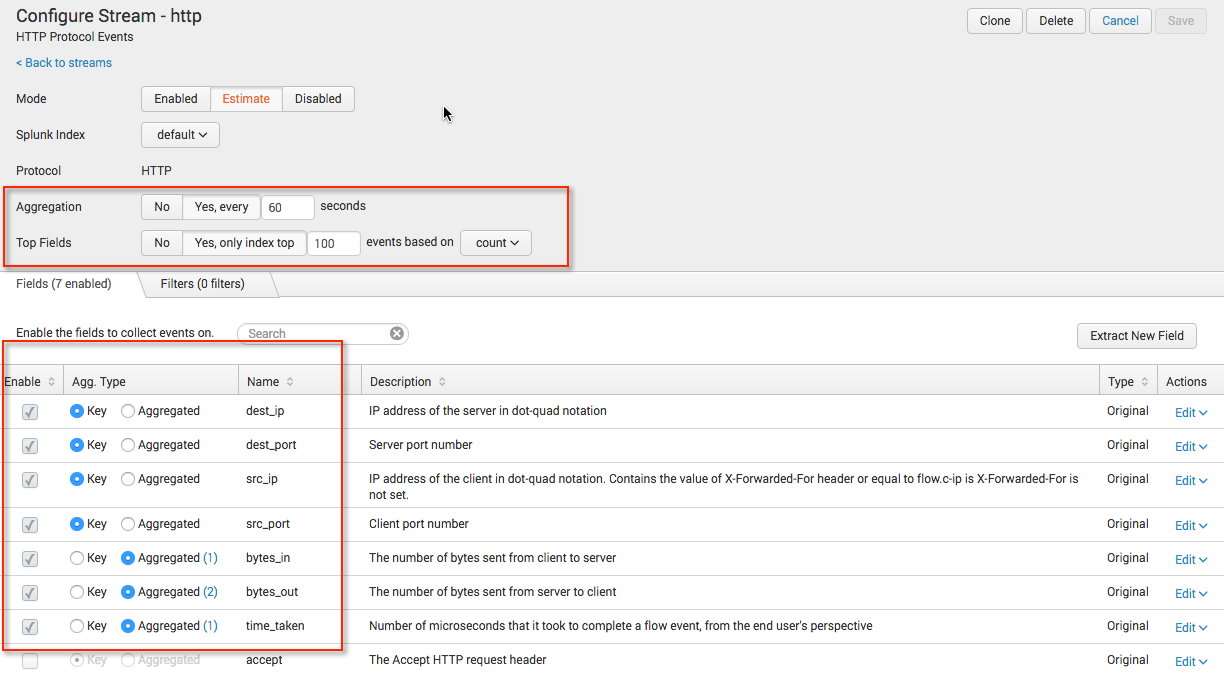
Set up aggregation
- In the Configure Streams UI, click on the name of your stream.
The configuration page for that particular stream opens. - Under Aggregation, click Yes, every, then enter a time in secs.
This enables Aggregation for the particular stream and determines the time interval over which data aggregation occurs. - (optional) Under Top Fields, click Yes, only index top, then enter a number. From the dropdown, you can select
countor any aggregated field which is configured, e.g.sum(bytes_in), as the basis for sorting. - Select the Enable checkbox for each field you want to aggregate.
- Select an Aggregation Type for each enabled field.
- Select Key to use the field for specifying aggregation buckets.
A separate bucket will be generated for each distinct value of the Key field over the selected time interval. - Select Aggregated to enable aggregation for that particular field.
The number of currently selected aggregate functions appears in parentheses. For example, (1). Thesumaggregate function is selected by default.
- Select Key to use the field for specifying aggregation buckets.
- Click on the number in parentheses (x) to select aggregate functions for a particular field.
A modal showing a list of available aggregate functions for that field appears. - Select one or more aggregate functions. Click Save.
- Click Save.

About multiple Key fields
If an aggregate event includes multiple Key fields, Stream looks for unique combinations of values of those fields and creates a separate bucket for each combination.
For example, if you assign Key to the field src_ip and you apply the sum aggregate function to the field bytes_in, then for each time interval, the app creates a bucket for each unique src_ip value that occurs, and sums the number of bytes_in over that interval for each bucket. If you also assign Key to the dest_ip field, the app creates a bucket for each unique pair of src_ip and dest_ip.
For more information, see Stream aggregation methods in this manual.
Use content extraction
You can use content extraction rules to capture and index a specific subset of data from a protocol string field. You can also use content extraction to generate MD 5 hashes or hexadecimal numbers of non-numeric fields.
Content extraction types
Splunk Stream supports the following content extraction types:
- Regex
- MD5 hash
- Hexadecimal
Create content extraction rules
Content extraction rules use regular expressions to extract sections of data from a parent field. This lets you capture only the specific pieces of data that you require for analysis, without indexing extraneous data.
For example, some string fields, such as src_content dest_content, and cookies, contain long strings of data. In many cases, the entire string of data is not useful. Using content extraction rules, you can limit data capture to specific pieces of data, such as a name, ID, account number and so on.
You can also specify a capturing group match, which outputs either the first value that matches the regular expression, or the "list" of all values that match the regular expression. Each content extraction rule creates a new field that captures only that data specified by the rule. The original field is not modified.
To create a content extraction rule:
- In the Configure Streams UI, click on the stream that contains the field from which you want to extract content.
The events page opens for the particular stream. - Click the Actions menu for the particular field, then select Extract New Field.

The Content Extraction dialog appears.
Note: It is not necessary for the original field to be enabled. If you also want to index the original field, consider using a field transformation instead. For more information, see field transformations in the Knowledge Manager Manual. - Enter a name for the content extraction rule. For example, "readable_cookie."
- Enter a description for the content extraction rule. For example, "Separate the cookies into name/value pairs in a readable format."
- In the Extraction Rule field, enter the regular expression for the content that you want to extract. For example, we can use following regular expression to extract a name and value pair from the
cookiefield:(.*?)\=(.*?;)</code>
Note: Stream uses Boost Perl Regular Expression syntax. - Under Match:
- Select First to return only the first value that matches the regex.
- Select All to return the "list" of all values that match the regex.
- In the Extraction Format plain text box, enter the format for the extraction. For example, enter
$1, $2to return the first and second values that match the regex.
This image shows the complete content extraction rule for our "readable_cookie" example: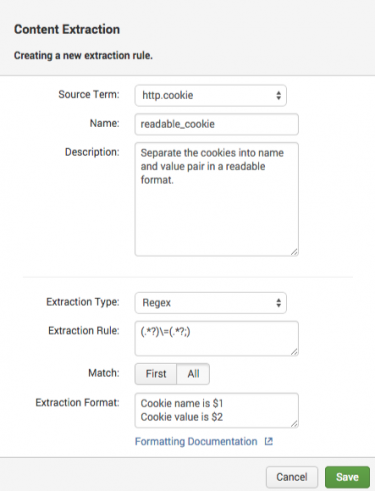
- Click Save.
The new field appears in the list of Fields on the events page for the particular stream.
Splunk search results for the "readable_cookie" field in our example should appear similar to this:


Note: The <MaxEventQueueSize> option in streamfwd.conf determines the maximum number of events that Splunk_TA_stream can queue for delivery to Splunk indexers. By default <MaxEventQueueSize> supports 10k events. To increase or decrease the maximum event queue size, modify the value of <MaxEventQueueSize> in streamfwd.conf. See Configure streamfwd.conf in the Splunk Stream Installation and Configuration Manual.
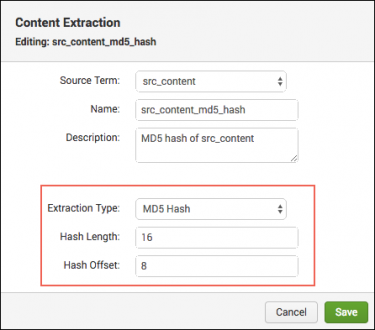
Extract fields as MD5 hash or hexadecimal
You can use content extraction to generate an MD5 hash or hexadecimal encoding of any non-numeric field for any protocol. MD5 hashes are useful for masking sensitive data in search results, such as user names, passwords, and other important account information. Hexadecimal encoding is useful for representing arbitrary binary data that can interfere with the Splunk search UI.
You can also use file hashing to detect if a specific file is being transmitted over your network, without having to store the entire contents of the file, which might be quite large. For example, you might store the hash of a file (such as a sensitive document or piece of malware), then compare that hash to the hash of email attachments you capture to see if it matches.
Each field that you extract as an MD5 hash or hexadecimal generates a new field. The original field does not need to be enabled. This lets you view a secure fingerprint of the field value in search results, without exposing the original field value.
An MD5 hash is 32 characters long by default. For additional security, you can truncate MD5 hash values to any number of characters, and specify an offset from the 1st character at left.
To extract a field as an MD5 hash:
- Click the Actions menu for the particular field that you want to hash, then select Extract New Field.
- Enter a name for the MD5 hash field that you want generate. For example, "src_content_MD5_hash."
- Enter a description for the new MD5 hash field. For example, "MD5 hash of src_content_field."
- In the Extraction Type menu, select MD5 hash.
- In the Hash Length field, specify the number of characters to use for the hash. Leave blank for default 32 characters.
- in the Hash Offset field, specify the number of characters to offset from 1st character at left. Leave blank for default of 0.
- Click Save.
The new field appears in the list of Fields on the events page for the particular stream.
Splunk search results for the "src_content_MD5_hash" field in our example should appear similar to this: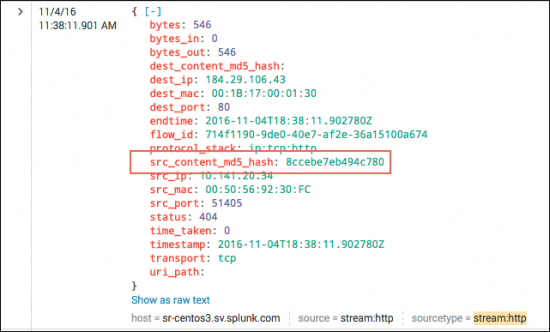


MD5 hash content extraction is pre-configured for specific fields in HTTP and SMTP protocol streams.
Use file extraction
Splunk Stream 7.1.0 and later supports file extraction from metadata streams. File extraction lets you capture files from network traffic, such as emails, email attachments, images, pdfs, and so on. You can identify extracted files in Splunk search results, and use workflow actions to download those files to your local machine.
File extraction supports http and smtp protocols only.
File extraction prerequisites
Before you can use file extraction to capture files with metadata streams, you must map your Splunk Stream deployment to a remote file server. The app uses the file server to store files extracted by Stream forwarder based on the metadata stream definition. See Configure file extraction in the Splunk Stream Installation and Configuration Manual.
Splunk Stream lets you capture network event data for a variety of network protocols. Make sure to consider your privacy and security obligations when selecting and using a remote file server for Splunk Stream data.
File extraction is not supported on Splunk Cloud.
Configure file extraction for a metadata stream
- Create or clone a new HTTP or SMTP metadata stream. See Configure metadata streams.
- In the Fields tab, enable one or both of the following fields:
file_extracted_req
file_extracted_resp
For example, if you only need http uploads, enable
file_extracted_reqfield. - Click Save.
The metadata stream now extracts files from request and response data. Extracted files appear in search results. See Search for extracted files.
Search for extracted files
To search for extracted files:
- In the Splunk Search and Reporting app, in the Search bar, enter the following event type:
eventtype="stream_extractedfilesaved" - In your search results, look for the
extracted_file []multi-value field.
All extracted files in the network event appear in this field.
Download extracted files
To download extracted files that you identify in search results:
- Expand the Event tab.
- Find the
extracted_file{}field in the expanded tab. - Click Actions > Downloaded Extracted File.
The extracted file downloads to your local machine.
Configure packet streams
Splunk Stream 7.1.0 and later support packet streams. Packet streams let you capture raw network packets based on targets that you define. You can run Splunk searches against full packet data, and use workflow actions to download pcap files containing that data to your local machine.
How targeted packet capture works
Packet streams use targeted packet capture to collect full network packets. Unlike metadata streams, which send all data that match the stream to indexers, packet streams capture only those packets that match pre-defined target fields.
When you create a new packet stream, Stream forwarder picks up the packet stream definition, then captures and stores targeted packets in pcap files on a remote file server. Stream forwarder also indexes metadata that identifies the pcap files in searches and workflow actions.
Packet stream prerequisites
Before you can collect data using packet streams, you must map your Splunk Stream deployment to a remote file server. The app uses the file server to store pcap files that Stream forwarder generates based on the packet stream definition. See Configure targeted packet capture in the Splunk Stream Installation and Configuration Manual.
Splunk Stream lets you capture network event data for a variety of network protocols. Make sure to consider your privacy and security obligations when selecting and using a remote file server for Splunk Stream data.
Targeted packet capture is not supported on Splunk Cloud
Create new packet stream
- Click New Stream > Packet Stream.
The packet stream workflow wizard appears. - Enter a Name and Description (optional) for the new packet stream. Click Next.
- On the Targets page, click Create New Target.
- Configure the new target:
Field Description Field Specify the protocol field that you want to target. Comparison Select a comparison type to filter target field data based on specific values. Value Enter a value to compare candidate values against.
A few comparison types, such as "Is defined", do not require a value.
Any/All Select the condition that events with multiple values for the field must satisfy. - Click Create.
Your new target appears in the targets list. - Click Next.
- On the expiration page, click Add condition.
Packet stream capture is ephemeral.
- Specify the conditions for packet stream expiration. For example, Elapsed Time/1 hour. Click Next.
- On the Fields page, enable the fields that you want to include in the packet stream. Click Next.
- On the Settings page, configure the following:
Field Description Index Select the index to use for storage of metadata generated by the packet stream. Status Choose if the packet stream is Enabled or Disabled upon creation. - Add additional targets. (optional)
- Select the match condition (Any/All) for the list of targets. This condition applies to all targets in the list.
- Click Next.
- Select the forwarder groups to use for this stream. Click Create Stream. The app creates the new packet stream.
- Click Done.
This sends your new packet stream configuration to the
streamfwdbinary where data capture occurs.
Your new packet stream now appears in the configure streams UI.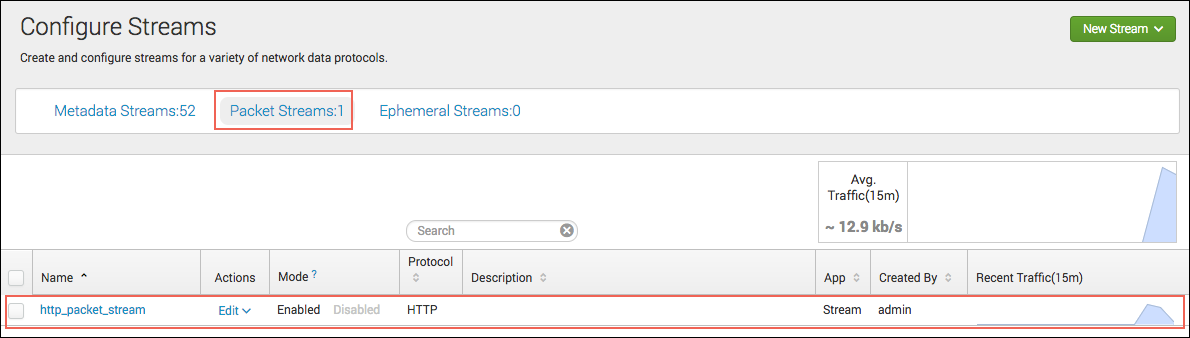

Search packet stream data
To run a search against captured packets:
- In the Splunk Search and Reporting app, in the Search bar, enter the following event type:
eventtype="stream_pcapsaved" - Optionally add additional event terms to restrict search results.
Download pcap files
To download pcap files associated with a search:
- Expand the Event tab.
- Click Event Actions > Download capture file.
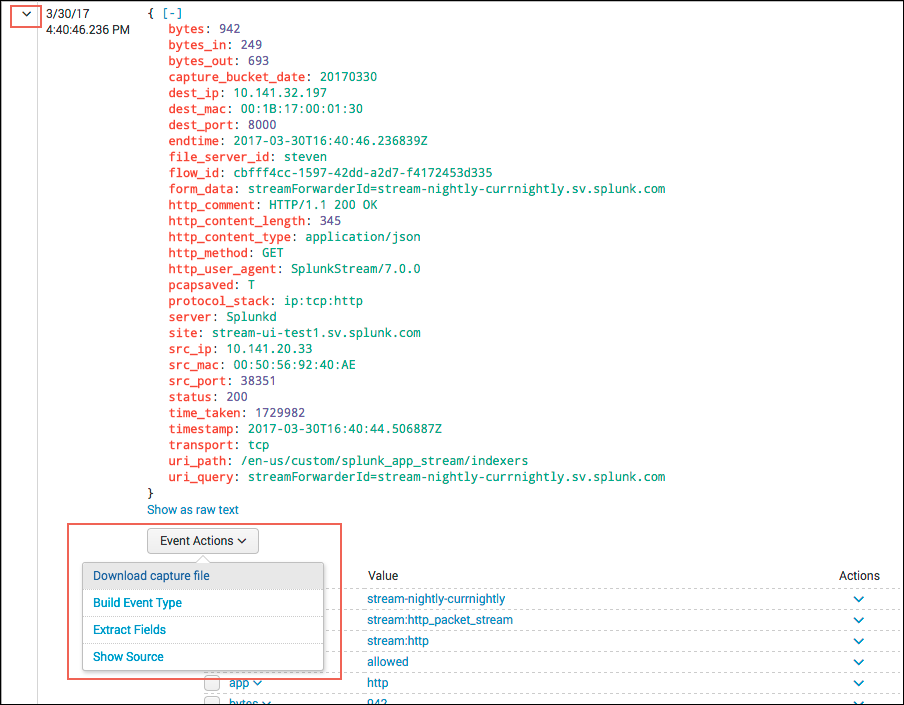
The pcap file downloads to your local machine.

Create custom (cloned) streams
You can clone any existing streams to create new custom streams. This lets you create variations on your streams and capture data with additional granularity.
When you clone a stream, the app produces an exact duplicate of the original stream, including all enabled fields and existing filters. You can then add additional capture rules, such as aggregation, filters, content extraction, and file extraction.
To create a custom (cloned) stream:
- In the Configure Streams UI, click on the name of the stream you want to clone.
The events page for the particular stream opens. - Click Clone.
The Clone Stream dialog appears. - Enter a Name and Description for the new stream. Click OK.
The new stream appears in the list of streams in the Configure Streams UI. - Click Enabled to enable capture for the cloned stream.
- Click Save.
About built-in metadata streams
Splunk Stream includes several built-in metadata streams as examples. You can use these built-in streams as a starting point for creating new metadata streams. All built-in streams begin with "Splunk_" in their name. You can view and clone built-in streams in the Configure Streams UI.
The data that built-in metadata streams capture populates the apps Informational dashboards. For more information, see Informational Dashboards in this manual.

Support for ephemeral streams
Ephemeral streams give users of external Splunk apps the ability to schedule stream capture for a user-defined period of time. This is useful if you want to capture and analyze a limited number of network events pertaining to specific network activity or transactions over a specific time interval.
While you must configure and schedule ephemeral stream capture from within the context of the external Splunk app, you can view and perform certain actions on existing ephemeral streams (such as enable/disable) inside the Configure Stream UI.
How ephemeral streams work
Splunk apps that support ephemeral streams take advantage of the Stream REST API. Ephemeral streams are similar to normal streams, but ephemeral streams require two additional parameters, createDate and expirationDate, which specify the stream start and stop times, respectively, in epoch time. For example:
createDate: 1404259338
expirationDate: 1414259338
Splunk app for Stream automatically and permanently deletes the ephemeral stream when the server system time is greater than or equal to expirationDate.
To view ephemeral streams:
In the Configure Streams UI, click Ephemeral Streams. This opens the Stream Buckets page, which displays a list of your existing ephemeral streams.
| Stream field details |
This documentation applies to the following versions of Splunk Stream™: 7.1.0, 7.1.1
Feedback submitted, thanks!