Configuration
This topic explains what happens when you activate the app after installing it on your Splunk instance. It show you how to enable or disable the inputs that come with the app, and can be used as a reference.
New for version 4.6, you can configure the Splunk App for Unix and Linux directly from the command line. For specific instructions on how to do so, read "Configure from the command line" later in this topic.
You can use Splunk Manager, the Splunk CLI, or Splunk configuration files to enable, disable, or edit configurations for the Splunk for Unix and Linux app and add-on.
When you access the app as a Splunk admin, you can always click on the Setup link on the far right of the app's main navigation to access the setup page.
App Setup Notification
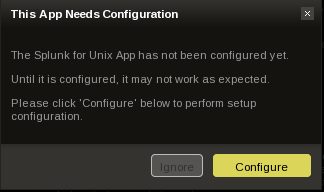
Additionally, when you access the app for the first time, you will see a dialog box like the following:
If you are a Splunk admin, this dialog box indicates that you need to configure the app before it can begin gathering information about your system.
If you are a Splunk user but not a Splunk admin, this dialog box will allow you to ignore this warning when you visit the app again. Make sure that you report to your Splunk admin that the app might require additional configuration.
Note: Splunk Manager will no longer display a setup link for this app. Setup and notification now occurs in the main content of the app rather than in Manager.
Configure from within Splunk Web
To configure the Splunk App for Unix and Linux:
1. Navigate to the Setup page, either by clicking Configure from the app setup notification dialogue or by clicking Setup on the app's main navigation.
2. Select the file and directory inputs that you want to enable for the app. Or, click (All) next to the Enable column to enable all of the inputs.
3. Select the scripted inputs that you want to enable for the app. Or, click (All) next to the Enable column to enable them all.
4. Optionally, you can change the intervals at which enabled scripted inputs are triggered. Do this by typing in a number, in seconds, in the entry box for the desired scripted input.
- For example, if you want the
hardware.shscripted input to run more than the default of once every 36000 seconds (10 hours), then select that input's entry box and type in the desired interval.
5. Once you are satisfied with the configuration of the inputs, save the configuration by clicking Save.
6. On the Splunk *nix App Setup Success page, click OK to be taken to the app's home page.
Configure from the command line
To configure the Splunk App for Unix and Linux from the command line, use the setup.sh command:
$SPLUNK_HOME/bin/splunk cmd $SPLUNK_HOME/etc/apps/unix/bin/setup.sh
Usage
setup.sh has the following arguments:
       (no argument)   menu-based setup
       --auth          credentials (user:pass) for specified command
       --clone-all     clone input configuration from local to remote
       --disable-all   disable all inputs
       --disable-input input to be disabled
       --enable-all    enable all inputs
       --enable-input  input to be enabled
       --help          print usage and exit
       --install-app   install the app at the given location
       --interval      set input to given interval
       --list-all      show details all inputs
       --list-input    show details for input
       --usage, --?    print usage and exit
       --uri           remote uri (https://host:port) to use
Examples
To set cpu.sh interval to 120 seconds (with auth prompt):
setup.sh --interval cpu.sh 120
To disable all local inputs (with no auth prompt):
setup.sh --disable-all --auth admin:changeme1
To show input status on remote host foobar:
setup.sh --list-all --uri https://foobar:8089
To update the unix app from your-server on the remote host foobar:
setup.sh --install-app https://your-server/unix.spl --uri https://foobar:8089
To copy the local input configuration to the remote host foobar:
setup.sh --clone-all --uri https://foobar:8089
| Log in and get started | Dashboard reference |
This documentation applies to the following versions of Splunk® App for Unix and Linux (EOL): 4.6

 Download manual
Feedback submitted, thanks!