First-time setup instructions for the Ingest Processor solution
After you request access to the Ingest Processor solution and the provisioning process is completed, you receive a welcome email confirming that you now have access to the Ingest Processor service, where you can create and deploy data processing pipelines.
Before beginning the first-time setup procedure for the Ingest Processor solution, verify that every Splunk Cloud Platform administrator using Ingest Processor has the sc_admin role. Splunk Cloud Platform administrators with the sc_admin role can create, update, delete, and view all resources in the Ingest Processor solution. Resources include Ingest Processor pipelines, and data destinations.
Prerequisite: Confirm that you can log in to your tenant
Before beginning the first-time setup procedure for the Ingest Processor service, confirm that your Splunk Cloud Platform account has the required capabilities and that you can log in to the tenant.
- Log in to your Splunk Cloud Platform deployment as an administrator.
- In the Settings menu, in the Users and authentication section, select Users.
- In the row that lists your username, select Edit and then select View Capabilities.
- Check if your account has the admin_all_objects capability. If your account doesn't have that capability, assign it. See Define roles on the Splunk platform with capabilities in the Securing Splunk Cloud Platform manual for more information.
- In a browser, navigate to https://px.scs.splunk.com/<tenant>, where <tenant> is the name of your tenant.
Because you already logged in to Splunk Cloud Platform during step 1, the URL redirects you to the My workspace page in the Ingest Processor service. When you are not logged in, the URL redirects you to the login page of your Splunk Cloud Platform deployment instead, and you must log in before proceeding.
If you encounter authentication errors or cannot access the Ingest Processor service despite ensuring that your user account has the required capabilities, contact your Splunk representative for assistance.
If you create additional indexes in your Splunk Cloud Platform deployment, you must wait a few minutes in order to make those indexes available in the tenant. For detailed instructions, see Make more indexes available to the tenant.
Allow your tenant to access Splunk Cloud Platform indexes
To make the necessary indexes from your Splunk Cloud Platform deployment available to your tenant, you must create a service account that can access those indexes and then configure the tenant to connect to the Splunk Cloud Platform deployment using that account. Do the following:
- In Splunk Cloud Platform, create a role that can access the required indexes. See Create a role for the service account.
- Create a service account, which is a Splunk Cloud Platform account that uses the role you created. See Create a service account.
- In your tenant, configure a connection to your Splunk Cloud Platform deployment using the service account. See Connect your tenant to your Splunk Cloud Platform deployment.
This connection grants your tenant the same permissions as the service account, allowing the Ingest Processor solution to send data to your indexes.
Create a role for the service account
In Splunk Cloud Platform, create a role that grants access to the internal indexes.
- Log in to your Splunk Cloud Platform deployment as an administrator.
- To start creating the role for the service account, clone the default user role:
- In the Settings menu, in the Users and authentication section, select Roles.
- In the row that lists the default user role, select Edit, then Clone.
- In the Name field, specify a name for the new role, such as scp_user.
- If you have search head clustering (SHC) on your Splunk Cloud Platform deployment, then you must add the list_search_head_clustering capability to the role. To do this, select the 2. Capabilities tab and then select list_search_head_clustering.
- On the 3. Indexes tab, select the Included check box for all the indexes that you want to make available in your tenant. At minimum, you must make all internal indexes available. Instead of specifying internal indexes individually, you can select the Included check box in the _* (All internal indexes) row.
- To avoid concurrent search limitations, select the 5. Resources tab and do the following:
- In the Role search job limit settings, change Standard search limit to 300.
- In the User search job limit settings, change Standard search limit to 200.
- In the Disk space limit settings, change Standard search limit to 10000.
- To save your settings and finish creating the role, select Save.
- (Optional) If you've already completed this first-time setup process, and you are now updating these role settings, then you must refresh the connection to your Splunk Cloud Platform deployment by doing the following steps in the Ingest Processor service:
- Select the Settings icon (
 ) and then select System connections.
 - On the scpbridge connection, select the refresh icon (
 ).
).
- Select the Settings icon (
Next, create a service account using this role.
Create a service account
In Splunk Cloud Platform, create an account that uses the role you created during the preceding steps. This account is a service account to be used by the tenant and the Ingest Processor solution and grants access to your internal indexes on Splunk Cloud Platform so you can route data to the correct indexes through your pipelines..
- In the Settings menu, in the Users and authentication section, select Users.
- Select New User.
- In the Name field, specify a name for the service account, such as service_acct.
- In the Set password and Confirm password fields, specify a password for the service account.
- In the Assign role area, do the following:
- Add the role that you created during Create a role for the service account.
- Remove the default user role.
- Deselect the Require password change on first login check box.
- To save your settings and finish creating the service account, select Save.
- To confirm that the service account is valid, log out of your Splunk Cloud Platform deployment and then log back in using the service account credentials.
On some systems, you might be prompted to reset the password even though you disabled that requirement. If prompted, reset the password.
- After confirming that you can successfully log in to Splunk Cloud Platform using the service account, log out of the service account.
You now have a service account that your tenant can use to connect to your Splunk Cloud Platform deployment.
Connect your tenant to your Splunk Cloud Platform deployment
- In a browser, navigate to https://px.scs.splunk.com/<tenant>, where <tenant> is the name of your tenant.
- Log in using your Splunk Cloud Platform username and password.
If you configured Splunk Cloud Platform to use another service as the identity provider for SSO, then use your SSO credentials when logging in to the tenant.
The browser redirects you to the Data management page in the Ingest Processor solution.
- Select the Settings icon () and then select System connections.
- Select New, then Platform connection.
- In the Connect to your data window, specify the information to connect to your Splunk Cloud Platform deployment. The following image identifies the fields. The table below the image describes the values that you need to specify.
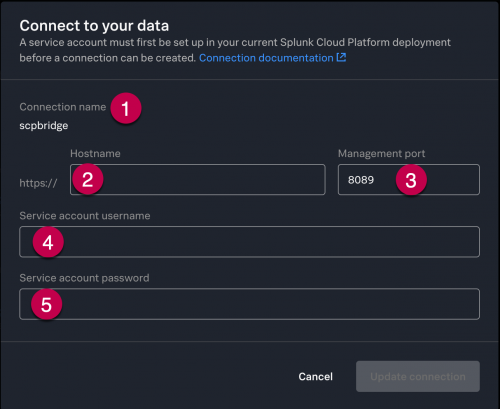
Number Element Description 1 Connection name The name of the connection. The value scpbridge is provided and can't be changed. 2 Host name The URL for your Splunk Cloud Platform deployment. The https://is assumed. For example, if your URL ishttps://scpanalytics.splunkcloud.comyou would specifyscpanalytics.splunkcloud.com.3 Management port The default port number. Most Splunk Cloud Platform deployments use the 8089 port as the default port. If you changed the default port in your deployment, specify that port number. 4 Service account username The name of the service account that you created during Create a service account. For example, service_acct. 5 Service account password The password of the service account. - Select Create connection.
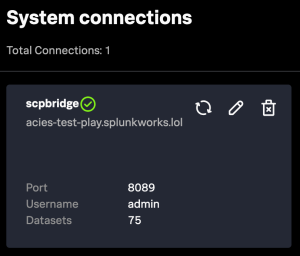
A connection named scpbridge is created, and a Status: connected icon ( ) displays beside the connection name.
A message appears to confirm that the setup was successfully completed.
The System connections page shows the connections that you have, including this new connection. Use the icons on the connection card to refresh, edit, or delete the connection.
- (Optional) If you need to change the connection after it has been successfully created, do the following:
- On the System connections page, select the Edit icon (
 ) on the scpbridge connection.
 - Update your connection settings as needed and then select Apply.
- On the System connections page, select the Edit icon (


The indexes from your Splunk Cloud Platform deployment are now available in the tenant. After you complete the remaining steps in this first-time setup process, you can send data into these indexes.
View and edit the connection
- On the App bar, select the Settings icon and select System connections.
- On the System connections window, you can see the port, username, and number of datasets associated with the connection.
- Use the Edit icon
 to make changes to your connection.
Refresh the connection
When indexes are added to your Splunk Cloud Platform deployment, or if you changed user permissions to any of your indexes, you must refresh the connection"
- On the App bar, select the Settings icon and select System connections.
- On the System connections window, you can see the port, username, and number of datasets associated with the connection.
- Use the Refresh icon
 to refresh the connection.
You have completed the steps to connect the Ingest Processor solution to your Splunk Cloud Platform deployment indexes.
| About Ingest Processor | Manage users for the Ingest Processor solution |
This documentation applies to the following versions of Splunk Cloud Platform™: 9.1.2308, 9.1.2312, 9.2.2403, 9.2.2406, 9.3.2408 (latest FedRAMP release), 9.3.2411
Feedback submitted, thanks!