Configure modular inputs for the Splunk Add-on for Kafka
The Splunk Add-on for Kafka is deprecated and the functionality of pulling Kafka events using modular inputs is no longer supported. Use Splunk Connect for Kafka to pull Kafka events using modular inputs.
The Splunk Add-on for Kafka includes a modular input that consumes messages from the Kafka topics that you specify. The Splunk instances that collect the Kafka data must be in the same network as your Kafka machines. Depending on your message volume on your Kafka clusters, this source of data can be very large. To determine how many heavy forwarders to dedicate to this task, review the sizing guidelines in Hardware and software requirements for the Splunk Add-on for Kafka.
Decide how you want to configure data collection for this input. You have four options. Follow the directions in the section that matches your preferences.
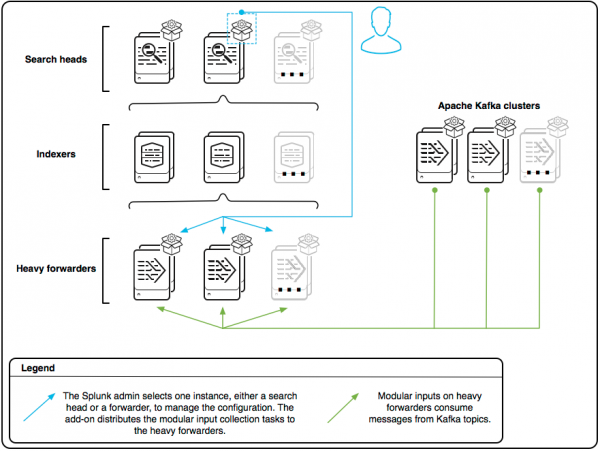
- Manage inputs centrally from a single node. Use Splunk Web to configure the collection parameters and identify the heavy forwarders to perform the collection from one central location, usually a search head. The Splunk platform then handles the division of collection tasks between the forwarders automatically.
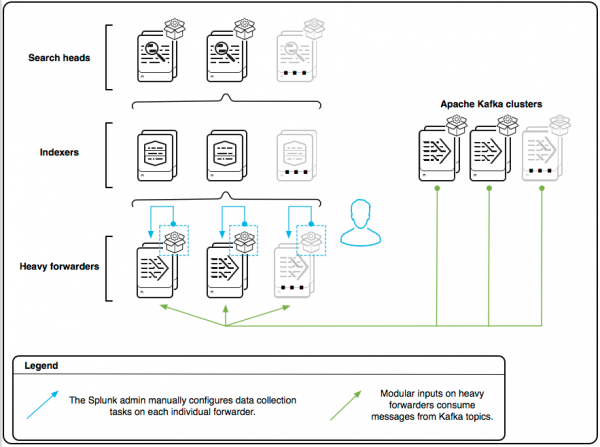
- Manage inputs manually from each forwarder. Use Splunk Web to manually manage event collection tasks on each heavy forwarder.
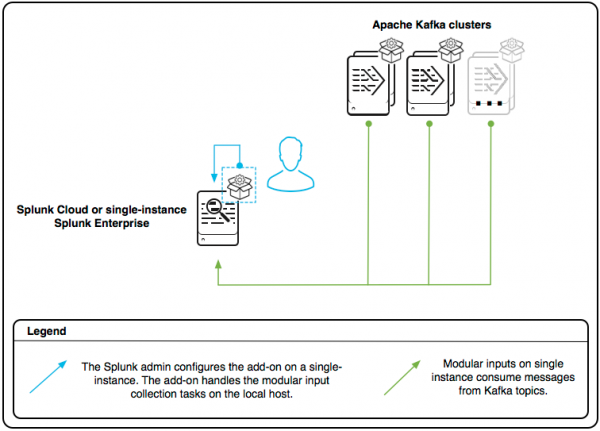
- Manage inputs on a single instance or Splunk Cloud. Use Splunk Web to manage the modular inputs on a single-instance deployment of Splunk Enterprise or on Splunk Cloud.
- Manage inputs using the configuration files. Use the configuration files to configure your modular inputs. This topic covers how to use the configuration files to manage inputs centrally from one node, but other configurations are also possible.
If you have the Snappy compression method enabled when injecting data into Kafka, you must install a Snappy binding to allow this add-on to support Snappy Kafka messages. See Kafka data injected with Snappy compression enabled for details.
Manage inputs centrally from a single node
If you want to manage your modular input configuration centrally on one node, you do not need to configure the add-on on each individual forwarder. Deploy the unconfigured add-on to all heavy forwarders that you want to use to collect Kafka topic data, then proceed with the steps below.
- Select a Splunk platform instance to use to centrally manage the input configuration. This node pushes the configuration to the forwarders that you specify to perform the data collection, so there is no single point of failure.
Splunk platform instance Description Unclustered search head Choose one search head to manage the configurations. Clustered search head Choose one search head in the cluster to manage the configurations. Before you begin, click Settings > Show All Settings so that you can see the Setup link on your search head cluster node. Heavy forwarder Choose one heavy forwarder to manage the configurations. You can also include this forwarder in the set of forwarders that perform the data collection. - In Splunk Web, click Apps > Manage Apps.
- In the row for Splunk Add-on for Kafka, click Set up. Wait a few seconds to allow the page to fully load.
- (Optional) Configure the Logging level for the add-on.
- Under Credential Settings, click Add Kafka Cluster and fill out the fields.
Field Description Kafka Cluster A name to identify this Kafka cluster. Kafka Brokers The IP addresses and ports for the Kafka instances which handle requests from consumers, producers, and indexing logs for this Kafka cluster. If you have more than one, use a comma-separated list. Topic Whitelist (Optional) A whitelist statement that specifies which topics from which you want to collect data. Supports regex. For example, my_topic.+. Whitelist overrides blacklist.Topic Blacklist (Optional) A blacklist statement that explicitly excludes topics from which you do not want to collect data. Supports regex. For example, _internal_topic.+.Partition IDs (Optional) Specific partition IDs from which to collect data, in a comma-separated list. Leave blank to collect from all partitions. Specify partition IDs when you have a very large topic that you want to divide into separate data collection tasks to improve performance. Partition Offset Select either Earliest or Latest for your offset. Select Earliest to ingest all historical data or Latest to start from now. Default is Earliest. Topic Group (Optional) Enter a name to define this configuration as part of a topic group. Use the same topic group name in other configurations to collect the data collection tasks for all configurations associated with this group into the same underlying process. Use topic groups to collect multiple small topic collection tasks together to improve performance. Index (Optional) Configure an index for this configuration. The default is main. - Click Save. Wait a few seconds after saving, then repeat for any additional Kafka clusters from which you want to collect topic data.
- Click Add Forwarder and fill out the fields.
Field Description Heavy Forwarder Name A friendly name to identify this forwarder. Heavy Forwarder Hostname and Port The IP or DNS name and port of this forwarder. Heavy Forwarder Username The username to use to access this forwarder. Heavy Forwarder Password The password to use to access this forwarder. - Click Save.
- Wait a few seconds after saving, then repeat steps 7 and 8 for all heavy forwarders that you want to use to collect data from your Kafka clusters. If you are performing this configuration from a heavy forwarder, add the credentials for the heavy forwarder you are currently on as well.
- At the bottom of the screen, click Save. The Splunk platform pushes the input configuration to the heavy forwarders you have identified and automatically divides up the collection tasks between them.
- Validate that data is coming in by running the following search:
sourcetype=kafka:topicEvent
Manage inputs manually from each forwarder
If you want to manage input job allocation manually, perform these steps on each heavy forwarder that you want to use to collect data from Kafka topics.
- In Splunk Web, click Apps > Manage Apps.
- In the row for Splunk Add-on for Kafka, click Set up.
- (Optional) Configure the Logging level for the add-on.
- Under Credential Settings, click Add Kafka Cluster and fill out only the first two fields. Leave all other fields blank.
Field Description Kafka Cluster A name to identify the Kafka cluster. Kafka Brokers The IP addresses and ports for the Kafka instances which handle requests from consumers, producers, and indexing logs for this Kafka cluster. If you have more than one, use the format (<host:port>[,<host:port>][,...]). - Click Save. Repeat for any additional Kafka clusters from which you want to collect topic data using this forwarder.
- Click Settings > Data inputs.
- In the row for Splunk Add-on for Kafka, click Add new.
- Fill out the form.
Field Description Kafka data input name A name to identify this input. Kafka cluster The name of a Kafka cluster that you configured in step 4 or 5. Kafka topic The Kafka topic on this cluster from which you want to collect data. Kafka partitions (Optional) Specific partition IDs from which to collect data, in a comma-separated list. Leave blank to collect from all partitions. Specify partition IDs when you have a very large topic that you want to divide into separate data collection tasks to improve performance. Kafka partition offset Select Earliest offset or Latest offset. Select Earliest to ingest all historical data or Latest to start from now. Topic group (Optional) Enter a name to define this input as part of a topic group. Use the same topic group name in other inputs to collect the data collection tasks for all inputs associated with this group into the same underlying process. Use topic groups to collect multiple small topic collection tasks together to improve performance. Index (Optional) Configure an index for this input. The default is main. - Click Next.
- Repeat steps 6 through 9 for any additional topics from which you want to collect data using this forwarder.
- Repeat steps 1 through 10 on all other heavy forwarders that you want to use to collect topic data. Be sure not to collect the same topic twice using two different forwarders to avoid duplicate data collection.
- Validate that data is coming in by running the following search:
sourcetype=kafka:topicEvent
Manage inputs on a single instance or Splunk Cloud
These instructions apply if you are setting up a POC on a single instance installation of Splunk Enterprise, or if you have a free trial Splunk Cloud instance. If you want to use this add-on on a paid Splunk Cloud deployment, contact Support for assistance. Not sure if you have a paid or a free trial Splunk Cloud deployment? See Splunk Cloud Platform deployment types to learn how they differ.
- In Splunk Web, click Apps > Manage Apps.
- In the row for Splunk Add-on for Kafka, click Set up.
- (Optional) Configure a Logging level for the add-on.
- Under Credential Settings, click Add Kafka Cluster and fill out the fields.
Field Description Kafka Cluster A name to identify this Kafka cluster. Kafka Brokers The IP addresses and ports for the Kafka instances which handle requests from consumers, producers, and indexing logs for this Kafka cluster. If you have more than one, use a comma-separated list. Topic Whitelist (Optional) A whitelist statement that specifies which topics from which you want to collect data. Supports regex. For example, my_topic.+. Whitelist overrides blacklist.Topic Blacklist (Optional) A blacklist statement that explicitly excludes topics from which you do not want to collect data. Supports regex. For example, _internal_topic.+.Partition IDs (Optional) Specific partition IDs from which to collect data, in a comma-separated list. Leave blank to collect from all partitions. Specify partition IDs when you have a very large topic that you want to divide into separate data collection tasks to improve performance. Partition Offset Select either Earliest or Latest for your offset. Select Earliest to ingest all historical data or Latest to start from now. Default is Earliest. Topic Group (Optional) Enter a name to define this configuration as part of a topic group. Use the same topic group name in other configurations to collect the data collection tasks for all configurations associated with this group into the same underlying process. Use topic groups to collect multiple small topic collection tasks together to improve performance. Index (Optional) Configure an index for this configuration. - Click Save. Repeat for any additional Kafka clusters from which you want to collect topic data.
- Click Add Forwarder and fill out the fields to describe the instance that you are currently on.
Field Description Heavy Forwarder Name A friendly name to identify this instance. Heavy Forwarder Hostname and Port The IP or DNS name and port of this instance. Heavy Forwarder Username The username to use to access this instance. Heavy Forwarder Password The password to use to access this instance. - Click Save.
- At the bottom of the screen, click Save.
- Validate that data is coming in by running the following search:
sourcetype=kafka:topicEvent
Manage inputs using the configuration files
These directions describe how to use configuration files to manage inputs centrally from a single node of Splunk Enterprise, not manually from each individual forwarder. Using this procedure does not involve the inputs.conf file, only the custom configuration files for this add-on.
- Select a Splunk platform instance to use to centrally manage the input configuration. You can use a search head or a heavy forwarder. You can also perform this configuration on a single instance Splunk Enterprise.
- On the instance, create a file called
kafka_credentials.confin$SPLUNK_HOME/etc/apps/Splunk_TA_Kafka/local. - In the file, create stanzas for each Kafka cluster from which you want to collect data, using the template below.
[<KafkaClusterFriendlyName>]
kafka_brokers = <comma-separated list of Kafka IP addresses and ports for the Kafka instances
which handle requests from consumers, producers, and indexing logs for this Kafka cluster.>
kafka_partition= <optional comma-separated list of partition IDs>
kafka_partition_offset = <earliest or latest>
kafka_topic_blacklist = <optional regex of topics to blacklist from data collection.>
kafka_topic_whitelist = <optional regex of topics to whitelist for data collection.>
kafka_topic_group = <optional group name, used to combine multiple small tasks into the same process>
index = <optional index for this data, overriding the default index for all Kafka data that you can set in kafka.conf>
disabled = 0
For example:
[MyFavoriteKafkaCluster]
kafka_brokers = 72.16.107.153:9092,172.16.107.154:9092,172.16.107.155:9092
kafka_partition= 0,1
kafka_partition_offset = earliest
kafka_topic_blacklist = test.+
kafka_topic_whitelist = _internal.+
index = kafka
disabled = 0

[MyOtherFavoriteKafkaCluster]
kafka_brokers = 10.66.128.237:9092,10.66.128.191:9092
kafka_partition_offset = latest
kafka_topic_group = newsmalltopics
index = kafka-misc
disabled = 0
- Save the file.
- Create a file called
kafka_forwarder_credentials.confin$SPLUNK_HOME/etc/apps/Splunk_TA_Kafka/local. - In the file, create a stanza for each heavy forwarder you want to use to collect topic data from your Kafka clusters, using the template below. If you are performing this configuration on a heavy forwarder, include a stanza for the instance you are currently on. If you are doing a POC on a single instance and not using forwarders, enter the credentials for the single instance.
[<HeavyForwarderFriendlyName>]
hostname = <Heavy forwarder's ip and port.>
username = <Username to access the heavy forwarder.>
password = <Password to access the heavy forwarder.>
disabled = False
For example:
[LocalHF]
hostname = localhost:8089
username = ********
password = **************
disabled = False

[HF1]
hostname = 10.20.144.233:8089
username = ******
password = ************
disabled = False

[HF2]
hostname = 10.20.144.210:8089
username = *********
password = ********
disabled = False
- Save the file.
- If you need to adjust any global settings for this add-on, create a file called
kafka.confin$SPLUNK_HOME/etc/apps/Splunk_TA_Kafka/local. See$SPLUNK_HOME/etc/apps/Splunk_TA_Kafka/README/kafka.conf.specfor details, or consult Troubleshoot the Splunk Add-on for Kafka for information about special cases. - Restart the instance.
- Validate that data is coming in by running the following search:
sourcetype=kafka:topicEvent
| Configure JMX inputs for the Splunk Add-on for Kafka | Troubleshoot the Splunk Add-on for Kafka |
This documentation applies to the following versions of Splunk® Supported Add-ons: released


 Download manual
Feedback submitted, thanks!