Use the Splunk Add-on Builder
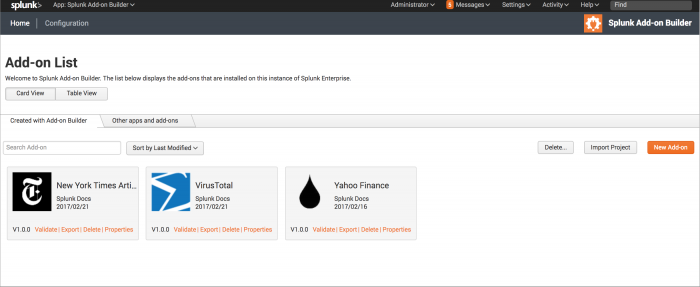
The home page of the Splunk Add-on Builder displays projects for all of the add-ons that were created using the Splunk Add-on Builder along with apps and add-ons that are installed on your instance of Splunk Enterprise. An Add-on Builder project is an editable add-on along with its meta data. You can export projects for use on other instances of Add-on Buiilder.
Import and export add-on projects
Each add-on you create in Splunk Add-on Builder has a corresponding project that contains the configuration settings for the add-on. The only way you can use Add-on Builder to modify certain parts of your add-on, such as data inputs or field extractions, is by having access to the add-on project.
If you want to modify your add-on on a different computer from the one you used for developing it, or if you want to share your add-on project, you can export the add-on project as a TGZ file. Then, the project file can be imported to a different instance of Splunk Enterprise running Add-on Builder. You can only import and export projects for add-ons that were created in Splunk Add-on Builder.
To import an add-on project
- On the Splunk Add-on Builder home page on the Created with Add-on Builder tab, click Import Project.
- Navigate to the add-on TGZ project file and click Open.
To export an add-on project
- On the Splunk Add-on Builder home page on the Created with Add-on Builder tab, click Export for the add-on.
When you export a project, any values that you entered for testing setup parameters, data inputs, and alert actions are saved with the project. For example, to test a data input, you might enter your user credentials or an API key. If you do not want to include these test values with the exported project, remove them by editing the setup page, data input, or alert action and clear the test fields before exporting the project.
Work with other apps and add-ons
Using Add-on Builder, you can work with other apps and add-ons that are installed on your instance of Splunk Enterprise, even if the app or add-on was not created using Add-on Builder.
- Validate&Package: Validate the app or add-on against best practices and other rules, and determine whether your app is ready for Splunk App Certification. You can also download a package file for the app or add-on.
- CIM: Map fields from the app or add-on to the Common Information Model (CIM).
- Alert Actions: Create and configure alert actions for the app or add-on.
If an existing app or add-on already has configuration files in the app's /default directory, you are prompted to allow Add-on Builder to move these configuration files to the app's /local directory and merge them with any existing configuration files. Typically these configuration files include props.conf, eventtypes.conf, and tags.conf, which are used for CIM mapping.
To use Add-on Builder to work with other apps and add-ons
- On the Splunk Add-on Builder home page, click the Other apps and add-ons tab.
- On the app or add-on, click the link for the activity you want: Validate, CIM or Alert Actions.
End-to-end walkthroughs
For end-to-end walkthroughs, see the Splunk Developer Portal.
| What to know before you build add-ons | Create an add-on |
This documentation applies to the following versions of Splunk® Add-on Builder: 2.1.0, 2.1.1, 2.1.2

 Download manual
Feedback submitted, thanks!