Configure data collection using your Python code
In the Configure Data Collection page, configure the data inputs and setup page for your add-on. Data inputs determine how you will get data into your add-on:
After you configure data inputs for your add-on, you can manage them from the Configure Data Collection page in Add-on Builder. This page displays a list of data inputs that you have configured for your add-on. Data inputs you configure for your add-on also appear on the Inputs page of the add-on.
- Data inputs must be enabled so that Splunk Enterprise can start indexing the data from them. You'll need indexed data if you want to perform field extractions and CIM mapping. Data inputs you configure are enabled by default.
- For each data input you configure, the Add-on Builder creates an input called "TAB_example", which is visible on the Inputs page of the add-on. Do not modify this input, which is used by the Add-on Builder. Instead, if you want to change settings for the data input, access the options from the Configure Data Collection page in Add-on Builder.
Your add-on's users must create data inputs within the add-on. Do not direct users to use the Settings > Data inputs page in Splunk Enterprise. When users open your add-on, the Inputs page provides the option to create a new input.
Add a data input by writing your own code
You can implement your own data collection mechanism using Python code.
Apps created in the Splunk Add-on Builder version 3.0.x, are only compatible with Splunk version 8.x. Add-ons built in version 3.0.x that are built to be compatible with Python 2 and Python 3 can run on Splunk version 7.x. See the Python 3 Migration manual
- On your add-on's homepage, click the Configure Data Collection icon.
- On the Configure Data Collection page, click Add Data to start the Create Data Input wizard.
- On the Choose Input Method page, select Modular input using your own Python code.
- On the Data Input Properties tab:
- Enter a name for the source type to create for this data input.
- Enter an input display name, internal name, and description.
- Specify a collection interval, in seconds, to indicate how often the add-on should retrieve data using this input. Do not set a collection interval for a single-instance input.
- Click the Data Input Parameters tab to define any parameters that are required for users to configure your data input. At least one parameter is required.
For each parameter, drag a field from the Component Library to the center panel, then specify its properties in the Property Editor. - Optionally, click the Add-on Setup Parameters tab to define any parameters that are required for users to configure your add-on.
- Select predefined options to prompt for account, proxy, or logging settings.
- Add custom inputs by dragging fields from the Component Library to the center panel panel. Select an input to specify its properties in the Property Editor.
- Click Next.
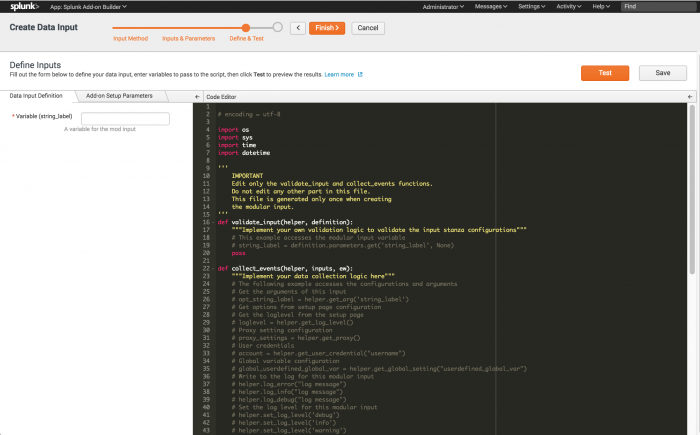
- On the Data Input Definition tab in the Code Editor panel, edit the Python code to create your modular input.
- Add code under the validate_input function to provide validation logic.
- Add code under the collect_events function to add data collection logic.
- Use the Python helper functions, which are dynamically generated as commented code, as a guide to working with the input parameters you defined in the previous step.
The autogenerated code contains a working example that generates a random number. - Under Data input parameters, enter sample values for testing the data input.
- If you created a setup page, click the Add-on Setup Parameters tab to enter sample values for setup parameters for testing purposes.
- Click the Data Input Definition tab, then click Test to run your code and test the data input configuration.
The Output section indicates whether your code succeeded (sample data is displayed) or failed (the error message is displayed). - Click Save to save the data input, then click Finish.
For more about setup pages, see Create a setup page.

The Add-on Builder displays a summary of the new data input, along with suggested next steps.
Add authentication to a data input
To use authentication for a REST input, add a Global Setup input field to your data input parameters form.
The Global account settings option is automatically selected on your setup page. To access a username and password in your code, use the following format:
import json
global_account = helper.get_arg('global_account')
username = global_account['username']
password= global_account['password']
When users first open your add-on, they set up their accounts on the add-on's Configuration page. Then they configure new inputs on the add-on's Inputs page, which displays the data input parameters you configured:
Pass values from data input parameters
Add-on Builder generates the Python helper functions for you to access the values from data input parameters, where "server" is the global parameter name, and "local" is the modular input parameter name:
server = helper.get_global_setting("server")

local = helper.get_param("local")
For more, see Python helper functions.
Single-instance and multi-instance modes
Multi-instance mode runs one instance of a data input per input stanza, resulting in multiple instances (one for each input stanza). This default behavior is useful in multi-thread environments or in situations that require different security contexts or access to different databases.
In a single-thread environment you can run an input in single-instance mode. For example, in a WMI environment you would run a single instance of an input to re-use connections.
Multi-instance mode is enabled by default. To enable single-instance mode, do not set a collection interval for the data input, and then uncomment the following lines in the Python code for the data input:
def use_single_instance_mode():
    return True
Learn more
For more information, see the following Splunk Enterprise documentation:
- Source type naming conventions in the Splunk Add-ons manual.
- Create custom data inputs for Splunk Cloud Platform or Splunk Enterprise on the Splunk Developer Portal
- How to create modular inputs using Splunk SDK for Python on the Splunk Developer Portal
- Create a setup page for a Splunk app on the Splunk Developer Portal
| Configure data collection using a shell command | Create a setup page |
This documentation applies to the following versions of Splunk® Add-on Builder: 3.0.0, 3.0.0, 3.0.1
Feedback submitted, thanks!