Splunk App for Anomaly Detection workflow
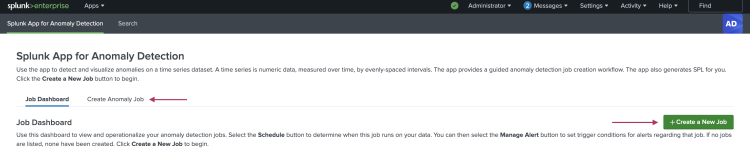
You can use the Splunk App for Anomaly Detection to benefit from machine learning insights on time-series data without having to immerse yourself in machine learning practices and methodologies. The app provides a guided anomaly detection job creation workflow.
The Splunk App for Anomaly Detection works with any time-series dataset that you can ingest into the Splunk platform. A time-series is numeric data, measured over time, by evenly spaced intervals. The app also generates SPL for you. Similar to other Splunk applications, the CPU and memory resources the app consumes is commensurate with the size of the datasets you use.
Dataset guidelines for anomaly detection
You can get better results and prevent potential errors with the app by making sure the dataset you use meets certain criteria. Use the following guidelines before creating your first anomaly detection job.
| Guideline or requirement | Required Y/N | Impact |
|---|---|---|
| Field selected for anomaly detection has only a few unique values. | N | You can proceed with the anomaly detection workflow but the results might lack valuable insights. |
| Data ranges over 8 or more orders of magnitude. | N | You can proceed with the anomaly detection workflow but the results might lack valuable insights. |
| Data exhibits high volatility/ low smoothness. | N | You can proceed with the anomaly detection workflow but there is not enough structure/predictability in the data for an accurate model. |
| Field selected for anomaly detection cannot have any missing values. | Y | You cannot complete the anomaly detection job creation without addressing this issue in the dataset. |
| Field selected for anomaly detection cannot have non-numeric values. | Y | You cannot complete the anomaly detection job creation without addressing this issue in the dataset. |
| Field selected for anomaly detection must have at least 20 values. | Y | You cannot complete the anomaly detection job creation without addressing this issue in the dataset. |
| Field selected for anomaly detection cannot have unevenly-spaced timestamps. | Y | You cannot complete the anomaly detection job creation without addressing this issue in the dataset. |
New job creation steps
Perform the following steps to create a new anomaly detection job:
- Open the Splunk App for Anomaly Detection and choose the Create Anomaly Job tab or the Create a New Job button.
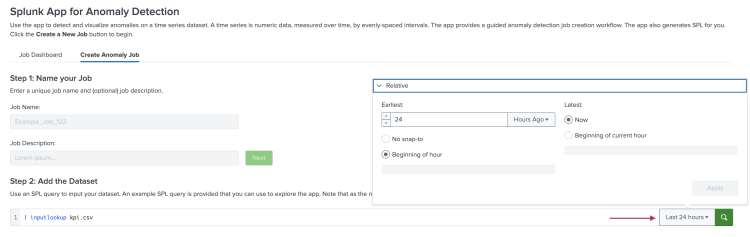
- Input a job name and optionally add a job description. Job names must be unique and alphanumeric. Underscores are allowed. Job name cannot begin with a digit.
Job names cannot change once created.
Click Next when ready.
- Use an SPL query to load the time-series dataset on which you want to perform anomaly detection. Optionally use the pre-populated sample dataset to explore the app before working with your own data.
The number of fields in the dataset can impact app response time.
- Optionally select the time-frame for the anomaly detection job from the time-range picker. The Last 24 hours is selected by default. Click enter or return on your keyboard, or the magnifying glass icon on the search bar when ready.
- Your data displays in the Preview Data panel and you can now select the numeric field on which you want to detect anomalies. From the drop-down menu, choose the numeric field. The drop-down list is filtered to only display the numeric fields in your queried dataset.
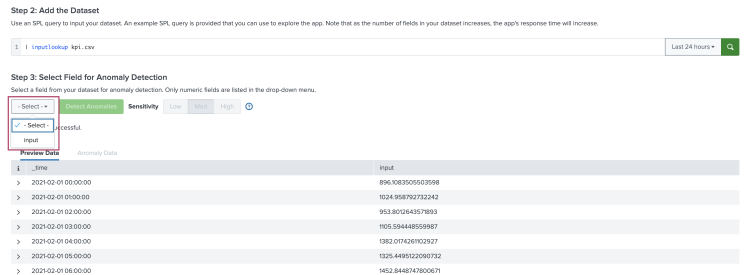
- Once you select a field, the app performs a data health diagnostic check. These diagnostics give you insight on quality of the data and determines if the data is well-suited for anomaly detection. Your data might not be deemed well-suited if there are missing values or the timestamps are not evenly distributed for example. Click Detect Anomalies when ready.
- The Anomaly Data panel is populated with your data plotted and any anomalies marked with yellow dots. The app finds anomalous points as well as periods of anomalous behavior. You can also view the results in a results table.
If you are not getting the expected results, you can adjust the detection Sensitivity. By default, sensitivity is set to Medium. Changing to Low or High automatically runs the query again. Opting for High sensitivity results in more anomalies being detected.
- If you are pleased with the anomaly detection job results, click Save Job. When using the app, Splunk Search Processing Language (SPL) is generated for you. Click the View SPL button to view and copy the SPL for use elsewhere in the Splunk platform. You can also click Open in Search to open a new Splunk search using this SPL query. You can modify the SPL prior to running the search as needed.
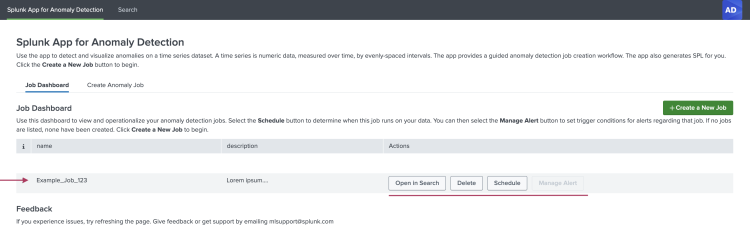
- Navigate back to the 'Job Dashboard to see the new job listed. From this view you can operationalize your results, detect anomalies on a schedule that makes sense for the time series you are monitoring, and create alerts based on selected triggers.
The Manage Alert option is only available after you create a job schedule.


Schedule jobs and manage alerts
After you create a Job in the app, you can schedule when that job runs on your data, and set trigger conditions as to when you get alerts related to that job.
You must first schedule a job in order to create job related alerts.
From the Job Dashboard tab, click Schedule on the row of your chosen job. The following Schedule Job window appears:

Select the timing for this anomaly job by minute, hour, day, or week. Click Save when done.
From the Job Dashboard tab, click Manage Alert on the row of your chosen job. The following Alert Trigger Condition window appears:

Select the criteria to trigger an alert and information on where to deliver the alert and with what subject line. Click Save when done.
| Install the Splunk App for Anomaly Detection | Share data in the Splunk App for Anomaly Detection |
This documentation applies to the following versions of Splunk® App for Anomaly Detection: 1.0.0
Feedback submitted, thanks!