Configure AWS for onboarding from organizational units
You can use Data Manager to ingest data from AWS organizational units (OUs).
Choose one AWS account as a control account. The control account is an AWS account ID that you designate as the management account. This account allows you to create, update, and delete StackSets across multiple organizational units, accounts, and regions (to view the list of supported AWS regions, go to Amazon Web Services). It is a separate account from the data accounts that you plan to monitor.
You can choose multiple AWS organizational units to onboard the data from their contained data accounts. You cannot onboard data in the same Splunk Cloud stack with overlapping data accounts and overlapping input type. Overlapping means that a data account is already configured for ingesting other data sources. For example, if an AWS account is already configured for a certain CloudTrail input type, you can't re-add that same account and input type with OUs. To avoid overlapping data accounts, make sure you don't add the same AWS data account and input type more than once.
Avoid overlapping data accounts
In this release, you are responsible for manually checking if there's any overlap of data accounts. For example, if you're already ingesting CloudTrail data for accounts A, B, and C that belong to OU_A, don't select OU_A or any of its parent OUs, including the organization root, when creating a new CloudTrail input.
Choose a control account
The AWS admin must choose the control account for the data you are inputting. The control account is an AWS account where you drive StackSet operations and it must be either the AWS management account or the AWS delegated administrator account. The control account allows you to create, update, and delete StackSets to manage resources across multiple organizational units and regions. The same control account can be used in multiple data inputs in Data Manager.
Create the SplunkDMReadOnlyRoleForOrgAdmin role in the control account
If this role already exists in the control account, the AWS admin can skip this step. If the role doesn't exist, the AWS admin creates the SplunkDMReadOnlyRoleForOrgAdmin role in the control account. This role is needed in the control account for reading IAM user and CloudFormation StackSet status. Make sure that the AWS administrator replaces the account placeholders in the policy.
Prerequisites
- You have copied the Splunk Cloud Platform account ID from the Trust Relationship statement in Data Manager.

- You have copied the Role Policy statement from Data Manager.

To go to the prerequisites page in Data Manager, see Select AWS Organizations.
Configure the role through the console
Complete the following steps to configure the SplunkDMReadOnlyRoleForOrgAdmin role in the AWS console.
- In the AWS console, log in to your control account.
- Go to IAM and then select Roles.
- Select Create role.
- On the Select trusted entity page, select AWS account.
- In the An AWS account section, select Another AWS account.
- In the Account ID field, paste the Splunk Cloud Platform account ID that you copied from the Trust Relationship statement in Data Manager. In this example, copy 123456789012 from the principal object:
"Principal" : {"arn:aws:iam::'''123456789012''':role/cfgh-d12345-12345"} - In the Options section, select Require external ID.
- In the External ID field, copy and paste the
sts:Externaldfrom the Trust Relationship in Data Manager. In this example, copyffcbd123-1a234-123b-12c3-1234567890bfrom the conditions object:"Conditions": {"StringEquals": {"sts:ExternalID": "'''ffcbd123-1a234-123b-12c3-1234567890b'''"}} - Select Next.
- On the Add permissions page, select Next.
- On the Name, review, and create page, in the Role Name field, enter the name SplunkDMReadOnlyRoleForOrgAdmin and select Create role. Your new role appears on the list of available roles.
- Choose SplunkDMReadOnlyRoleForOrgAdmin to view the role's details.
- Go to the Permissions tab, select Add permission, and then Create inline policy.
- Go to the JSON tab.
- Overwrite the JSON text by pasting the Role Policy statement that you copied from Data Manager. See Prerequisites.
- Replace the
<CONTROL_ACCOUNT_ID>and<MANAGEMENT_ACCOUNT_ID>variables.- If you choose the AWS management account as the control account, replace the
<CONTROL_ACCOUNT_ID>variable with your control account ID. - If you choose the AWS delegated administrator account as the control account, replace the
<CONTROL_ACCOUNT_ID>variable with your control account ID and replace the<MANAGEMENT_ACCOUNT_ID>variable with your AWS management account ID.
To find your AWS management account ID, go to AWS console and then AWS Organizations, and in the Organization section look for the management account. ID is displayed under the account name.
- If you choose the AWS management account as the control account, replace the
- Select Review Policy.
- In the Name field, enter any name of your choice, for example SplunkDMReadOnlyRoleForOrgAdminPolicy.
- Select Create policy.
- Go to the Trust relationships tab and select Edit Trust Relationship.
- Update the AWS principal, such as arn:aws:iam::123456789012:role/cfgh-d12345-12345 from Data Manager.
- Select Update Trust Policy.
Configure the role through the CLI
Prepare the terminal to use the AWS credentials that allow you to run the following CLI command against your control account. For more information, see AWS CLI Prerequisites.
- Create the SplunkDMReadOnlyRoleForOrgAdmin role. To create the role, copy the code from Data Manager and do the following:
- Replace the
<CONTROL_ACCOUNT_ID>placeholder with your control account ID. - Replace the
<EXTERNAL_ID>placeholder from the Trust Relationship statement in Data Manager. See Prerequisites. - Use the following code in the CLI:
aws iam create-role --role-name SplunkDMReadOnlyRoleForOrgAdmin --assume-role-policy-document '{"Version":"2012-10-17","Statement":[{"Effect":"Allow","Principal":{"AWS":["arn:aws:iam::<CONTROL_ACCOUNT_ID>:role/cfgh-d12345-12345"]},"Action":"sts:AssumeRole","Condition":{"StringEquals":{"sts:ExternalId":"<EXTERNAL_ID>"}}}]}'
- Replace the
- Create the inline policy for SplunkDMReadOnlyRoleForOrgAdminPolicy and attach it to the role. Copy the code from Data Manger. See Prerequisites.
- If you use an AWS management account as the control account, use the copied command and replace the
<CONTROL_ACCOUNT_ID>placeholder with your control account ID. Use the following code in the CLI:aws iam put-role-policy --policy-name SplunkDMReadOnlyRoleForOrgAdminPolicy --policy-document '{"Version":"2012-10-17","Statement":[{"Effect":"Allow","Action":["iam:GetRole","iam:GetRolePolicy","iam:ListRolePolicies","iam:ListAttachedRolePolicies","iam:GetPolicy","iam:GetPolicyVersion","cloudformation:DescribeStackSet","cloudformation:DescribeStacks","cloudformation:ListStackInstances","cloudformation:ListStackSetOperations","cloudformation:DescribeStackSetOperation","cloudformation:DetectStackSetDrift"],"Resource":["arn:aws:cloudformation:*:<CONTROL_ACCOUNT_ID>:stack/SplunkDM*/*","arn:aws:cloudformation:*:<CONTROL_ACCOUNT_ID>:stackset/SplunkDM*:*","arn:aws:iam::<CONTROL_ACCOUNT_ID>:role/aws-service-role/stacksets.cloudformation.amazonaws.com/AWSServiceRoleForCloudFormationStackSetsOrgAdmin","arn:aws:iam::<CONTROL_ACCOUNT_ID>:policy/*","arn:aws:iam::<CONTROL_ACCOUNT_ID>:role/SplunkDM*"]},{"Effect":"Allow","Action":["s3:ListBucket"],"Resource":["arn:aws:s3:::sdm-dataingest-cft*"]},{"Effect":"Allow","Action":["organizations:ListOrganizationalUnitsForParent","organizations:ListParents","organizations:ListRoots","organizations:DescribeOrganization","organizations:ListAWSServiceAccessForOrganization","organizations:ListAccountsForParent"],"Resource":"*"}]}' --role-name SplunkDMReadOnlyRoleForOrgAdmin - If you use an AWS delegated administrator account as the control account, use the copied command and replace the
<CONTROL_ACCOUNT_ID>and<MANAGEMENT_ACCOUNT_ID>placeholders with your control account ID and AWS Organizations management account ID respectively. Copy the code from Data Manager. Use the following code in the CLI:aws iam put-role-policy --policy-name SplunkDMReadOnlyRoleForOrgAdminPolicy --policy-document '{"Version":"2012-10-17","Statement":[{"Effect":"Allow","Action":["iam:GetRole","iam:GetRolePolicy","iam:ListRolePolicies","iam:ListAttachedRolePolicies","iam:GetPolicy","iam:GetPolicyVersion","cloudformation:DescribeStackSet","cloudformation:DescribeStacks","cloudformation:ListStackInstances","cloudformation:ListStackSetOperations","cloudformation:DescribeStackSetOperation","cloudformation:DetectStackSetDrift"],"Resource":["arn:aws:cloudformation:*:<CONTROL_ACCOUNT_ID>:stack/SplunkDM*/*","arn:aws:cloudformation:*:<MANAGEMENT_ACCOUNT_ID>:stackset/SplunkDM*:*","arn:aws:iam::<MANAGEMENT_ACCOUNT_ID>:role/aws-service-role/stacksets.cloudformation.amazonaws.com/AWSServiceRoleForCloudFormationStackSetsOrgAdmin","arn:aws:iam::<CONTROL_ACCOUNT_ID>:policy/*","arn:aws:iam::<CONTROL_ACCOUNT_ID>:role/SplunkDM*"]},{"Effect":"Allow","Action":["s3:ListBucket"],"Resource":["arn:aws:s3:::sdm-dataingest-cft*"]},{"Effect":"Allow","Action":["organizations:ListOrganizationalUnitsForParent","organizations:ListParents","organizations:ListRoots","organizations:DescribeOrganization","organizations:ListAWSServiceAccessForOrganization","organizations:ListAccountsForParent","organizations:ListDelegatedAdministrators"],"Resource":"*"}]}' --role-name SplunkDMReadOnlyRoleForOrgAdmin
- If you use an AWS management account as the control account, use the copied command and replace the
Create the SplunkDMReadOnlyRoleForOrgMember role in organizational units
Create a StackSet in your control account to push the SplunkDMReadOnlyRoleForOrgMember role to each of your organizational units or data accounts. This role allows Splunk Cloud Platform to read metadata from CloudTrail, Security Hub, GuardDuty, CloudFormation, Firehose, S3, Lambda, events, and logs.
Prerequisites
- Download the CloudFormation Template from Data Manager. You need this template to use in your control account in order to create a StackSet that makes this role in each organizational unit or data account. The template is in the Prerequisites page of Data Manager, as shown in the following image:
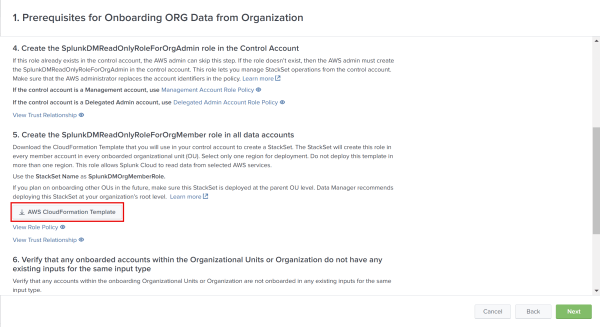

To go to the prerequisites page, see Select AWS Organizations.
Configure the role through the console
Complete the following steps to configure the SplunkDMReadOnlyRoleForOrgMember role in the AWS console.
- In the AWS console, log in to your control account and navigate to the CloudFormation service.
- Select StackSets and then Create StackSet.
- On the Choose a template page, go to the Permissions section and select Service-managed permissions.
- In the Prerequisite - Prepare template section, select Template is ready.
- In the Specify template section, select Upload a template file.
- Select Choose file and upload the CloudFormation template.
- Select Next.
- On the Specify StackSet details page, enter the StackSet name of your template: SplunkDMOrgMemberRole.
- Leave the StackSet description as is.
- In the Parameters section, don't define any parameters.
- Select Next.
- On the Configure StackSet options page, go to the Tags - optional section and make sure that no tags are added.
- In the Execution configuration section, select Inactive.
- in the Capabilities section, select I acknowledge that AWS CloudFormation might create IAM resources with customised names.
- Select Next.
- On the Set deployment options page, go to the Add stacks to stack set section and select Deploy new stacks.
- In the Deployment targets section, select Deploy to organizational units (OUs).
- In the AWS OU ID field, add IDs for the desired OUs.
- In the Auto-deployment options section, for Automatic deployment select Activated.
- For Account removal behavior select Delete stacks.
- In the Specify regions section, select one region, preferably US East (Virginia).
Select only 1 region for deployment. Don't deploy this template in more than 1 region.
- In the Deployment options section, for Maximum concurrent accounts - optional, select Number and enter 1.
- For Failure tolerance - optional, select Number and enter 0. This setting means that if there is a failure, the operation doesn't continue.
- For the Region Concurrency field, select Sequential.
- For Concurrency mode, select Strict failure tolerance.
- Select Next.
- On the Review page, check your entries and select Submit.
- (Optional) Because only 50 OUs are supported at a time for creation, deletion, or editing, for every 50 OUs you have in your deployment, repeat steps 5 and 6.
If your organization has more than 50 OUs, create multiple StackSets, each with up to 50 OUs.
Verify that the roles are added to your AWS accounts
After you set up the roles, you can verify if they are added to your AWS accounts. Make sure that placeholders are replaced with correct account IDs.
- Log into the AWS account that is your control account.
- Go to IAM and select Roles.
- In the search bar, enter the role that you want to check, for example enter SplunkDMReadOnlyRoleForOrgAdmin or SplunkDMReadOnlyRoleForOrgMember.
- Select the role and go to the Trust relationships tab. Make sure that the trust relationship statement matches the one you copied from the Data Manager.
- Go to the Permissions tab. Make sure that the correct account IDs are used to replace placeholders copied from Data Manager.
- If you choose the AWS Management account as the control account, the
<CONTROL_ACCOUNT_ID>placeholder is replaced with your control account ID. - If you choose the AWS Delegated Administrator account as the control account, the
<CONTROL_ACCOUNT_ID>placeholder is replaced with your control account ID and the<MANAGEMENT_ACCOUNT_ID>placeholder is replaced with your AWS Management account ID.
To find your AWS Management account ID, go to AWS console and select AWS Organizations. in the Organization section, look for the management account. ID is displayed under the account name.
- If you choose the AWS Management account as the control account, the
| Configure AWS for onboarding from multiple accounts | Create input for AWS Organizations |
This documentation applies to the following versions of Data Manager: 1.13.0
Feedback submitted, thanks!