Configuration Settings
As a Splunk Enterprise administrator, you can make configuration changes to your Splunk Enterprise Security installation.
General Settings
Use the General Settings page and edit threshold values and other commonly changed values for your Enterprise Security installation.
- On the Enterprise Security menu bar, select Configure > General > General Settings.
| Setting | Description |
|---|---|
| Asset Sources | A search macro that enumerates the lookup tables that contain asset information used for asset correlation. |
| Auto Pause | Type the time in seconds before a drilldown search will pause. |
| Default Watchlist Search | Define the watchlisted events for the 'Watchlisted Events' correlation search |
| Domain Analysis | Enable or disable WHOIS tracking for Web domains. |
| Domain From URL Extraction Regex | A regular expression used to extract domain (url_domain) from a URL. |
| Enable Identity Generation Autoupdate | If true, permit the Identity Manager to auto-update asset_sources, identity_sources, and generate_identities macros. True by default. |
| HTTP Category Analysis Sparkline Earliest | Set the start time for sparklines displayed on the HTTP User Category Analysis dashboard. |
| HTTP Category Analysis Sparkline Span | Set the time span for sparklines displayed on the HTTP User Category Analysis dashboard. |
| HTTP User Agent Analysis Sparkline Earliest | Set the start time for sparklines displayed on the HTTP User Agent Analysis dashboard. |
| HTTP User Agent Analysis Sparkline Span | Set the time span for sparklines displayed on the HTTP User Agent Analysis dashboard. |
| IRT Disk Sync Delay | Set the number of seconds for Enterprise Security to wait for a disk flush to finish. Relevant to Indexed real time searches. |
| Identity Generation | Defines the transformations used to normalize identity information. See How Splunk Enterprise Security processes and merges asset and identity data |
| Identity Generation Timeout | Number of seconds the Identity Manager waits before warning of slow search completion in identity_manager.log. |
| Identity Sources | Enumerates the source lookup tables that contain identity information. |
| Incident Review Analyst Capacity | Estimated maximum capacity of notable events assigned to an analyst. Relative measure of analyst workload. |
| Indexed Realtime | Enable or disable indexed real-time mode for searches. |
| Large Email Threshold | An email that exceeds this size in bytes is considered large. |
| Licensing Event Count Filter | Define the list of indexes to exclude from the "Events Per Day" summarization. |
| New Domain Analysis Sparkline Span | Set the time span for sparklines displayed in the New Domain Analysis dashboard. |
| Notable Modalert Pipeline | SPL for the notable adaptive response action. |
| Predicate pushdown | Dynamically replaces |datamodel drilldown searches with a new search that approximates the same constraints to speed up the return of events in search results. If a drilldown search references an evaluated field (example: src="unknown",) the replacement drilldown search will always return No results found.The setting is global and changes the Incident Review notable event drilldown for contributing events and all simple XML dashboards that use a specific search syntax for drilldown searches. Disabled by default. Change this setting only if the search head performance of drilldown searches is unacceptable. If you use Splunk platform version 6.5.x or later, search optimization of this type happens automatically. You do not need to select this setting to get the optimization benefits. |
| Search Disk Quota (admin) | Set the maximum amount of disk space in MB that an admin user can use to store search job results. |
| Search Jobs Quota (admin) | Set the maximum number of concurrent searches allowed for admin users. |
| Search Jobs Quota (power) | Set the maximum number of concurrent searches for power users. |
| Short Lived Account Length | An account creation and deletion record that exceeds this threshold is anomalous. |
| TSTATS Allow Old Summaries | Enable or disable searching of data model accelerations containing fields that do not match the current data model configuration. |
| TSTATS Local | Determine whether or not the TSTATS macro will be distributed. |
| TSTATS Summaries Only | Determine whether or not the TSTATS or summariesonly macro will only search accelerated events. |
| Use Other | Enable or disable the term OTHER on charts that exceed default series limits. |
| Website Watchlist Search | A list of watchlisted websites used by the "Watchlisted Events" correlation search. |
Credential Management
The Credential Management page displays stored credentials for objects, such as threat lists or lookups, that run as scripted or modular inputs. An input configuration that references a credential will attempt to find the credential values here.
Add a new credential for an input
- On the Enterprise Security menu bar, select Configure > General and open Credential Management.
- Click New Credential to add a new user credential.
- Use the edit panel to add the username and password for the new credential.
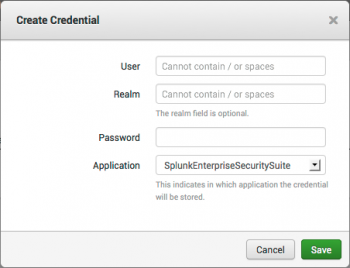
- (Optional) Use the Realm field to differentiate between multiple credentials that have the same username.
- Select the Application for the credential.
- Click Save.

Edit an existing input credential
- On the Enterprise Security menu bar, select Configure > General and open Credential Management.
- In the Action column of a credential, select Edit.
- Use the editor to change the username, password, or application for the credential. You cannot change the realm after it has been applied to a credential. You must create a new credential to change the realm.
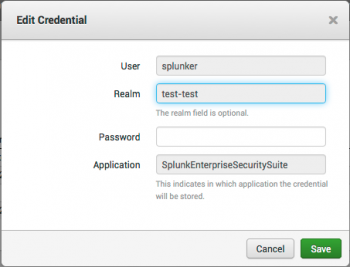
- Click Save.

Delete an existing input credential
- On the Enterprise Security menu bar, select Configure > General and open Credential Management.
- In the Action column of a credential, select Delete.
Permissions
Use the Permissions page to view and assign Enterprise Security capabilities to non-admin roles.
- On the Enterprise Security menu bar, select Configure > General > Permissions.
- Select the checkbox for the role and permissions for that role.
- Click Save.
For more information about ES capabilities, see Adding capabilities to a role in the Installation and Upgrade Manual.
Use the Navigation editor to present and arrange the domains and dashboards displayed in the Enterprise Security menu bar. Removing domains or dashboards from the menu bar disables only the navigation and display of that item. Any unused, disabled, or removed objects are shown in the Unused Reports list to the left of the Navigation editor. You must have Enterprise Security administrator privileges to modify menu bar settings.

- On the Enterprise Security menu bar, select Configure > General and open Navigation.
- Use the Navigation Editor to arrange objects and enable or disable the display of dashboards.
- Move a single menu item by selecting the item from a menu list and drag it on to another location.
- To disable a domain or dashboard, click the "X" on the main menu panel.
- To disable a single menu item, select the item (a check mark shows that the item is selected) and then click the "X" next to the item.
- To rearrange display of the menus, click and drag them into a new order.
- When you complete your changes, click Save.
- From the Navigation editor, select a dashboard or report from the list of Unused Reports on the left.
- Drag the report into the menu area and place it under a menu title. The existing menu items will shift to make room for the new item.
- Click Save.
For the list of dashboards that may be added to the menu bar using the Navigation editor, see the "Dashboard requirements matrix" topic in this manual.
Add a link to the ES navigation menu. For example, add a link to a specifically-filtered view of Incident Review or to an external system.
Create a link in the menu to an external system or webpage.
- From the Splunk platform menu, select Settings > User Interface.
- Click Navigation menus.
- Select the Nav name default next to SplunkEnterpriseSecuritySuite.
- Create or modify a collection.
For example, to create a drop-down menu option titled Resources with a link to this topic titled Configuration Settings, add a new collection like the following example.<collection label="Resources">
<a href='http://docs.splunk.com/Documentation/ES/latest/User/ManageSearches' target="_blank">Configuration Settings</a>
</collection> - Save the changes.
- Use the app picker to return to Splunk Enterprise Security.
- Verify that the menu navigation is updated and works as expected.
Replace the current menu link to Incident Review with a filtered view of Incident Review.
- Filter Incident Review to your desired filters.
- From the web browser address bar, copy the part of the URL that starts with
/app/SplunkEnterpriseSecuritySuite/ - Replace the
<view name="incident_review" />section with a collection and links that reference the filter link that you copied.
This example creates a menu option called Incident Review with drop-down options that show Incident Review filtered to show only in progress notable events, Incident Review filtered to show only critical notable events, and Incident Review filtered to show only new and unassigned notable events.<collection label=“Incident Review">
<a href='/app/SplunkEnterpriseSecuritySuite/incident_review?form.status_form=2'>IR – In Progress</a>
<a href='/app/SplunkEnterpriseSecuritySuite/incident_review?form.selected_urgency=critical'>IR - Critical</a><a href='/app/SplunkEnterpriseSecuritySuite/incident_review?form.status_form=1&form.owner_form=unassigned'>IR – New</a>
</collection> - Save the changes.
- Use the app picker to return to Splunk Enterprise Security.
- Verify that the menu navigation is updated and works as expected.
You can also construct a URL manually using the parameters in the following table. Use an asterisk to show all results for a specific parameter. If the URL you create includes multiple parameters, HTML-encode the & separating the parameters as &.
| Parameter | Description | Possible values | Example |
|---|---|---|---|
form.selected_urgency |
Display notable events with the urgency specified by this parameter. | critical, high, medium, low, informational | form.selected_urgency=critical
|
form.status_form |
Display notable events with the status specified by this parameter. An integer corresponds to each status value. | 0 for unassigned, 1 for new, 2 for in progress, 3 for pending, 4 for resolved, 5 for closed | form.status_form=0
|
form.owner_form |
Display notable events owned by the user specified by this parameter. | usernames | form.owner_form=admin
|
form.rule_name |
Display notable events created by the correlation search specified by this parameter. HTML-encode spaces in the correlation search name and use the name that appears in the notable event rather than the name that appears on Content Management. | Endpoint - Host With Multiple Infections - Rule | form.rule_name=Endpoint%20-%20Host%20With%20Multiple%20Infections%20-%20Rule
|
form.tag |
Displays notable events with the tag specified by this paramter. | malware, any custom tag value | form.tag=malware
|
form.srch |
Displays notable events that match the SPL specified in this parameter. HTML-encode special characters such as = for key-value pairs. |
dest=127.0.0.1 | form.srch=dest%3D127.0.0.1
|
form.security_domain_form |
Displays notable events in the security domain specified by this parameter. | access, endpoint, network, threat, identity, audit | form.security_domain_form=endpoint
|
earliest= and latest= |
Displays notable events in the time range specified by these parameters. Specify a relative time range. HTML-encode special characters such as @. | -24h@h, now | earliest=-24h%40h&latest=now
|
form.new_urgency_count_form |
Displays notable events that do not have the urgency specified by this parameter. | critical, high, medium, low, informational | form.new_urgency_count_form=informational
|
| Send correlation search results to Splunk UBA to be processed as anomalies | Content Management |
This documentation applies to the following versions of Splunk® Enterprise Security: 4.5.0, 4.5.1, 4.5.2, 4.5.3
Feedback submitted, thanks!