Customize the menu bar in Splunk Enterprise Security with the Edit Navigation view. Add new dashboards, reports, views, links to filtered dashboards, or links to the web to your menu bar. You must have Enterprise Security administrator privileges to make changes to the menu bar navigation.
You can add views to the menu bar as part of a collection that groups several views together or as an individual item on the menu bar. For example, Incident Review is an individual dashboard in the menu bar, and Audit is a collection of the audit dashboards.
Splunk Enterprise Security persists customizations you made to the navigation from previous versions.
Check for updated views
Views and collections that are new, updated, or deprecated in the version of the app that you have installed are highlighted with small icons that indicate the relevant changes.
After installing a new version of Splunk Enterprise Security or a new version of an app that provides views and collections for use in Enterprise Security, visit the Edit Navigation view to check for updates in those views and collections.
- On the Enterprise Security menu bar, select Configure > General > Navigation.
- If any content has been updated, the message "Some content updates available" appears at the top of the navigation editor.
- Look for icons on the views on the editor pane to find content that has been added, updated, or deprecated. These same icons also appear in the Add a New View and Add a New Collection menus.
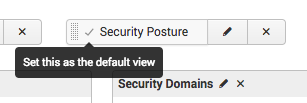
Set a default view for Splunk Enterprise Security
To see a specific view or link when you or another user opens Splunk Enterprise Security, set a default view.
- On the Enterprise Security menu bar, select Configure > General > Navigation.
- Locate the view or link that you want to be the default view.
- Click the checkmark icon that appears when you mouse over the view to Set this as the default view.
- Click Save to save your changes
- Click OK to refresh the page and view your changes.

- On the Enterprise Security menu bar, select Configure > General > Navigation.
- Click and drag views or collections of views to change the location of the views or collections of views in the menu.
- Click the X next to a view or collection to remove it from the menu.
- Click the
 icon to edit the name of a collection.
 - Click the
 icon to add a divider and visually separate items in a collection.
 - Click Save to save your changes
- Click OK to refresh the page and view your changes.
You can add a new view to the menu bar without adding it to a collection.
- On the Enterprise Security menu bar, select Configure > General > Navigation.
- Click Add a New View.
- Leave View Options set to the default of View.
- Click Select a View from Unused Views.
- Select a dashboard or view from the list.
- Click Save. The dashboard appears on the navigation editor.
- If you are finished adding items to the menu, click Save to save your changes
- Click OK to refresh the page and view your changes.
Use a collection to organize several views or links together in the menu bar.
- On the Enterprise Security menu bar, select Configure > General > Navigation.
- Click Add a New Collection.
- Type a Name. For example, Audit.
- Click Save. The collection appears on the navigation editor.
You must add a view or link to the collection before it appears in the menu navigation.
Add a view to an existing collection
Add views to an existing collection.
- On the Enterprise Security menu bar, select Configure > General > Navigation.
- Locate the collection that you want to add views to.
- Click the
 icon.
icon. - Leave View Options set to the default of View.
- Click Select a View from Unused Views.
- Select a view from the list.
- Click Save. The view appears on the navigation editor.
- If you are finished adding items to the menu, click Save to save your changes
- Click OK to refresh the page and view your changes.
You can add a link to the menu bar of Splunk Enterprise Security. For example, add a link to a specifically-filtered view of Incident Review or to an external ticketing system.
- On the Enterprise Security menu bar, select Configure > General > Navigation.
- Click Add a New View to add it to the menu, or locate an existing collection and click the icon to add the link to an existing collection of views.
- Select Link from View Options.
- Type a Name to appear on the Splunk Enterprise Security menu. For example, Splunk Answers.
- Type a link. For example, https://answers.splunk.com/
- Click Save.
- If you are finished adding items to the menu, click Save to save your changes
- Click OK to refresh the page and view your changes.
Add a link to a filtered view of Incident Review
A common link to add to the menu bar is a filtered view of Incident Review.
- Filter Incident Review with your desired filters. When you filter the dashboard, the URL updates with query string parameters matching your filters.
- In the web browser address bar, copy the part of the URL that starts with
/app/SplunkEnterpriseSecuritySuite/and paste it in a plain text file for reference.
For example, if you filtered the dashboard to show only critical notable events, the part of the URL that you copy looks like/app/SplunkEnterpriseSecuritySuite/incident_review?form.selected_urgency=critical. - On the Enterprise Security menu bar, select Configure > General > Navigation.
- Click Add a New View to add it to the menu, or locate an existing collection and click the Add View icon to add the link to an existing collection of views.
- Select Link from View Options.
- Type a Name to appear on the Splunk Enterprise Security menu. For example, IR - Critical.
- In the Link field, paste the URL section. For example,
/app/SplunkEnterpriseSecuritySuite/incident_review?form.selected_urgency=critical - Click Save.
- If you are finished adding items to the menu, click Save to save your changes.
- Click OK to refresh the page and view your changes.
If you add a link with multiple parameters you must modify the query string parameters by encoding the & separating the parameters as &. For example, type the link for a filtered view of Incident Review that shows new and unassigned notable events as /app/SplunkEnterpriseSecuritySuite/incident_review?form.status_form=1&form.owner_form=unassigned.
You can also construct a URL manually using the parameters in the following table. Use an asterisk to show all results for a specific parameter. Not all parameters are required.
| Parameter | Description | Possible values | Example |
|---|---|---|---|
form.selected_urgency |
Display notable events with the urgency specified by this parameter. | critical, high, medium, low, informational | form.selected_urgency=critical
|
form.status_form |
Display notable events with the status specified by this parameter. An integer corresponds to each status value. | 0 for unassigned, 1 for new, 2 for in progress, 3 for pending, 4 for resolved, 5 for closed | form.status_form=0
|
form.owner_form |
Display notable events owned by the user specified by this parameter. | usernames | form.owner_form=admin
|
form.source |
Display notable events created by the correlation search specified by this parameter. HTML-encode spaces in the correlation search name and use the name that appears in the notable event rather than the name that appears on Content Management. | Endpoint - Host With Multiple Infections - Rule | form.source=Endpoint%20-%20Host%20With%20Multiple%20Infections%20-%20Rule
|
form.rule_name |
Display notable events created by the correlation search specified by this parameter. HTML-encode spaces in the correlation search name. Use the name that appears on Content Management. | Host With Multiple Infections | form.rule_name=Host%20With%20Multiple%20Infections
|
form.tag |
Displays notable events with the tag specified by this paramter. | malware, any custom tag value | form.tag=malware
|
form.srch |
Displays notable events that match the SPL specified in this parameter. HTML-encode special characters such as = for key-value pairs. |
dest=127.0.0.1 | form.srch=dest%3D127.0.0.1
|
form.security_domain_form |
Displays notable events in the security domain specified by this parameter. | access, endpoint, network, threat, identity, audit | form.security_domain_form=endpoint
|
earliest= and latest= |
Displays notable events in the time range specified by these parameters. Specify a relative time range. HTML-encode special characters such as @. | -24h@h, now | earliest=-24h%40h&latest=now
|
form.new_urgency_count_form |
Displays notable events that do not have the urgency specified by this parameter. | critical, high, medium, low, informational | form.new_urgency_count_form=informational
|
form.selected_urgency |
Displays notable events that have the urgency specified by this parameter. Use multiple instances of this parameter to select multiple urgency settings. | critical, high, medium, low, informational | form.selected_urgency=critical&form.selected_urgency=high
|
To restore the default navigation of the Splunk Enterprise Security menu bar:
- On the Enterprise Security menu bar, select Configure > General > Navigation.
- In the upper right corner, click Restore Default Configuration.
- Click OK to confirm.
- Scroll to the bottom of page and click Save.
| Manage permissions in Splunk Enterprise Security | Configure per-panel filtering in Splunk Enterprise Security |
This documentation applies to the following versions of Splunk® Enterprise Security: 4.7.0, 4.7.1, 4.7.2, 4.7.3, 4.7.4, 4.7.5, 4.7.6
Feedback submitted, thanks!