Example forwarder deployment topologies
You can deploy universal forwarders in a wide variety of scenarios. This topic provides an overview of some of the most useful types of topologies that you can create with universal forwarders.
Data consolidation topology
Data consolidation is one of the most common topologies, with multiple forwarders sending data to a single Splunk deployment. The scenario involves universal forwarders that send unparsed data from hosts to a central Splunk deployment for consolidation and indexing.
For more information on data consolidation, see Consolidate data from multiple hosts.
In the following diagram, three universal forwarders send data to a single indexer:
Load balancing topology for Splunk Enterprise
Load balancing simplifies the process of distributing data across several indexers to handle considerations such as high data volume, horizontal scaling for enhanced search performance, and fault tolerance. In load balancing, the forwarder routes data sequentially to different indexers at specified intervals.
For more information on how to configure load balancing, see Configure load balancing.
In the following diagram, three universal forwarders are each performing load balancing between two indexers:
Forwarders and indexer clusters for Splunk Enterprise
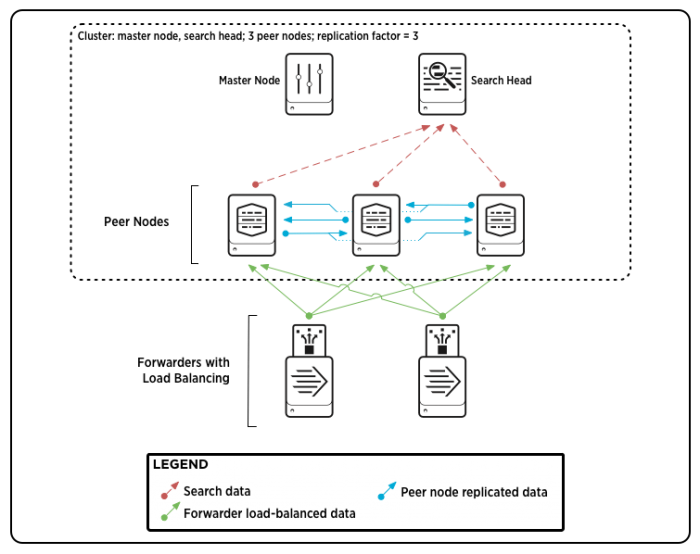
You can use universal forwarders to send data to peer nodes in an indexer cluster. It is recommended that you use forwarders in a load-balanced configuration for that purpose.
To learn more about universal forwarders and indexer clusters, see Use forwarders to get your data in Managing Indexers and Clusters of Indexers. To learn more about indexer clusters in general, see About indexer clusters and index replication, also in that manual.
This diagram shows two load-balanced forwarders sending data to a Splunk Enterprise indexer cluster:
Intermediate forwarding
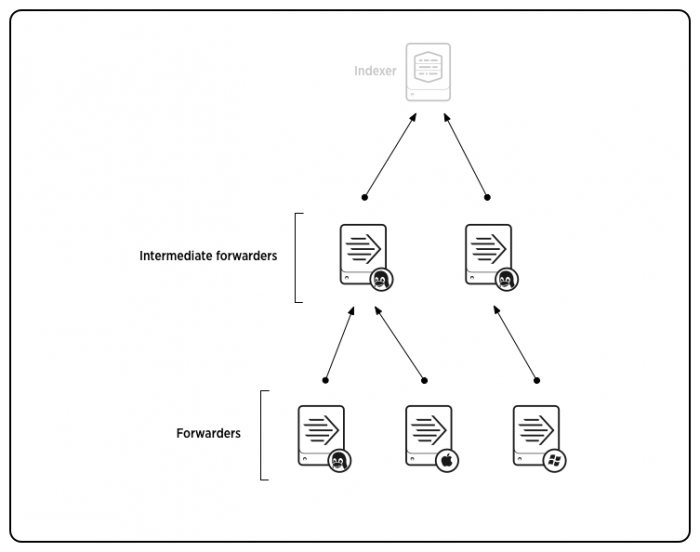
To handle some advanced use cases, you might want to insert an intermediate forwarder between a group of forwarders and the indexer. Universal forwarders can also act as intermediate forwarders.
In this type of scenario, the originating forwarders send data to a consolidating forwarder, which then forwards the data on to an indexer, usually after indexing it locally. This forwarder can also route and filter data, if it is a heavy forwarder.
Typical use cases are situations where you want to reduce or limit network bandwidth usage on specific network segments (for example, if you have multiple data centers around the world and want to limit bandwidth in a certain region) or if you have some need to limit access to the indexer machine; for instance, for security reasons.
You can also use intermediate forwarding when you need an intermediate index (either for "store-and-forward" requirements or to enable localized searching) but this requires a heavy forwarder.
To enable intermediate forwarding, see Configure an intermediate forwarder.
The following diagram shows a simple intermediate forwarding layout:
Minimize open ports for Splunk Cloud Platform
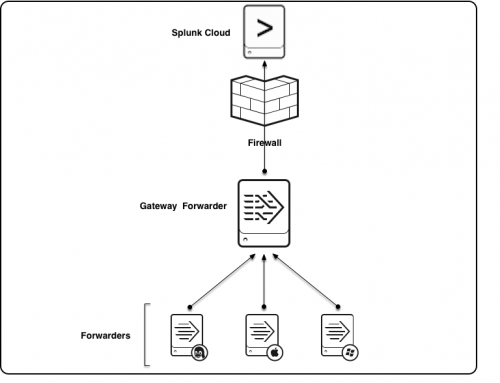
For security, you can minimize the number of open firewall ports required to send data from your network to Splunk Cloud Platform by configuring a gateway forwarder. In this approach, all your forwarders send data to a single gateway forwarder, which then sends data to Splunk Cloud. This approach also simplifies the administration of certificates and provides a single location where apps are installed.
You can also use a gateway forwarder to configure a single point for anonymizing data that is exiting your corporate environment. Configure a heavy forwarder as the gateway forwarder and specify the transforms required to hide sensitive information. For details about anonymizing data, see Anonymize Data in the Splunk Enterprise Getting Data In manual. If you do not need to anonymize or transform outbound data, configure a universal forwarder as your gateway forwarder.
To configure a universal forwarder instance as a gateway forwarder, perform the following steps.
- On the gateway forwarder, run the following command to enable listening:
/opt/splunkforwarder/bin/splunk enable listen <port> -auth <username>:<password>
- Restart the gateway forwarder.
- To configure another forwarder to send data to the gateway forwarder, run the following command:
/opt/splunkforwarder/bin/splunk add forward-server <host name or ip address>:<listening port>
- Restart the forwarder.
The following figure shows a basic gateway forwarder configuration that opens a single firewall port to direct data from three internal forwarders to Splunk Cloud Platform.
Routing and filtering
Universal forwarders cannot route, filter, or transform data because they do not have the frameworks necessary to perform those actions. However, you can configure a universal forwarder to send data to an intermediate forwarding tier that consists of heavy forwarders, which can route data based on criteria such as source, source type, or patterns in the events themselves.
For more information on routing and filtering, see Route and filter data in the Splunk Enterprise Forwarding Data Manual.
| Universal forwarder system requirements | Compatibility between forwarders and Splunk Enterprise indexers |
This documentation applies to the following versions of Splunk® Universal Forwarder: 7.0.0, 7.0.1, 7.0.2, 7.0.3, 7.0.4, 7.0.5, 7.0.6, 7.0.7, 7.0.8, 7.0.9, 7.0.10, 7.0.11, 7.0.13, 7.1.0, 7.1.1, 7.1.2, 7.1.3, 7.1.4, 7.1.5, 7.1.6, 7.1.7, 7.1.8, 7.1.9, 7.1.10, 7.2.0, 7.2.1, 7.2.2, 7.2.3, 7.2.4, 7.2.5, 7.2.6, 7.2.7, 7.2.8, 7.2.9, 7.2.10, 7.3.0, 7.3.1, 7.3.2, 7.3.3, 7.3.4, 7.3.5, 7.3.6, 7.3.7, 7.3.8, 7.3.9, 8.0.0, 8.0.1, 8.0.2, 8.0.3, 8.0.4, 8.0.5, 8.0.6, 8.0.7, 8.0.8, 8.0.9, 8.0.10, 8.1.0, 8.1.1, 8.1.2, 8.1.3, 8.1.4, 8.1.5, 8.1.6, 8.1.7, 8.1.8, 8.1.9, 8.1.10, 8.1.11, 8.1.12, 8.1.13, 8.1.14, 8.2.0, 8.2.1, 8.2.2, 8.2.3


 Download manual
Feedback submitted, thanks!