Integrate ITSI with Splunk On-Call
Integrate IT Service Intelligence (ITSI) with Splunk On-Call to correlate Splunk On-Call incidents with ITSI episodes. Your teams can collaborate with monitoring data inside the Splunk On-Call timeline to speed up incident response and remediation.
Prerequisites
| Requirement | Description |
|---|---|
| Splunk On-Call | You must have Splunk On-Call Alert Admin Permissions or greater. |
| ITSI roles | You must have the itoa_admin or itoa_team_admin role to set up the integration with Splunk On-Call. |
Set up the integration
Perform the following steps to integrate ITSI with Splunk On-Call:
1. Install and configure the Splunk On-Call app
- Install Splunk On-Call version 1.0.20 or later. See Splunk On-Call on Splunkbase.
- From the Splunk On-Call web portal, click the Integrations tab.
- Click Splunk ITSI.
- Click Enable Integration and copy the API key to the clipboard.
- Open the Splunk On-Call app and click Configuration > Alert API Key Configuration.
- Configure the following fields:
Field Description Name Provide a name for the API key. API Key The API key you copied in the previous step. Routing Key <Leave blank>
2. Test the integration
You're now ready to start creating Splunk On-Call incidents from ITSI.
- Within ITSI, navigate to Episode Review. If you configured the integration correctly, the option to Create an incident in Splunk On-Call appears in the Actions dropdown menu.
- To create an incident, follow the steps in Create a ticket in Splunk On-Call.
Note: The integration is unidirectional, so updates to Splunk On-Call tickets aren't reflected in ITSI.
Automate the process of creating Splunk On-Call incidents
Configure aggregation policy action rules to create and update Splunk On-Call incidents when certain trigger conditions are met. In the following example, you configure ITSI to create a critical incident in Splunk On-Call when an episode's severity is greater than Normal. You also create a rule to resolve the Splunk On-Call incident when the episode breaks, and automatically set the incident's status to RECOVERY, which resolves the incident.
1. Define a rule to create incidents in Splunk On-Call
Define the following aggregation policy action rule to open a critical Splunk On-Call incident when an episode is created in ITSI:
- Within ITSI, click Configuration > Notable Event Aggregation Policies.
- Open the aggregation policy you want to integrate with Splunk On-Call.
- Go to the Action Rules tab.
- Click Add Rule and configure trigger conditions for when to open a Splunk On-Call incident. For example, the following rule opens an incident each time an episode is created:
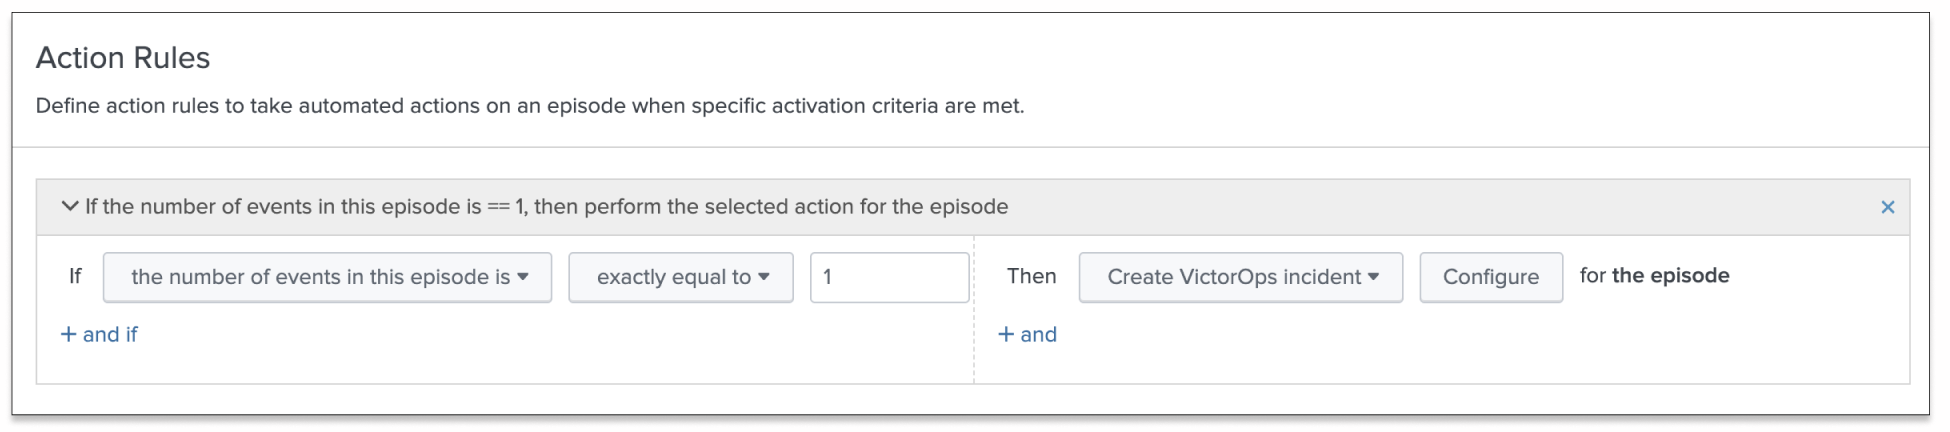
- Click Configure and configure the following fields:
For more information about configuring aggregation policy action rules, see Configure episode action rules in ITSI.Field Description Message Type CRITICALMonitoring Tool Splunk-ITSIAlert Entity ID $result.itsi_group_id$.Keep this ID consistent for all message types across related actions. Splunk On-Call uses this field to identify incidents and correlate subsequent alerts with the original incident. Once configured correctly, ITSI pipes directly into your Splunk On-Call timeline.
Alert Entity Display Name $result.itsi_group_title$State Message $result.itsi_group_title$Routing Key Optionally, configure a routing key to override the global Splunk On-Call routing key.

2. Define a rule to resolve incidents in Splunk On-Call
Within the same aggregation policy, configure the following action rule to resolve a Splunk On-Call incident when its corresponding episode is resolved in ITSI.
- Click Add Rule and configure an additional action rule for when an episode breaks:
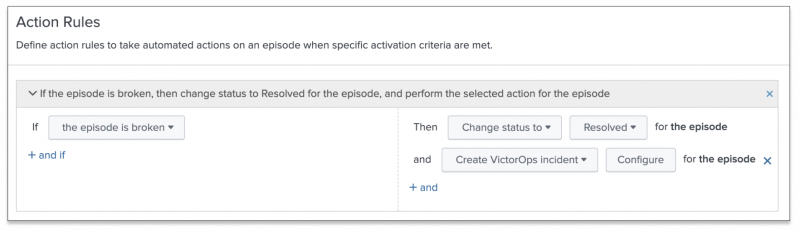
- Click Configure and configure the policy to change the incident's status to RECOVERY when the ITSI incident is resolved.
- Click Save to save the policy.

Manually acknowledge a Splunk On-Call incident
Once a Splunk On-Call ticket is created from an ITSI episode, you can manually acknowledge that incident.
- From the ITSI main menu, click Episode Review.
- Select an episode that is currently linked to a Splunk On-Call ticket.
- Click Actions > Create Splunk On-Call incident.
- Configure the following fields:
Field Description Message Type ACKNOWLEDGEMENTMonitoring Tool Splunk-ITSI.Alert Entity ID $result.itsi_group_id$Alert Entity Display Name $result.itsi_group_title$State Message $result.itsi_group_title$Routing Key Optionally, configure a routing key to override the global Splunk On-Call routing key. - Click Done. Check the Activity tab to confirm the action ran successfully.
Enable non-admins to test and send alerts
Non-admin roles creating incidents through the Episode Review Actions must be assigned certain permissions. To provide non-admin roles the ability to create and test incidents, assign them the following capabilities:
- execute-notable_event_action
- write-notable_event
- delete-notable_event
- list_storage_passwords
- victorops_user
Set Splunk On-Call fields to reasonable defaults
Rather than manually typing in the Splunk On-Call incident creation fields each time you create an incident, you can set the fields to reasonable defaults.
Prerequisites
- Only users with file system access, such as system administrators, can modify default fields using a configuration file.
- Review the steps in How to edit a configuration file in the Admin Manual.
Never change or copy the configuration files in the default directory. The files in the default directory must remain intact and in their original location.
Steps
- Open or create a local version of
alert_actions.confin$SPLUNK_HOME/etc/apps/victorops_app/local. - Add the following stanza:
[victorops]
disabled = 0
param.entity_id = ITSI Alert: $result.itsi_group_id$
param.entity_display_name = ITSI Alert: $result.itsi_group_title$
param.monitoring_tool = Splunk-ITSI
| Integrate ITSI with BMC Remedy | Integrate ITSI with Splunk SOAR |
This documentation applies to the following versions of Splunk® IT Service Intelligence: 4.11.0, 4.11.1, 4.11.2, 4.11.3, 4.11.4, 4.11.5, 4.11.6, 4.12.0 Cloud only, 4.12.1 Cloud only, 4.12.2 Cloud only, 4.13.0, 4.13.1, 4.13.2, 4.13.3, 4.14.0 Cloud only, 4.14.1 Cloud only, 4.14.2 Cloud only, 4.15.0, 4.15.1, 4.15.2, 4.15.3, 4.16.0 Cloud only, 4.17.0, 4.17.1, 4.18.0, 4.18.1, 4.19.0, 4.19.1, 4.19.2, 4.19.3, 4.19.4, 4.20.0, 4.20.1
Feedback submitted, thanks!