Import entities from a CSV file in ITSI
You can import entities from CSV files that contain one or more entity definitions. Importing entities from CSV files is an efficient way to define multiple entities. You can dump data from a change management database (CMDB) or asset inventory database into a CSV file and automate the import for ongoing updates.
ITSI uses the itsiimportobjects command to import entities from a CSV file. All events your Splunk platform deployment indexes from a CSV file is stored in the itsi_import_objects index. Each event has the itsi_import_objects:csv source type.
You can't set up a recurring entity import from a CSV file. To configure recurring entity imports from data that's stored in a CSV file, you have to configure a universal forwarder to monitor the CSV file and send data to your Splunk platform deployment, run an entity import from a Splunk search, and configure a recurring import from the Splunk search. For more information, see Set up a recurring entity import from a CSV file.
You can import a maximum of 50,000 entities at a time. If you attempt to import more than 50,000 entities, only the first 50,000 are imported.
Prerequisites
| Requirement | Description |
|---|---|
| ITSI role | You have to log in as a user with the itoa_admin, or a user with the itoa_team_admin role with write access to the global team, and write permissions to import entities and services. |
| CSV file |
You have to have a CSV file that contains entity definitions. Specify column names in the first row. In each subsequent row, specify an entity title and entity type, as well as one or more entity aliases, and one or more entity information fields. To associate an entity with a service, provide a column with the name of the service. Importing from a CSV file has a limit of one service and one entity per row. There is no limit on the number of dependent services, entity aliases, or entity rule values per row. A CSV file can contain multiple rows. Importing from a CSV file supports five different separators: comma (,), semicolon (;), pipe (|), tab (\t), and caret (^). |
Steps
In this example you want to create two entities called appserver-04 and appserver-05, and associate appserver-04 with the Web A service and associate appserver-05 with the Web B service. The Web A service already exists in ITSI but the Web B service doesn't.
The following image shows the CSV file to import:

- Go to Configuration > Entity Management.
- Select Create Entity > Import from CSV. If your role doesn't have write access to Global team, the New Entity button isn't available.
- Select browse... and select your CSV file. Or drag your CSV file into Import CSV area.
The CSV file uploads and a file preview appears.

- Select Next.
- Under Import Column As, select the appropriate column type for each column.
You can edit the Column Name field for columns that you import as Entity Title, Entity Alias, and Entity Information, for custom field mappings.Column type Description Entity Title Makes the column entry the entity title. The column is also added as an Entity Alias using <column name> = <value>.Entity Description Makes the column entry a description of the entity. Entity Alias Makes the column entry a searchable entity identifier. Event Data Search uses aliases to populate recent log events for an entity in the entity health page.
When creating an entity alias, make sure the key-value pair is unique. ITSI relies on alias key-value pairs to identify entities in visualizations such as Service Analyzer and Episode Review. To identify any duplicate entity aliases in your environment, see the Check for Duplicate Entity Aliases panel of the ITSI Health Check dashboard.
Entity Information field Makes the column entry a tag that provides user-facing validation. Information fields are like common fields and can have the same values across entities. For example, an info field like datacenter=vault13can be common to all the entities of the same data center.Entity Type Associates the entity with an existing entity type that matches the column entry. If the entity type doesn't already exist, you have to create it first. ITSI ignores entity type column entries that don't already exist. Service Title Makes the column entry the name of the service to associate the entity with. The service will be created if it does not already exist. Service Description Makes the column entry the description of the service. Do Not Import Removes the column entry from the imported data. - Configure the following options in the Settings section:
Option Description Service Team (Only displays if you are importing services.)
The team to create the services in. Import Services As (Only displays if you are importing services.)
Whether services are enabled or disabled upon import. Conflict Resolution Determines how ITSI updates and stores your entity data: - Skip Over Existing Entities: Adds new entity data to the datastore only if the entity doesn't already exist. If an entity already exists, the entity is not updated.
- Update Existing Entities: Merges the imported data and the existing data associated with the entity. Uses the Conflict Resolution field to identify the entity.
- Replace Existing Entities: Replaces existing entity data with new entity data. Uses the Conflict Resolution field to identify the entity.
Conflict Resolution Field The field used to merge on. Entities that have the same field value are considered to be the same entity. For example, if there is an entity defined with the same IP, then merge into that entity. If Conflict Resolution is set to Update Existing Entities or Replace Existing Entities, ITSI resolves duplicate entities based on this field. For this example, you are using Update Existing Entities and
For more information about Conflict Resolution, see Resolve conflicts during ITSI entity imports.hostfor the Conflict Resolution field. - In the Preview section, select Entities to be imported to confirm that your entity import configuration is correct. The preview shows the entity information you're importing. It doesn't show the final merged entity values.
- Select Import.
- Select View all Entities and View all Services to confirm that your imported entities and services appear.
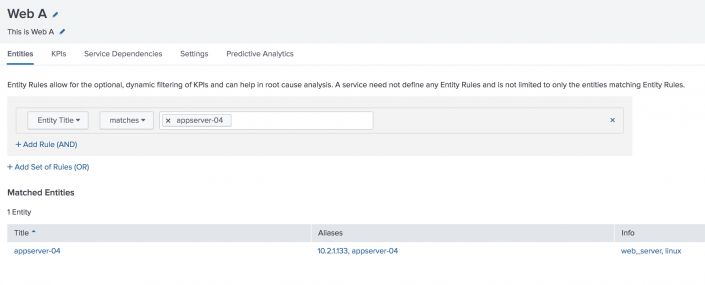
For example, for service Web A, which already existed, an Entity Title matching rule is added forappserver-04.appserver-04is listed in the table of matching entities and the aliases and Information fields have been added to the entity from the CSV file.
The service Web B was created and the Entity Title matching rule was added forappserver-05. View theappserver-05listed in the table of matching entities at the bottom and the Aliases and Info fields added to the entity from the CSV file.


In this example, you want to map the columns in the CSV file to the following fields in ITSI:


| Import entities from a search in ITSI | Overview of ITSI entity discovery searches |
This documentation applies to the following versions of Splunk® IT Service Intelligence: 4.11.0, 4.11.1, 4.11.2, 4.11.3, 4.11.4, 4.11.5, 4.11.6, 4.12.0 Cloud only, 4.12.1 Cloud only, 4.12.2 Cloud only, 4.13.0, 4.13.1, 4.13.2, 4.13.3, 4.14.0 Cloud only, 4.14.1 Cloud only, 4.14.2 Cloud only, 4.15.0, 4.15.1, 4.15.2, 4.15.3, 4.16.0 Cloud only, 4.17.0, 4.17.1, 4.18.0, 4.18.1, 4.19.0, 4.19.1, 4.19.2, 4.19.3, 4.19.4, 4.20.0, 4.20.1
Feedback submitted, thanks!