Develop and package a custom machine learning model in MLTK
You can leverage the ML-SPL API to bring a model trained outside of MLTK, into MLTK.
Perform the following high-level steps to deploy a pre-trained model in MLTK:
- Pre-train the model in your preferred environment.
- Create an MLTK algorithm.
- Generate the .mlmodel artifact.
- Add the model to MLTK.
Pre-train the model in your preferred environment
Your pre-trained model must be built using python libraries that exist in the Python for Scientific Computing (PSC) add-on. These libraries include standard numerical and ML libraries such as pandas, numpy, scikit-learn, scipy, statsmodels, and networkx.
Train the model in the environment of choice. The model must rely on Python libraries. Save the model in a standard file format such as pickle or ONNX.
Create an MLTK algorithm
If the model you are training utilizes algorithms and options that are supported by MLTK you will not need to create a new MLTK algorithm. If, however, you are utilizing an algorithm that is not supported by MLTK, then you will need to create and add a custom algorithm to MLTK.
To review the algorithms supported by MLTK, see Algorithms in the Machine Learning Toolkit.
To learn how to create and add a custom algorithm to MLTK, see Add a custom algorithm to the Machine Learning Toolkit.
If you are not intending on re-training the model in the Splunk platform you do not have to write much code for the fit stage of the algorithm. You can focus on the apply stage of the process.
Generate the .mlmodel artifact
MLTK models generated by the fit command are stored as an .mlmodel artifact in the lookups folder of the application they are trained in. The artifact is a CSV file that contains three columns that allow MLTK to instantiate a specific algorithm with the provided model parameters and options.
When working with a pre-trained model, you must create this .mlmodel artifact in an offline manner. In order to populate the CSV with the correct data, encode the pre-trained model with MLTK codecs, and capture the model options that you want to use.
Specifically the MLTK model file must have the following headers in the CSV: algo, model, and options, as described in the following table:
| Required CSV header name | Required information | Description |
|---|---|---|
algo
|
Algorithm name | Match this name to the name of the MLTK algorithm or the name of the custom algorithm to which you want to apply your pre-trained model. |
model
|
Model details | Use the base models class from MLTK and the MLTK codecs to encode the model details. |
options
|
Model options | Alongside feature variables, target variables, and algorithm options this should be a json object that also includes the model_name, algo_name and mlspl_limits. For details, see Available fields in the mlspl.conf file. |
The following data is required for each of the columns that must be written to the CSV model file.
Header name: algo
The algorithm name you want to use in MLTK for your pre-trained model. For example, if you have a pre-trained linear regression model that you want to apply in MLTK and you use the existing MLTK codebase for running the inference, you would use "LinearRegression" for the algo name in the CSV file.
If you were instead using a custom algorithm, use the name you gave that custom algorithm for the algo name in the CSV file. For example, if you have a custom algorithm called MyCustomAlgo and want to run the inference using that custom algorithm, you would input "MyCustomAlgo" for the algo name in the CSV file.
Ensure the algo name in the CSV is an exact match to the name of the algorithm as it appears in the MLTK app, or as you named the custom algorithm.
Header name: model
To create the CSV data for your pre-trained model you need to use some of the existing MLTK python scripts, namely the codecs.py and base.py scripts in the bin/codec and bin/models directories, respectively:
- The base model class allows you to create an MLTK model
- The codecs script allows you to encode the model in a format MLTK can interpret when calling the
applycommand.
The following example code demonstrates how you can use these MLTK python scripts to encode a model. The encode process is comprised of a series of high level steps as follows:
- The code reads the pre-trained model. In this example the pre-trained model has been saved as a pickle file.
- The code creates an MLTK model using the appropriate algo script. In this example, the LinearRegression algorithm that ships with MLTK and not a custom algorithm.
- The code applies some options to the MLTK model and applies the pre-trained model details to the MLTK model.
- The MLTK model is encoded.
import pickle
from codec.codecs import SimpleObjectCodec
from algos.LinearRegression import LinearRegression
import models.base as mb

pre_trained_model = pickle.load(open("/path/to/my/pre-trained/model", 'rb'))

mltk_model=LinearRegression()
mltk_model.target_variable=["target_variable_name"]
mltk_model.feature_variables=["feature","variable","names"]
mltk_model.columns=["feature","and","target","variables"]
mltk_model.estimator=pre_trained_model
mltk_model.register_codecs()
model_details=mb.encode(mltk_model)
This action should be run from the command line in a python shell from the SPLUNK_HOME/etc/apps/Splunk_ML_Toolkit/bin directory. Doing so provides access to the codecs, algo, and base model scripts, making sure the "SPLUNK_HOME" environment variable has been set. If you need to set the "SPLUNK_HOME" variable run the following command in your Python shell: os.environ["SPLUNK_HOME"]=/path/to/splunk/
Header name: options
The final data point required for the CSV model file is options. The model options schema is as follows:
{
"args": ["list","your","input","arguments","here"],
"target_variable": ["target_variable_name"],
"feature_variables": ["feature","variable","names"],
"model_name": "model_name",
"algo_name": "algo_name",
"mlspl_limits": {
	"handle_new_cat": "default",
            "max_distinct_cat_values": "100",
            "max_distinct_cat_values_for_classifiers": "100",
            "max_distinct_cat_values_for_scoring": "100",
            "max_fit_time": "600",
            "max_inputs": "100000",
            "max_memory_usage_mb": "1024",
            "max_model_size_mb": "15",
            "max_score_time": "600",
            "use_sampling": "true"
},
"kfold_cv": None
}
Add the model to MLTK
You can now add the model to MLTK. Take the .mlmodel artifact that was written in the previous step and copy it into the lookups folder of MLTK. You could also copy this .mlmodel artifact to other suitable Splunk apps in the same way.
You might need to check the permissions of the .mlmodel file to ensure your users have access.
Example: Use an existing MLTK algorithm
The following example leverages an existing MLTK algorithm to package a model built outside of MLTK.
The high-level steps in this example are as follows:
This example uses some of the BOTSv2 data and trains a simple Random Forest Classifier to predict the host based on the event code and event count using the Python SDK.
Pre-train the model
The example code to query the data and train a classifier is as follows:
import io, os, sys, types, datetime, math, time, glob
from datetime import datetime, timedelta

import splunklib.client as client
import splunklib.results as results
import pandas as pd
import numpy as np

from sklearn.ensemble import RandomForestClassifier
from sklearn.model_selection import train_test_split

HOST = "localhost"
PORT = 8089
USERNAME = "user_name"
PASSWORD = "user_password"

# Create a Service instance and log in
service = client.connect(
    host=HOST,
    port=PORT,
    username=USERNAME,
    password=PASSWORD)

# Run an export search and display the results using the results reader.
kwargs_export = {"earliest_time": "0",
                 "latest_time": "now",
                 "enable_lookups": "true",
                 "parse_only": "false",
                 "count": "0"}
searchquery_export = """search index=botsv2 source="*WinEventLog:Security" earliest=1503183600 latest=1504306800
        | bin _time span=1h
        | eval key=host."|".user."|".EventCode
        | stats count by _time key
        | makemv key delim="|"
        | eval DayOfWeek=strftime(_time,"%a"), host=mvindex(key,0), user=mvindex(key,1), EventCode=mvindex(key,2)
        | eval key=mvjoin(key, "|")"""

exportsearch_results = service.jobs.oneshot(searchquery_export, **kwargs_export)

# Get the results and convert them into a  pandas dataframe using the ResultsReader
reader = results.ResultsReader(exportsearch_results)

items=[]
for item in reader:
    items.append(item)

df=pd.DataFrame(items)

# Set our variables to use in the model training and testing
target_variable=df['host']
feature_variables=df[['count','EventCode']]

# Split into train and test datasets
feature_train, feature_test, target_train, target_test = train_test_split(feature_variables, target_variable, test_size=0.3, random_state=42)

# Train the random forest classifier
rfc=RandomForestClassifier()
rfc.fit(feature_train,target_train)
# Write the trained model to disk using pickle
pickle.dump(rfc,open('/path/to/my/pre-trained/model','wb')
Generate the .mlmodel artifact
The next step creates the .mlmodel artifact that MLTK needs to interpret the now trained model. The following code is run from the command line in a Python shell that is initiated in the Splunk_ML_Toolkit app directory.
import pickle
import os
os.environ["SPLUNK_HOME"]="/path/to/splunk/"

filename='/path/to/my/pre-trained/model'
rfc_model = pickle.load(open(filename, 'rb'))

algo_options={'target_variable':['host'],'feature_variables':['count','EventCode'],'columns': ['host','count','EventCode']}
options={"args": algo_options['target_variable'] + algo_options['feature_variables'],
         "target_variable": algo_options['target_variable'],
         "feature_variables": algo_options['feature_variables'],
        "model_name": "rfc_test",
        "algo_name": "RandomForestClassifier",
        "mlspl_limits": {
            "handle_new_cat": "default",
            "max_distinct_cat_values": "100",
            "max_distinct_cat_values_for_classifiers": "100",
            "max_distinct_cat_values_for_scoring": "100",
            "max_fit_time": "600",
            "max_inputs": "100000",
            "max_memory_usage_mb": "1024",
            "max_model_size_mb": "15",
            "max_score_time": "600",
            "use_sampling": "true"

        },
        "kfold_cv": None}

from codec.codecs import SimpleObjectCodec
from algos.RandomForestClassifier import RandomForestClassifier
import models.base as mb
import json
import csv

rfc=RandomForestClassifier()
rfc.target_variable=algo_options['target_variable']
rfc.feature_variables=algo_options['feature_variables']
rfc.columns=algo_options['columns']
rfc.estimator=rfc_model
rfc.register_codecs()
opaque=mb.encode(rfc)

with open("__mlspl_rfc_test.mlmodel","w") as fh:
    model_writer = csv.writer(fh)
    model_writer.writerow(['algo','model','options'])
    model_writer.writerow(['RandomForestClassifier',opaque,json.dumps(options)])
Package the model
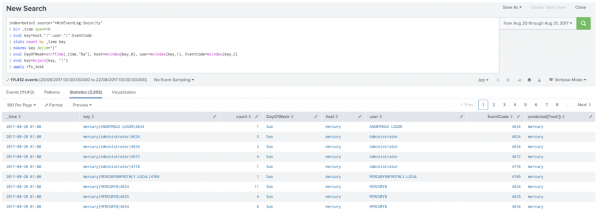
Package the model by copying the .mlmodel artifact and pasting it into the lookups folder of the Splunk app that you want to apply it in. Once the artifact is copied into the relevant lookups directory, it can be applied in the Splunk platform as shown in the following image:
Example: Use a custom MLTK algorithm
The following example leverages a custom MLTK algorithm to package a model built outside of MLTK.
The high-level steps in this example are as follows:
The model in this example is trained entirely using scikit-learn, and encapsulated in a pipeline. This is a good pattern to ensure compatibility with PSC, run efficiently on the CPU, and enable easy model packaging.
Pre-train the model
The following simple text classifier identifies unusual scripts in command line arguments:

Create an MLTK algorithm
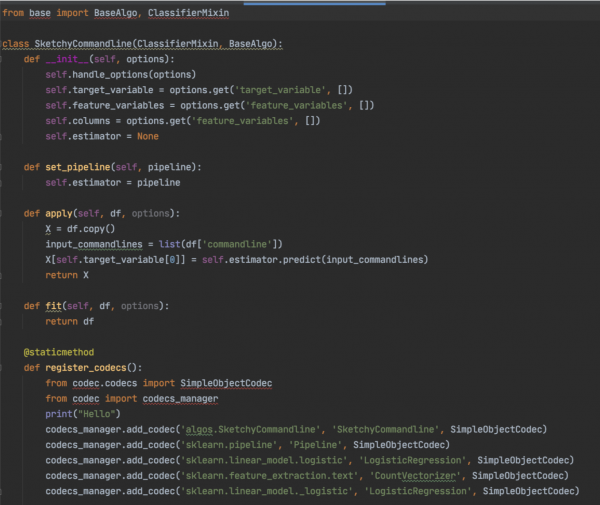
The following code is the text classifier for suspicious command line scripting:

The amount of code is minimal because the model is a scikit learn pipeline. Since the model does not need to be fit, it is returned in a dataframe of the fit command. The apply function is where you perform machine learning inference.
There is one method that is specific to this process and not found in other MLTK algorithms: set_pipeline. This one line assigns to the estimator field a model. This is not used by MLTK, but solely for packaging an .mlmodel artifact. By creating an instance of this algorithm with the pre-trained model, it allows for serialization, and MLTK at runtime will have the proper pre-trained model instantiated in the estimator field.
Once this code is written, you can perform the following actions:
- Add the algorithm implementation under bin/ where the package name can be chosen by the app author
- Add a stanza to register the algorithm under local/algos.conf
- Add a stanza to metadata/local.meta that exports the previous algorithm configuration to the system
Generate the .mlmodel artifact
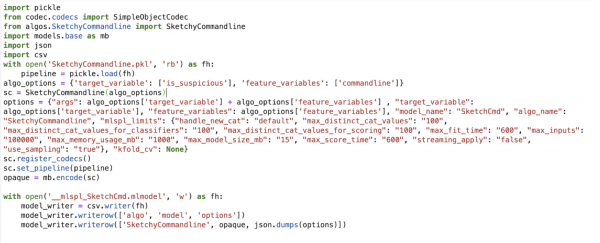
The following snippet of code shows how a CI/CD process takes the algorithm and pre-trained model and creates an artifact that MLTK can load and apply.
The codec and models package are part of MLTK.
The functionality to encode a model in an offline way requires replicating the calls that MLTK would make in fitting data. The code instantiates a single instance of the algorithm which allows you to set the model. You call register_codecs to register the serializers so that the MLTK library can properly create an encoding of the object. During inference, MLTK will first instantiate the object with the constructor and then set the fields of the object with the encoded contents in the .mlmodel file.
The serialized file format is written in the last three lines. This can be done within MLTK, but given the simplicity of the file format it is done here.
Package the model
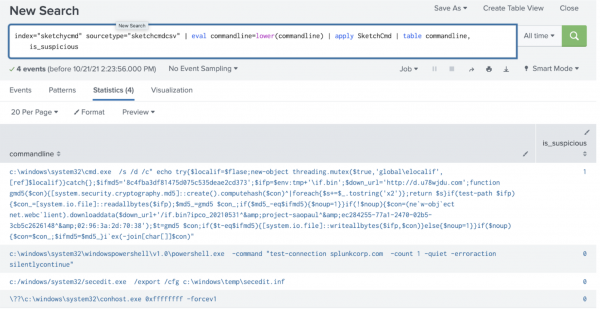
Once the model has been added to the lookups folder it is accessible using an SPL query, as shown in the following example:
| Learn about the Splunk Machine Learning Toolkit | Create user facing messages |
This documentation applies to the following versions of Splunk® Machine Learning Toolkit: 4.5.0, 5.0.0, 5.1.0, 5.2.0, 5.2.1, 5.2.2, 5.3.0, 5.3.1, 5.3.3, 5.4.0, 5.4.1, 5.4.2, 5.5.0, 5.6.0, 5.6.1


 Download manual
Feedback submitted, thanks!