Add the universal forwarder to the server class
This topic discusses adding the universal forwarder you installed in the previous step to the server class you defined on the deployment server. This phase is the final step in configuring the basic infrastructure for the Splunk App for Windows Infrastructure deployment - from here, you can use this procedure to add universal forwarders and server classes as needed.
Universal forwarder becomes deployment client
When you specified the deployment server during the universal forwarder installation process, the forwarder became what is known as a deployment client. Deployment clients connect to deployment servers and get apps and configurations, then activate and execute those apps and configurations locally.
Earlier, you created the "send to indexer" app, which was an outputs.conf file that provided instructions on how to send data to the indexer. You configured this file to send data to the indexer you set up at the beginning of this process. Now, you will complete the loop and deploy the app to any deployment clients that connect to the deployment server.
Confirm that deployment server can see the deployment client
The first part of this final step is to confirm that the universal forwarder you just installed phones home to the deployment server.
- Log into the Splunk indexer you set up previously.
- In the system bar, click Settings > Forwarder Management
- Click the Clients tab. You should see the universal forwarder you installed in the previous step. If you don't, confirm that the forwarder service is active and that its configuration points to this deployment server.
- Click the Server Classes tab.
- In the server class you created earlier ("Universal Forwarders"), click Edit, and in the pop-up that appears, click Edit Clients. Splunk Enterprise loads the "Edit clients" page.
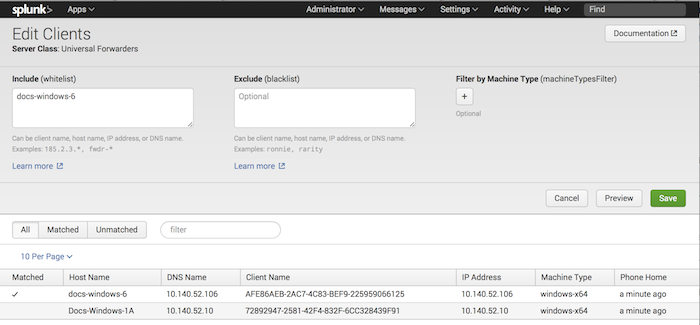 This page lists all clients that have connected to the deployment server. Those clients appear on the page below the Include, Exclude, and Filter by Machine Type controls at the top.
To add clients to the server class:
This page lists all clients that have connected to the deployment server. Those clients appear on the page below the Include, Exclude, and Filter by Machine Type controls at the top.
To add clients to the server class:
- In the Include (whitelist) field at the top of the page, type in the host name of the deployment client.
- Click Preview. Splunk Enterprise updates the list to show you which clients match the string you entered in the "Include (whitelist)" field.
- If the results look good to you, click Save. Splunk Enterprise returns you to the Forwarder Management page and deploys the "send to indexer" app to the deployment client.

Review server class status

To confirm that the deployment server has deployed the "send to indexer" app to the deployment client, revisit the server class properties page:
- From the Forwarder Management page, select the server class you created earlier by clicking its name in the list.
- Review the page.
- In the upper section, you should see the "sendtoindexer" app in the list of apps within the server class. On the right side of the page, in the "Clients" column, you should see that the app has been deployed to a client.
- In the lower section, you should see the universal forwarder you installed previously. On the right side of the page, in the "Deployed Apps" column, you should see that at least 1 app has been deployed.
If you don't see these entries, try the following steps to troubleshoot:
- Make sure the app is in the Splunk deployment apps folder on the deployment server.
- Confirm that you have configured the deployment client with the deployment server host name or IP address and management port.
- Confirm that you can contact the deployment server on its management port from the deployment client (make sure that a firewall does not block that access.)
Summary
To summarize, you have:
- Set up an indexer and configured it as a receiver.
- Created the "send to indexer" app, which tells universal forwarders to send data to this indexer.
- Activated deployment server by copying the "send to indexer" app from the Splunk apps directory to the deployment apps directory.
- Installed a universal forwarder and pointed it at the deployment server.
- Created a server class and added the "send to indexer" app and deployment client to the class.
You can use this procedure to add more apps and deployment clients to this server class. As clients come online and you add them to the server class, they get the "send to indexer" app which tells them to send data to the indexer. Once you bring all deployment clients online, you then complete basic setup of your Splunk App for Windows Infrastructure deployment.
If you need to make a change to the forwarding configuration, edit the outputs.conf file in the "send to indexer" app. After you restart Splunk Enterprise, the deployment server picks up the new changes and deploys them to all deployment clients that contact it. As you add indexers to scale the deployment, you can edit the configuration to instruct the deployment clients to send data to all indexers.
What's next?
The next step of setupis to get the Windows, and Active Directory data that is present on those hosts into the indexer. Read the next chapters to learn how to get this data into the Splunk Enterprise indexer.
| Install a universal forwarder on each Windows host | Download and configure the Splunk Add-on for Windows |
This documentation applies to the following versions of Splunk® App for Windows Infrastructure (EOL): 1.4.1, 1.4.2, 1.4.3, 1.4.4, 1.5.0, 1.5.1, 1.5.2, 2.0.0, 2.0.1, 2.0.2, 2.0.3, 2.0.4
Feedback submitted, thanks!