Use the driver with MicroStrategy
You can access Splunk Enterprise data from either MicroStrategy Analytics Desktop version 9.4.1 or later or MicroStrategy Analytics Enterprise version 9.4.1 or later using the Splunk ODBC Driver version 2.0 and later.
- Note: To access Splunk Enterprise data from MicroStrategy, ensure you've installed the 32-bit version of the Splunk ODBC Driver.
Connect MicroStrategy Analytics Desktop to Splunk data
To use the Splunk ODBC Driver to get Splunk data into MicroStrategy Analytics Desktop:
- Open MicroStrategy Analytics Desktop, and in the pane on the left, click Import, and then click Data.
- On the Select your data source page, click Database.
- In the Database connections pane, click the New connection button (the plus "+" icon).
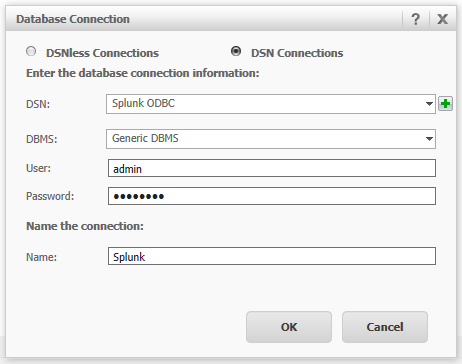
- In the Database connection window, select DSN Connections.
- For each entry under Enter the database connection information, do the following:
- DSN: Click the pop-up menu, and choose Splunk ODBC.
- DBMS: Leave the pop-up menu set to Generic DBMS.
- User: Enter your Splunk Enterprise username.
- Password: Enter the Splunk Enterprise password for the user you entered in User.
- Enter a name for the connection, and then click OK.

- In the Database connections pane, click the name that you gave the new connection. MicroStrategy Analytics Desktop connects to your Splunk Enterprise server.
- Important If at this point you see an ODBC error message, please contact MicroStrategy Support to request the "Splunk ODBC metadata fix." Once you apply the fix and restart MicroStrategy Analytics Desktop, you will be able to continue with these instructions. The fix is anticipated to be included in the next maintenance release of MicroStrategy Analytics Desktop.
The tables that appear in the Available tables pane map to the reports (also known as saved searches), data models, and data model objects that are defined in Splunk Enterprise and available to the logged in user. Data models and their objects are listed as follows: data_model_object in data_model. For example, if you wanted to use the Ticket Management data model and its Problem data model object, you would look for the entry in the table list called Problem in Ticket_Management.
To view a list of available columns in a table, click the Expand icon next to the table name. The columns in the table are listed, along with their data types.
To add a table to your imported data, drag the name of the table from the table list into the Editor panel in the middle of the page. The table and all the columns it contains appear in a box in the Editor panel.
For more information, see the MicroStrategy Analytics Desktop PDF documentation—specifically, the Select the data to be imported subsection of the Importing data from a database section.
Connect MicroStrategy Analytics Enterprise to Splunk data
- Note: This section describes how to get going with the Splunk ODBC Driver and MicroStrategy Analytics Enterprise. It assumes that MicroStrategy Intelligence and Web Server have been installed and configured. Splunk recommends you read the MicroStrategy Analytics Enterprise Installation and Configuration Guide for detailed information about connecting MicroStrategy to data sources via ODBC. Chapters 5 and 6, "Configuring and Connecting Intelligence Server," and "Deploying MicroStrategy Web and Mobile Server" are particularly useful for explaining how to configure the MicroStrategy suite. Depending on your installation, the guide is most likely located at the following path: Start menu -> All Programs -> MIcroStrategy Documentation -> Product Manuals -> Installation and Configuration Guide (PDF).
Once you've installed the Splunk ODBC Driver and configured MicroStrategy components, you have a choice of two methods with which to connect MicroStrategy to Splunk Enterprise data:
Data Import
Data Import mode in MicroStrategy Analytics Enterprise is similar to connecting to Splunk Enterprise with MicroStrategy Analytics Desktop, which is described in the previous section. You bring Splunk Enterprise data into MicroStrategy and use MicroStrategy to create visualizations with the data.
To use the Splunk ODBC Driver to get Splunk data into MicroStrategy Analytics Enterprise using Data Import mode:
- Open MicroStrategy Web, and log in to your Splunk project. If you haven't yet set up your Splunk project in MicroStrategy, see Chapter 5, "Configuring and Connecting Intelligence Server,"—and, in particular, the section titled "Communicating with databases: ODBC and DSNs"—to learn how to do so.
- In the pane on the left of the page, click Create, and then click Import Data.
- On the Select your data source page, click Database.
- In the Database connections pane, click the New connection button (the plus "+" icon).
- In the Database connection window, select DSN Connections.
- For each entry under Enter the database connection information, do the following:
- DSN: Click the pop-up menu, and choose Splunk ODBC.
- DBMS: Leave the pop-up menu set to Generic DBMS.
- User: Enter your Splunk Enterprise username.
- Password: Enter the Splunk Enterprise password for the user you entered in User.
- Enter a name for the connection, and then click OK.

- In the Database connections pane, click the name that you gave the new connection. MicroStrategy Analytics Desktop connects to your Splunk Enterprise server.
- Important If at this point you see an ODBC error message, please contact MicroStrategy Support to request the "Splunk 6.0 Object" and instructions to add the object. Once you apply the object and restart MicroStrategy, you will be able to continue with these instructions. The fix is anticipated to be included in the next maintenance release of MicroStrategy Analytics Enterprise.
The tables that appear in the Available tables pane map to the reports (also known as saved searches), data models, and data model objects that are defined in Splunk Enterprise and available to the logged in user. Data models and their objects are listed as follows: data_model_object in data_model. For example, if you wanted to use the Ticket Management data model and its Problem data model object, you would look for the entry in the table list called Problem in Ticket_Management.
To view a list of available columns in a table, click the Expand icon next to the table name. The columns in the table are listed, along with their data types.
To add a table to your imported data, drag the name of the table from the table list into the Editor panel in the middle of the page. The table and all the columns it contains appear in a box in the Editor panel.
Query Builder
In Query Builder mode, MicroStrategy sends queries to Splunk Enterprise over ODBC and displays the results in the selected visualization. Every time the visualization is refreshed, the Splunk Enterprise data is refreshed, providing real-time Splunk Enterprise data.
To use the Splunk ODBC Driver to get Splunk data into MicroStrategy Analytics Enterprise using Query Builder mode:
- Create a report the Query Builder interface in MicroStrategy Developer.
- Create a visualization on top of the report in MicroStrategy Web.
Create a report the Query Builder interface in MicroStrategy Developer
- Open MicroStrategy Developer, and log in to your Splunk project. If you haven't yet set up your Splunk project in MicroStrategy, see Chapter 5, "Configuring and Connecting Intelligence Server,"—and, in particular, the section titled "Communicating with databases: ODBC and DSNs"—to learn how to do so.
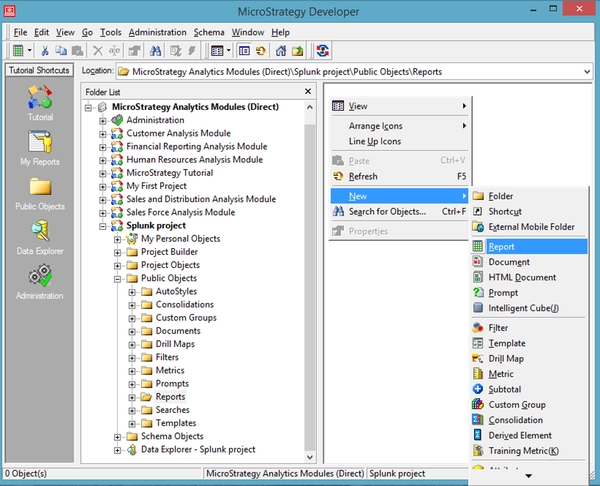
- In the pane on the left of the window, select your Splunk project, go to Public Objects -> Reports, and then right-click somewhere within the pane on the right. From the pop-up menu, point to New, and then click Report.

- In the New Grid window, click the Freeform Sources tab, and then click the New ODBC Source button.
- In the Database Instances window, enter a name for the database instance name, select Generic DBMS in the Database connection type pop-up menu, and then click New.
- In the Database Connections window, enter a name for the database connection, select Splunk ODBC DSN (or whatever you've called the Splunk ODBC Driver's DSN) under Local system ODBC data sources, and then click New.
- In the Database Login window, provide a database login name, login ID and password, and click OK.
- Back in the Database Connections window, select the newly created Splunk database login, and click OK.
- Back in the Database Instances window, select the newly created Splunk database connection, and click OK.
- Back in the New Grid window, select the newly created Splunk database instance. Then select Create Query Builder Report and click OK.
MicroStrategy Developer connects to your Splunk Enterprise server and provides an interface for query building just like in Data import mode. You can now create and save a report.
For more information about using Query Builder to create reports, see the “Customize your SQL queries: Query Builder” section of Chapter 11 of the MicroStrategy Advanced Reporting Guide. Depending on your installation, the guide is most likely located at the following path: Start Menu -> All Programs-> MicroStrategy Documentation -> Product Manuals -> Advanced Reporting Guide (PDF)
Create a visualization on top of the report in MicroStrategy Web
To create a visualization using a report in MicroStratregy Web:
- Open MicroStrategy Web, and log in to your Splunk project.
- In the pane on the left, click Create, and then select New Dashboard.
- On the Select Dataset page, under Use Existing, browse to the report created in the previous section, and then click Next.
You can now start creating visualizations on the report (dataset) connected to Splunk Enterprise.
| Use the driver with Tableau | How to take advantage of data model support in the Splunk ODBC Driver |
This documentation applies to the following versions of Splunk® ODBC Driver: 2.0
 Download manual
Feedback submitted, thanks!