Use a subsearch
In this section you will learn how to correlate events by using subsearches.
A subsearch is a search that is used to narrow down the set of events that you search on. The result of the subsearch is then used as an argument to the primary, or outer, search. Subsearches are enclosed in square brackets within a main search and are evaluated first.
Let's find the single most frequent shopper on the Buttercup Games online store, and what that shopper has purchased.
The following examples show why a subsearch is useful. Example 1 shows how to find the most frequent shopper without a subsearch. Example 2 shows how to find the most frequent shopper with a subsearch.
Example 1: Search without a subsearch
You want to find the single most frequent shopper on the Buttercup Games online store and what that shopper has purchased. Use the top command to return the most frequent shopper.
- Start a new search.
- Change the time range to All time.
- To find the shopper who accessed the online shop the most, use this search.
sourcetype=access_* status=200 action=purchase | top limit=1 clientipThe
limit=1argument specifies to return 1 value. Theclientipargument specifies the field to return.
This search returns oneclientipvalue, 87.194.216.51, which you will use to identify the VIP shopper. The search also returns a count and a percent. These are the default fields returned with thetopcommand. - You now need to run another search to determine how many different products the VIP shopper has purchased. Use the
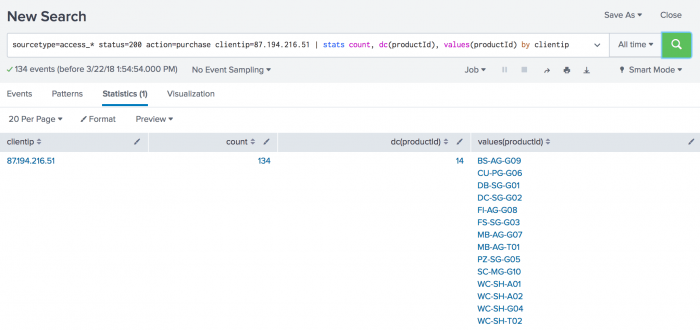
statscommand to count the purchases by this VIP customer.sourcetype=access_* status=200 action=purchase clientip=87.194.216.51 | stats count, distinct_count(productId), values(productId) by clientipThis search uses several statistical functions with the
This search uses thestatscommand. An alias for thedistinct_count()function isdc().count()function to return the total count of the purchases for the VIP shopper. Thedc()function is the distinct_count function. Use this function to count the number of different, or unique, products that the shopper bought. Thevaluesfunction is used to display the distinct product IDs as a multivalue field.
The drawback to this approach is that you have to run two searches each time you want to build this table. The top purchaser is not likely to be the same person at any given time range.
Example 2: Search with a subsearch
Let's start with our first requirement, to identify the single most frequent shopper on the Buttercup Games online store.
- Copy and paste the following search into the Search bar and run the search. Make sure the time range is All time.
sourcetype=access_* status=200 action=purchase | top limit=1 clientip | table clientipThis search returns the clientip for the most frequent shopper,
clientip=87.194.216.51. This search is almost identical to the search in Example 1 Step 1. The difference is the last piped command,| table clientip, which displays the clientip information in a table.
Let's call this the most frequent shopper search.
To find what this shopper has purchased, you run a search on the same data. Let's call this the purchases search.When you use a subsearch, you are providing the result of the most frequent shopper search as one of the criteria for the purchases search.
The most frequent shopper search becomes the subsearch for the purchases search. The purchases search is referred to as the outer or primary search. Because you are searching the same data, the beginning of the outer search is identical to the beginning of the subsearch.
A subsearch is enclosed in square brackets [ ] and processed first when the search is parsed. - Copy and paste the following search into the Search bar and run the search.
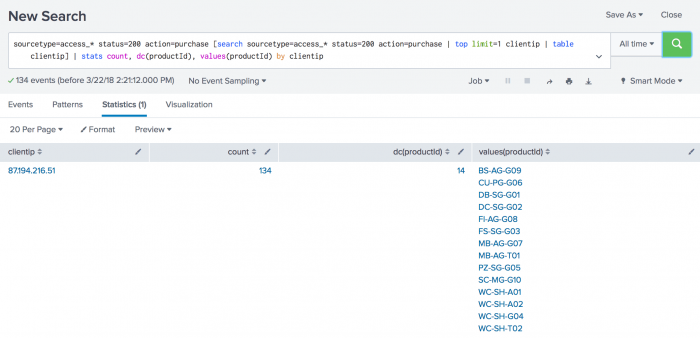
sourcetype=access_* status=200 action=purchase [search sourcetype=access_* status=200 action=purchase | top limit=1 clientip | table clientip] | stats count, distinct_count(productId), values(productId) by clientipBecause the
topcommand returns the count and percent fields, thetablecommand is used to keep only theclientipvalue.These results should match the result of the two searches in Example 1, if you run it on the same time range. If you change the time range, you might see different results because the top purchasing customer will be different.
The performance of this subsearch depends on how many distinct IP addresses match
status=200ANDaction=purchase. If there are thousands of distinct IP addresses, thetopcommand has to keep track of all of those addresses before the top 1 is returned, impacting performance. By default, subsearches return a maximum of 10,000 results and have a maximum runtime of 60 seconds. In large production environments, it is possible that the subsearch in this example will timeout before it completes. The best option is to rewrite the query to limit the number of events that the subsearch must process. Alternatively, you can increase the maximum results and maximum runtime parameters.You can make the information more understandable by renaming the columns.
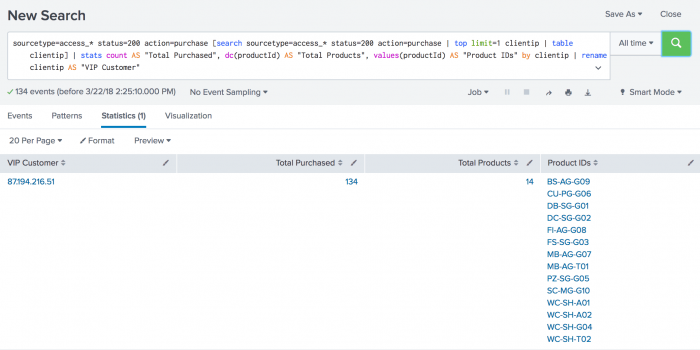
Column Rename count Total Purchased dc(productId) Total Products values(productId) Product IDs clientip VIP Customer You rename columns by using the AS operator on the fields in your search. If the rename that you want to use contains a space, you must enclose the rename in quotation marks.
- To rename the fields, copy and paste the following search into the Search bar and run the search.
sourcetype=access_* status=200 action=purchase [search sourcetype=access_* status=200 action=purchase | top limit=1 clientip | table clientip] | stats count AS "Total Purchased", distinct_count(productId) AS "Total Products", values(productId) AS "Product IDs" by clientip | rename clientip AS "VIP Customer" - Experiment with this search. What happens when you run the search over different time periods? What if you wanted to find the top product sold and how many people bought it?
Next step
This completes Part 4 of the Search Tutorial.
You have learned how to use fields, the Splunk search language, and subsearches to search your data. Continue to Part 5: Enriching events with lookups.
See also
About subsearches in the Search Manual
The top command in the Search Reference
The stats command in the Search Reference
| Use the search language | Enabling field lookups |
This documentation applies to the following versions of Splunk® Enterprise: 7.1.0, 7.1.1, 7.1.2, 7.1.3, 7.1.4, 7.1.5, 7.1.6, 7.1.7, 7.1.8, 7.1.9, 7.1.10, 7.2.0, 7.2.1, 7.2.2, 7.2.3, 7.2.4, 7.2.5, 7.2.6, 7.2.7, 7.2.8, 7.2.9, 7.2.10


 Download manual
Feedback submitted, thanks!