Add a regular expression field
You can add a regular expression field to any dataset in your data model. Regular expression fields turn the named groups in regular expression strings into separate data model fields. You can arrange for the regular expression to extract fields from the _raw event text as well as specific field values.
- In the Data Model Editor, open the dataset you'd like to add a regular expression field to.
- For an overview of the Data Model Editor, see Design data models.
- Click Add Field and select Regular Expression.
- This takes you to the Add Fields with a Regular Expression page.
- Under Extract From select the field that you want to extract from.
- The Extract From list should include all of the fields currently found in your dataset, with the addition of
_raw. If your regular expression is designed to extract one or more fields from values of a specific field, choose that field from the Extract From list. On the other hand, if your regular expression is designed to parse the entire event string, choose _raw from the Extract From list.
- The Extract From list should include all of the fields currently found in your dataset, with the addition of
- Provide a Regular Expression.
- The regular expression must have at least one named group. Each named expression in the regular expression is extracted as a separate field. Field names cannot include whitespace, single quotes, double quotes, curly braces, or asterisks.
- After you provide a regular expression, the named group(s) appear under Field(s).
- Note: Regular expression fields currently do not support sed mode or sed expressions.
- (Optional) Provide different Display Name values for the field(s).
- Field Display Name values cannot include asterisk characters.
- (Optional) Correct field Type values.
- They will be given String by default.
- (Optional) Change field Flag values to whatever is appropriate for your needs.
- (Optional) Click Preview to get a look at how well the fields are represented in the dataset.
- For more information about previewing fields, see "Preview regular expression field representation," below.
- Click Save to save your changes.
- You will be returned to the Data Model Editor. The regular expression fields will be added to the list of calculated dataset fields.
For a primer on regular expression syntax and usage, see Regular-Expressions.info. You can test your regex by using it in a search with the rex search command. Splunk also maintains a list of useful third-party tools for writing and testing regular expressions.
Preview regular expression field representation
When you click Preview after defining one or more field extraction fields, Splunk software runs the regular expression against the datasets in your dataset that have the Extract From field you've selected (or against raw data if you're extracting from _raw) and shows you the results. The preview results appear underneath the setup fields, in a set of four or more tabbed pages. Each of these tabs shows you information taken from a sample of events in the dataset. You can determine how this sample is determined by selecting an option from the Sample list, such as First 1000 events or Last 24 hours. You can also determine how many events appear per page (default is 20).
If the preview doesn't return any events it could indicate that you need to adjust the regular expression, or that you have selected the wrong Extract From field.
The All tab
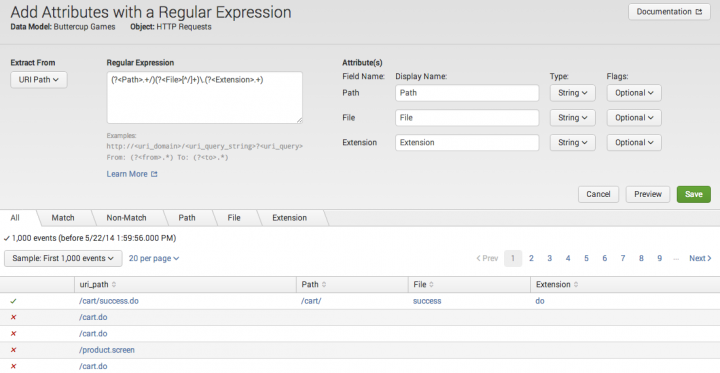
The All tab gives you a quick sense of how prevalent events that match the regular expression are in the event data. You can see an example of the All tab in action in the screen capture near the top of this topic.
It shows you an unfiltered sample of the events that have the Extract From field in their data. For example, if the Extract From field you've selected is uri_path this tab displays only events that have a uri_path value.
The first column indicates whether the event matched the regular expression or not. Events that match have green checkmarks. Non-matching events have red "x" marks.
The second column displays the value of the Extract From field in the event. If the Extract From field is _raw, the entire event string is displayed. The remaining columns display the field values extracted by the regular expression, if any.
The Match and Non-Match tabs
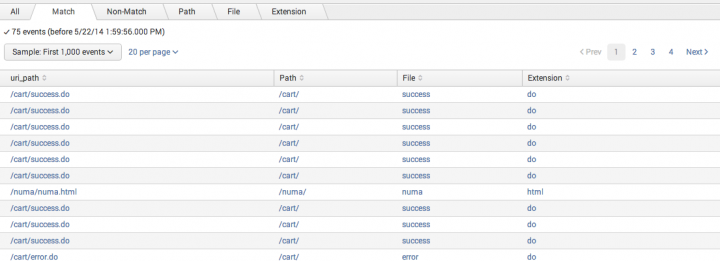
The Match and Non-Match tabs are similar to the All tab except that they are filtered to display either just events that match the regular expression or just events that do not match the regular expression. These tabs help you get a better sense of the field distribution in the sample, especially if the majority of events in the sample fall in either the matching or non-matching event set.
The field tab(s)
Each field named in the regular expression gets its own tab. A field tab provides a quick summary of the value distribution in the chosen sample of events. It's set up as a top values list, organized by Count and percentage. If you don't see the values you're expecting, or if the value distribution you are seeing seems off to you, this can be an indication that you need to fine-tune your regular expression.
You can also increase the sample size to find rare field values or values that appear further back in the past. In the example below, setting Sample to First 10,000 events uncovered a number of values for the path field that do not appear when only the first 1,000 events are sampled.
The top value tables in field tabs are drilldown-enabled. You can click on a row to see all of the events represented by that row. For example, if you are looking at the path field and you see that there are 6 events with the path /numa/, you can click on the /numa/ row to go to a list that displays the 6 events where path="/numa/".
| Add a lookup field | Add a Geo IP field |
This documentation applies to the following versions of Splunk® Enterprise: 7.0.0, 7.0.1, 7.0.2, 7.0.3, 7.0.4, 7.0.5, 7.0.6, 7.0.7, 7.0.8, 7.0.9, 7.0.10, 7.0.11, 7.0.13, 7.1.0, 7.1.1, 7.1.2, 7.1.3, 7.1.4, 7.1.5, 7.1.6, 7.1.7, 7.1.8, 7.1.9, 7.1.10, 7.2.0, 7.2.1, 7.2.2, 7.2.3, 7.2.4, 7.2.5, 7.2.6, 7.2.7, 7.2.8, 7.2.9, 7.2.10, 7.3.0, 7.3.1, 7.3.2, 7.3.3, 7.3.4, 7.3.5, 7.3.6, 7.3.7, 7.3.8, 7.3.9, 8.0.0, 8.0.1, 8.0.2, 8.0.3, 8.0.4, 8.0.5, 8.0.6, 8.0.7, 8.0.8, 8.0.9, 8.0.10, 8.1.0, 8.1.1, 8.1.2, 8.1.3, 8.1.4, 8.1.5, 8.1.6, 8.1.7, 8.1.8, 8.1.9, 8.1.10, 8.1.11, 8.1.12, 8.1.13, 8.1.14, 8.2.0, 8.2.1, 8.2.2, 8.2.3, 8.2.4, 8.2.5, 8.2.6, 8.2.7, 8.2.8, 8.2.9, 8.2.10, 8.2.11, 8.2.12, 9.0.0, 9.0.1, 9.0.2, 9.0.3, 9.0.4, 9.0.5, 9.0.6, 9.0.7, 9.0.8, 9.0.9, 9.0.10, 9.1.0, 9.1.1, 9.1.2, 9.1.3, 9.1.4, 9.1.5, 9.1.6, 9.1.7, 9.1.8, 9.1.9, 9.2.0, 9.2.1, 9.2.2, 9.2.3, 9.2.4, 9.2.5, 9.2.6, 9.3.0, 9.3.1, 9.3.2, 9.3.3, 9.3.4, 9.4.0, 9.4.1, 9.4.2


 Download manual
Feedback submitted, thanks!