Search actions
Splunk software provides a set of controls that you can use to manage "in process" searches and to create reports and dashboards.
Control search job progress
After you launch a search, you can access and manage information about the search job without leaving the Search view.
- After your search is running, paused, or finalized, click Job from the Search actions group.
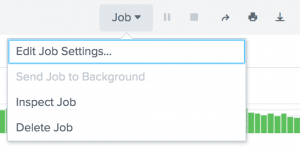
- Select an option from the list.
- Edit job settings. Opens the Job Settings dialog, where you can change the read permissions for the job, extend the job lifespan, and get a URL for the job. You can use the URL to share the job with others or to add a bookmark to the job in your Web browser.
- Send job to the background. Runs the job on the background. Use this option if the search job is slow to complete. This enables you to work on other activities, including running a new search job.
- Inspect job. Opens the Search Job Inspector window and displays information and metrics about the search job. You can select this action while the search is running or after the search completes. For more information, see View search job properties.
- Delete job. Deletes the current job, even if that job is running, paused, or has finalized. After you delete the job you can still save the search as a report.

For more information, see About jobs and job management.
Change the search mode
The search mode controls the search experience. The default search mode is Smart Mode.
- Fast Mode
- Speeds up searches by cutting down on the amount of event information that the search returns.
- Verbose Mode
- Returns as much event information as possible.
- Smart Mode
- Automatically toggles the search behavior between Fast Mode and Verbose Mode, based on the type of search that you are running.

For more information, see Search modes in this manual.
Save the results
The Save as menu lists options for saving the results of a search as a report, dashboard panel, alert, and event type.

- Report
- Saves a search as a report to use the search again later. You can run the report again from the Reports page. You access the Reports page from the App bar. Read more about how to Create and edit reports in the Reporting Manual.
- Dashboard Panel
- Generates a dashboard panel based on your search and add it to a new or existing dashboard. To learn more, see the Dashboard overview in the Dashboards and Visualizations manual.
- Alert
- Defines an alert based on your search. An alert runs a report in the background (either on a schedule or in real time). When the search returns results that meet a condition you have set in the alert definition, the alert is triggered. For more information, see the Alerting Manual.
- Event Type
- Classify events that have common characteristics. If the search does not include a pipe operator or a subsearch, you can use this option to save the search as an event type. For more information, see About event types and Define event types in Splunk Web in the Knowledge Manager manual.
Other search actions
Between the job progress controls and search mode selector are three buttons which enable you to Share, Export, and Print the results of a search.
- Click Share to share the job. When you select this, the job's lifetime is extended to 7 days and read permissions are set to Everyone. For more information about jobs, see About jobs and job management in this manual.
- Click Export to export the results. You can select to output to CSV, raw events, XML, or JSON and specify the number of results to export.
- Click Print to send the results to a printer that has been configured.
Additionally, use the Close button next to Save as menu to cancel the search and return to Splunk Home.
See also
| Help reading searches | Search modes |
This documentation applies to the following versions of Splunk® Enterprise: 7.1.0, 7.1.1, 7.1.2, 7.1.3, 7.1.4, 7.1.5, 7.1.6, 7.1.7, 7.1.8, 7.1.9, 7.1.10, 7.2.0, 7.2.1, 7.2.2, 7.2.3, 7.2.4, 7.2.5, 7.2.6, 7.2.7, 7.2.8, 7.2.9, 7.2.10, 7.3.0, 7.3.1, 7.3.2, 7.3.3, 7.3.4, 7.3.5, 7.3.6, 7.3.7, 7.3.8, 7.3.9, 8.0.0, 8.0.1, 8.0.2, 8.0.3, 8.0.4, 8.0.5, 8.0.6, 8.0.7, 8.0.8, 8.0.9, 8.0.10, 8.1.0, 8.1.1, 8.1.2, 8.1.3, 8.1.4, 8.1.5, 8.1.6, 8.1.7, 8.1.8, 8.1.9, 8.1.10, 8.1.11, 8.1.12, 8.1.13, 8.1.14, 8.2.0, 8.2.1, 8.2.2, 8.2.3, 8.2.4, 8.2.5, 8.2.6, 8.2.7, 8.2.8, 8.2.9, 8.2.10, 8.2.11, 8.2.12, 9.0.0, 9.0.1, 9.0.2, 9.0.3, 9.0.4, 9.0.5, 9.0.6, 9.0.7, 9.0.8, 9.0.9, 9.0.10, 9.1.0, 9.1.1, 9.1.2, 9.1.3, 9.1.4, 9.1.5, 9.1.6, 9.1.7, 9.1.8, 9.1.9, 9.2.0, 9.2.1, 9.2.2, 9.2.3, 9.2.4, 9.2.5, 9.2.6, 9.3.0, 9.3.1, 9.3.2, 9.3.3, 9.3.4, 9.4.0, 9.4.1, 9.4.2
Feedback submitted, thanks!