Add an eval expression field
You can add eval expression fields to any dataset in your data model. Use eval expressions to create fields and add them to events in a manner similar to that of calculated fields.

- In the Data Model Editor, open the dataset that you would like to add a field to.
- Click Add Field. Select Eval Expression to define an eval expression field.
- The Add Fields with an Eval Expression dialog appears.
- Enter the Eval Expression that defines the field value.
- The Eval Expression text area should just contain the
<eval-expression>portion of theevalsyntax. There's no need to type the full syntax used in Search (eval <eval-field>=<eval-expression>).
- The Eval Expression text area should just contain the
- Under Field enter the Field Name and Display Name.
- The Field Name is the name in your dataset. The Display Name is the field name that your Pivot users see when they create pivots. Note: The Field Name cannot include whitespace, single quotes, double quotes, curly braces, or asterisks. The field Display Name cannot contain asterisks.
- Define the field Type and set its Flag.
- For more information about the Flag values, see the subsection on marking fields as hidden or required in Define dataset fields
- (Optional) Click Preview to verify that the eval expression is working as expected.
- You should see events in table format with the new eval field(s) included as columns. For example, if you're working with an event-based dataset and you've added an eval field named gb, the preview event table should show a column labeled gb to the right of the first column (_time).
- The preview pane has two tabs. Events is the default tab. It presents the events in table format. The new eval field should appear to the right of the first column (the
_timecolumn).
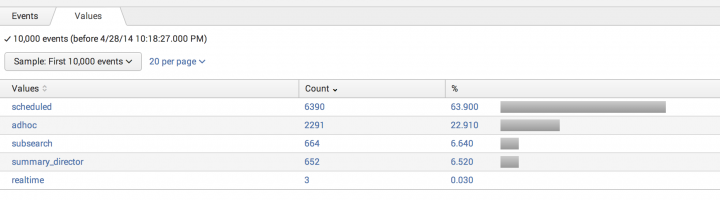
- If you do not see values in this column, or you see the same value repeated in the events at the top of the list, it could mean that more values appear later in the sample. Select the Values tab to review the distribution of eval field values among the selected event sample. You can also change the Sample value to increase the number of events in the preview sample--this can sometimes uncover especially rare values of the field created by the eval expression.
- In the example below, the three real-time searches only appeared in the value distribution when Sample was expanded from First 1,000 events to First 10,000 events.
- Click Save to save your changes and return to the Data Model Editor.

For more information about the eval command and the formatting of eval expressions, see the eval page as well as the topic Evaluation functions in the Search Reference.
Eval expressions can utilize fields that have already been defined or calculated, which means you can chain fields together. Fields are processed in the order that they are listed from top to bottom. This means that you must place prerequisite fields above the eval expression fields that uses those fields in its eval expression. In other words, if you have a calculation B that depends on another calculation A, make sure that calculation A comes before calculation B in the field order. For more information see the subsection on field order and chaining in Define dataset fields.
You can use fields of any type in an eval expression field definition. For example, you could create an eval expression field that uses an auto-extracted field and another eval expression field in its eval expression. It will work as long as those fields are listed above the one you're creating.
When you create an eval expression field that uses the values of other fields in its definition, you can optionally "hide" those other fields by setting their Flag to Hidden. This ensures that only the final eval expression value is available to your Pivot users.
| Add an auto-extracted field | Add a lookup field |
This documentation applies to the following versions of Splunk® Enterprise: 7.0.0, 7.0.1, 7.0.2, 7.0.3, 7.0.4, 7.0.5, 7.0.6, 7.0.7, 7.0.8, 7.0.9, 7.0.10, 7.0.11, 7.0.13, 7.1.0, 7.1.1, 7.1.2, 7.1.3, 7.1.4, 7.1.5, 7.1.6, 7.1.7, 7.1.8, 7.1.9, 7.1.10, 7.2.0, 7.2.1, 7.2.2, 7.2.3, 7.2.4, 7.2.5, 7.2.6, 7.2.7, 7.2.8, 7.2.9, 7.2.10, 7.3.0, 7.3.1, 7.3.2, 7.3.3, 7.3.4, 7.3.5, 7.3.6, 7.3.7, 7.3.8, 7.3.9, 8.0.0, 8.0.1, 8.0.2, 8.0.3, 8.0.4, 8.0.5, 8.0.6, 8.0.7, 8.0.8, 8.0.9, 8.0.10, 8.1.0, 8.1.1, 8.1.2, 8.1.3, 8.1.4, 8.1.5, 8.1.6, 8.1.7, 8.1.8, 8.1.9, 8.1.10, 8.1.11, 8.1.12, 8.1.13, 8.1.14, 8.2.0, 8.2.1, 8.2.2, 8.2.3, 8.2.4, 8.2.5, 8.2.6, 8.2.7, 8.2.8, 8.2.9, 8.2.10, 8.2.11, 8.2.12, 9.0.0, 9.0.1, 9.0.2, 9.0.3, 9.0.4, 9.0.5, 9.0.6, 9.0.7, 9.0.8, 9.0.9, 9.0.10, 9.1.0, 9.1.1, 9.1.2, 9.1.3, 9.1.4, 9.1.5, 9.1.6, 9.1.7, 9.1.8, 9.1.9, 9.2.0, 9.2.1, 9.2.2, 9.2.3, 9.2.4, 9.2.5, 9.2.6, 9.3.0, 9.3.1, 9.3.2, 9.3.3, 9.3.4, 9.4.0, 9.4.1, 9.4.2
Feedback submitted, thanks!