Build field extractions with the field extractor
Use the field extractor utility to create new fields. The field extractor provides two field extraction methods: regular expression and delimiters.
The regular expression method works best with unstructured event data. You select a sample event and highlight one or more fields to extract from that event, and the field extractor generates a regular expression that matches similar events in your dataset and extracts the fields from them. The regular expression method provides several tools for testing and refining the accuracy of the regular expression. It also allows you to manually edit the regular expression.
The delimiters method is designed for structured event data: data from files with headers, where all of the fields in the events are separated by a common delimiter, such as a comma or space. You select a sample event, identify the delimiter, and then rename the fields that the field extractor finds. data that resides in a file that has headers and fields separated by specific characters
Overview of the field extractor
To help you create a new field, the field extractor takes you through a set of steps. The field extractor workflow diverges at the Select Method step, where you select the field extraction method that you want to use.

This table gives you an overview of the required steps. For detailed information about a step, click the link in the Step Title column.
| Step Title | Description | Field Extraction Method |
|---|---|---|
| Select sample | Select the source type or source that is tied to the events that have the field (or fields) that you want to extract. Then choose a sample event that has that field (or fields). | Both |
| Select method | Select a field extraction method. You can have the field extractor generate a field-extracting regular expression, or you can employ delimiter-based field extraction. The choice you make depends on whether you are trying to extract fields from unstructured or structured event data. | Both |
| Select fields | Highlight one or more field values in the event to identify them as fields. The field extractor generates a regular expression that matches the event and extracts the field. Optionally, you can:
|
Regular expression |
| Rename fields | Identify the delimiter that separates all of the fields in the event, and then rename one or more of those fields. | Delimiters |
| Validate fields |
|
Regular expression |
| Save | Name your new field extraction, set its permissions, and save it. | Both |
Access the field extractor
There are several ways to access the field extractor utility. The access method you use can determine which step of the field extractor workflow you start at.
All users can access the field extractor after running a search that returns events. You have three post-search entry points to the field extractor:
- Bottom of the fields sidebar
- All Fields dialog box
- Any event in the search results
You can also enter the field extractor:
- from the Field Extractions page in Settings.
- when you add data with a fixed source type.
- from the Splunk Web Home page (if you have Admin role privileges).
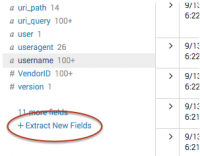
Access the field extractor from the bottom of the fields sidebar
When you use this method to access the field extractor it runs only against the set of events returned by the search that you have run. To get the full set of source types in your Splunk deployment, go to the Field Extractions page in Settings.
- Run a search that returns events.
- Scroll down to the bottom of the fields sidebar and click Extract New Fields.
- The field extractor starts you at the Select Sample step.

Access the field extractor from the All Fields dialog box
When you use this method to access the field extractor you can only extract fields from the data that has been returned by your search. To get the full set of source types in your Splunk deployment, go to the Field Extractions page in Settings.
- Run a search that returns events.
- At the top of the fields sidebar, click All Fields.
- In the All Fields dialog box, click Extract new fields.
- The field extractor starts you at the at the Select Sample step.

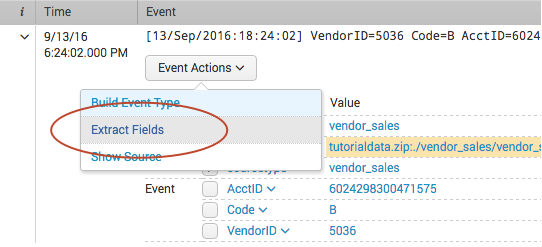
Access the field extractor from a specific event
Use this method to select an event in your search results, and create a field extraction that:
- Extracts one or more fields found in that event.
- Is tied to the source type of that event.
When you use this method to access the field extractor, the field extractor runs against the set of events returned by the search that you have run.
- Run a search that returns events.
- Find an event that you want to extract fields from, and click the arrow symbol to the left of the timestamp to open it.
- Click Event Actions, and select Extract Fields.
- The field extractor starts you at the Select Method step, in a new browser tab. You have already defined the source type and sample event.

Access the field extractor through the Field Extractions page in Settings
This entry method is available to all users.
- Select Settings > Fields > Field extractions.
- Click the Open field extractor button.
- The field extractor starts you at the Select Sample step.
Access the field extractor through the Home page
This entry method is available only to users whose roles have the edit_monitor capability, such as Admin.
On the Home page, click the extract fields link under the Add Data icon.
- The field extractor starts you at the Select Sample step.
Access the field extractor after you add data
This entry method is available only to users whose roles have the edit_monitor capability, such as Admin.
After you add data to Splunk Enterprise, use the field extractor to extract fields from that data, as long as it has a fixed source type.
For example: You add a file named vendors.csv to your Splunk deployment and give it the custom source type vendors. After you save this input, you can enter the field extractor and extract fields from the events associated with the vendors source type.
Another example: You create a monitor input for the /var/log directory and select Automatic for the source type, meaning that Splunk software automatically determines the source type values of the data from that input on an event by event basis. When you save this input you do not get a prompt to extract fields from this new data input, because the events indexed from that directory can have a variety of source type values.
- Enter the Add Data page.
- See "How do you want to add data?" in the Getting Data In manual.
- Define a data input with a fixed source type.
- This can be an existing source type or a custom source type that you define. See "View and set source types for event data" in the Getting Data In manual.
- Save the new data input.
- Note: Wait 30 seconds before going to the next step. This gives the Splunk software some time to index the data and get it ready for field extraction.
- In the "File has been uploaded successfully" dialog box, click Extract Fields.
- The field extractor starts you at the Select Sample step.
| About regular expressions with field extractions | Field Extractor: Select Sample step |
This documentation applies to the following versions of Splunk® Enterprise: 7.0.0, 7.0.1, 7.0.2, 7.0.3, 7.0.4, 7.0.5, 7.0.6, 7.0.7, 7.0.8, 7.0.9, 7.0.10, 7.0.11, 7.0.13, 7.1.0, 7.1.1, 7.1.2, 7.1.3, 7.1.4, 7.1.5, 7.1.6, 7.1.7, 7.1.8, 7.1.9, 7.1.10, 7.2.0, 7.2.1, 7.2.2, 7.2.3, 7.2.4, 7.2.5, 7.2.6, 7.2.7, 7.2.8, 7.2.9, 7.2.10, 7.3.0, 7.3.1, 7.3.2, 7.3.3, 7.3.4, 7.3.5, 7.3.6, 7.3.7, 7.3.8, 7.3.9, 8.0.0, 8.0.1, 8.0.2, 8.0.3, 8.0.4, 8.0.5, 8.0.6, 8.0.7, 8.0.8, 8.0.9, 8.0.10, 8.1.0, 8.1.1, 8.1.2, 8.1.3, 8.1.4, 8.1.5, 8.1.6, 8.1.7, 8.1.8, 8.1.9, 8.1.10, 8.1.11, 8.1.12, 8.1.13, 8.1.14, 8.2.0, 8.2.1, 8.2.2, 8.2.3, 8.2.4, 8.2.5, 8.2.6, 8.2.7, 8.2.8, 8.2.9, 8.2.10, 8.2.11, 8.2.12, 9.0.0, 9.0.1, 9.0.2, 9.0.3, 9.0.4, 9.0.5, 9.0.6, 9.0.7, 9.0.8, 9.0.9, 9.0.10, 9.1.0, 9.1.1, 9.1.2, 9.1.3, 9.1.4, 9.1.5, 9.1.6, 9.1.7, 9.1.8, 9.1.9, 9.2.0, 9.2.1, 9.2.2, 9.2.3, 9.2.4, 9.2.5, 9.2.6, 9.3.0, 9.3.1, 9.3.2, 9.3.3, 9.3.4, 9.4.0, 9.4.1, 9.4.2
Feedback submitted, thanks!