Manually assign searches to workload pools
While using workload rules to assign searches to workload pools automatically provides the most efficient method for allocating resources, you can also assign searches to workload pools manually.
This page shows you how to assign searches to workload pools manually. For detailed instructions on how to assign searches to workload pools automatically using workload rules, see Create workload rules.
To assign a search to a workload pool manually, a role must have list_workload_pools and select_workload_pools capabilities
How to assign a search to a workload pool manually depends on the type of search.
Assign a scheduled search to a workload pool
You can assign a scheduled search to a workload pool using Splunk Web, CLI, or REST.
When you assign a scheduled search to a workload pool, the pool information is written to savedsearches.conf. For more information, see savedsearches.conf.spec.
Assign a scheduled search using Splunk Web
To assign a scheduled search to a workload pool using Splunk Web, follow these steps:
- Click on Settings > Searches, Reports, and Alerts.
- Find the specific saved search, and click Edit > Advanced Edit.
- In the Workload Pool field, enter the name of the pool.
- Click Save.
The workload pool information is written tolocal/savedsearches.confand the scheduled search runs in the specified pool.
Assign a scheduled search using the CLI
To assign a scheduled search to a workload pool, run the following CLI command:
./splunk add saved-search -name <search_name> -workload_pool <pool_name>
Assign a scheduled search using REST
Send a POST request to the saved/searches/{name} endpoint. For example:
curl -k -u admin:pass https://localhost:8089/services/searches/<search_name> -d workload_pool=<pool_name>
Assign an ad hoc search to a workload pool
You can assign an ad hoc search to a workload pool using Splunk Web, CLI, or REST.
Assign an ad hoc search using Splunk Web
- In the Search bar, enter your ad hoc search string.
- Select a workload pool from the menu.
- Run the search.
The ad hoc search job runs in the specified workload pool.
If you select Policy-Based Pool, workload management automatically assigns the search to a pool based on any defined workload rules. If an explicit match for the search is not found, workload management assigns the search to the default pool.
The workload pool menu is only visible to roles that have
list_workload_poolsandselect_workload_poolscapabilities. - Click Job > Inspect Job > Search job properties.
- Confirm that the ad hoc search ran in the specified pool. For example:
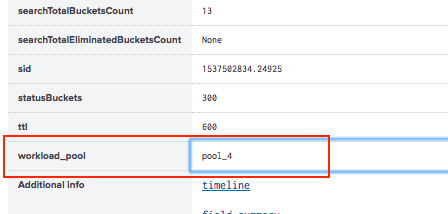


Assign an ad hoc search using CLI
To assign an ad hoc search, run the following CLI command:
./splunk search "index=_internal" -workload_pool=<pool_name>
Assign an ad hoc search using REST
Send a POST request to the search/jobs endpoint. For example:
curl -k -u admin:pass https://localhost:8089/services/search/jobs -d search="search index=_internal" -d workload_pool=pool_1
Change the workload pool for a running search
You can re-assign an actively running search to a different workload pool using Splunk Web or REST. This applies to both scheduled searches and ad hoc searches.
To change the workload pool for a running search, a role must have the list_workload_pools and select_workload_pools capabilities. See Set access controls for workload management.
Change workload pool using Splunk Web
- Click Activity > Jobs.
- For the specific running search, click Job > Edit Job Settings.
- Select a new pool from the Workload Pool menu.
Re-assigning an ad hoc search on the Search bar triggers a new search process in the new pool. To continue running the same search process in a new pool, re-assign the search via the Job Activity page or REST endpoint.
Change workload pool using REST
Send a POST request to the search/jobs/{search_id}/control endpoint. For example:
curl -k -u admin:pass https://localhost:8089/services/search/jobs/{search_id}/control -d action=setworkloadpool -d workload_pool=<pool_name>
Assign accelerated reports to workload pools
You can assign any report that qualifies for acceleration to a workload pool.
Assigning an accelerated report to a workload pool with ample cpu and memory resources can help you minimize performance issues that can occur during report acceleration, which can be resource intensive.
You can assign an accelerated report to a workload pool using Splunk Web.
- Click Settings > Searches, Reports, and Alerts.
- Find the report you want to accelerate and click Edit > Edit Acceleration.
- Select the Accelerate Report checkbox.
- Select the Summary Range for the report acceleration.
- Select a workload pool from the menu.
- Click Save.
The workload pool that you specify in the Edit Acceleration modal is written to the auto_summarize.workload_pool setting in savedsearches.conf
For more information on report acceleration, see Accelerate reports in the Reporting Manual.
Assign accelerated data models to workload pools
You can assign an accelerated data model to a workload pool using Splunk Web:
- Click Settings > Data models.
- Find the data model you want to accelerate and click Edit > Edit Acceleration.
- Select the Accelerate checkbox.
- Select the Summary Range for the data model acceleration.
- Select a workload pool from the menu.
- Click Save.
For more information on accelerated data models, see Accelerate data models in the Knowledge Manager Manual.
| Set access controls for workload management | Workload management examples |
This documentation applies to the following versions of Splunk® Enterprise: 8.0.0, 8.0.1, 8.0.2, 8.0.3, 8.0.4, 8.0.5, 8.0.6, 8.0.7, 8.0.8, 8.0.9, 8.0.10, 8.1.0, 8.1.1, 8.1.2, 8.1.3, 8.1.4, 8.1.5, 8.1.6, 8.1.7, 8.1.8, 8.1.9, 8.1.10, 8.1.11, 8.1.12, 8.1.13, 8.1.14, 8.2.0, 8.2.1, 8.2.2, 8.2.3, 8.2.4, 8.2.5, 8.2.6, 8.2.7, 8.2.8, 8.2.9, 8.2.10, 8.2.11, 8.2.12, 9.0.0, 9.0.1, 9.0.2, 9.0.3, 9.0.4, 9.0.5, 9.0.6, 9.0.7, 9.0.8, 9.0.9, 9.0.10, 9.1.0, 9.1.1, 9.1.2, 9.1.3, 9.1.4, 9.1.5, 9.1.6, 9.1.7, 9.1.8, 9.1.9, 9.2.0, 9.2.1, 9.2.2, 9.2.3, 9.2.4, 9.2.5, 9.2.6, 9.3.0, 9.3.1, 9.3.2, 9.3.3, 9.3.4, 9.4.0, 9.4.1, 9.4.2
Feedback submitted, thanks!