Get Microsoft Azure data into Splunk Cloud Platform
This topic guides you through the steps to get Microsoft Azure data into Splunk Cloud Platform.
Administrator requirements
Splunk Cloud Platform administrators must meet the following prerequisites to get Microsoft Azure data into Splunk Cloud Platform:
- Permissions necessary to make changes in your Microsoft Azure environment.
- Activity logs and subscriptions in your Microsoft Azure environment.
If you don't know this information or have these permissions, work closely with your organization's Microsoft Azure administrator to complete these steps.
Customers are responsible for the setup, configuration, and maintenance of third-party services and resources, which includes payment. See Network connectivity and data transfer in the Splunk Cloud Platform Service Description.
Before you begin
To get Microsoft Azure data into Splunk Cloud Platform, you need a solid understanding of Splunk concepts. The table lists these concepts and provides links to more information.
| Product | Concept | See |
|---|---|---|
| Splunk and Splunk Cloud Platform | indexes search head |
Fundamental Splunk and Splunk Cloud Platform concepts |
Overview
In this procedure, you'll get your Microsoft Azure activity data into your Splunk Cloud Platform instance. The activity logs contain information on events and users' actions and when those actions occurred.
You'll first create an application registration, which is similar to a service account that you can use to authenticate to Microsoft Azure. The application registration has an application ID (similar to a user name) and an application key or secret (which is similar to a password). This allows your Splunk Cloud Platform instance to authenticate to Microsoft Azure and get the activity log data in. You'll then configure the Splunk Add-on for Microsoft Cloud Services on your search head, search head cluster member instance, or the Inputs Data Manager and on Splunk Cloud Platform to make it easy to get the data into Splunk Cloud Platform.
There are many other types of data you may want to get into your Splunk Cloud Platform instance, and this topic is not intended to be a comprehensive guide for getting all your Microsoft Azure data into Splunk Cloud Platform. Instead, use this process as a template that you can repeat until you've included all of the relevant source types.
Before performing this procedure, check if your Splunk Cloud Platform environment uses the Victoria Experience or the Classic Experience; see Determine your Splunk Cloud Platform Experience. If your Splunk Cloud Platform environment uses the Victoria Experience, perform step 4 on your Splunk Cloud Platform search head or search head cluster member instance. If your Splunk Cloud Platform environment uses the Classic Experience, perform step 4 on your Splunk Cloud Platform Inputs Data Manager (IDM) instance.
To get Microsoft Azure data into Splunk Cloud Platform, complete the following high-level steps:
- Set up your Splunk Cloud Platform environment.
- Configure an index on your Splunk Cloud Platform instance.
You create an index for the Microsoft Azure data you want to bring into your Splunk Cloud Platform deployment. - Configure Microsoft Azure to authenticate and ingest data from Splunk Cloud Platform.
While you are configuring Microsoft Azure, you'll also need to record some information that you'll use to connect Splunk Cloud Platform with Microsoft Azure. - Configure the Splunk Add-on for Microsoft Cloud Services.
To ensure data ingestion, you will also need to configure the add-on and the inputs. If you're a Victoria Experience customer, you'll do this configuration on the search head or search head cluster member instance. If you're a Classic Experience customer, you'll do this configuration on the Inputs Data Manager (IDM). - Confirm data is flowing to your Splunk Cloud Platform instance.
After configuring Microsoft Azure settings and add-on settings, verify that data is flowing to your Splunk Cloud Platform instance.
Step 1: Set up your Splunk Cloud Platform environment
Before you can get Microsoft Azure data into your Splunk Cloud Platform instance, you must ensure the following:
- Confirm that you are assigned the
sc_adminrole on your Splunk Cloud Platform instance. - Install the following, and ensure you allow adequate time for these tasks to be completed before you attempt to get data in:
- Classic Experience customers must request that Splunk Support install the Splunk Add-on for Microsoft Cloud Services on your Inputs Data Manager and your Splunk Cloud Platform instance.
- Victoria Experience customers can use the self-service app install procedure described in Install an app to install Splunk Add-on for Microsoft Cloud Services to your search head or search head cluster member instance, and on your Splunk Cloud Platform instance.
- Create a test index in your Splunk Cloud instance so that you can test your installation before going into production. Follow these instructions to create an index: Manage Splunk Cloud Platform Indexes.
Step 2: Configure a new index on your Splunk Cloud Platform instance
Complete the following steps to create indexes to store the events sent from your Microsoft Azure instance.
It's a best practice to create separate indexes for different types of data. For this initial index, you'll create an index to store Microsoft Azure activity data.
- From your Splunk Cloud Platform instance, go to Settings > Indexes.
- Click New Index.
- In the Index name field, as an example, enter azure-activity. Alternatively, you can select a name that is consistent with your company's index naming convention.
- For Index Data Type, select Events.
- For Searchable time (days), enter the number of days you want data to be searchable. As an example, enter 30.
- Click No Additional Storage, and click Save.
Step 3: Configure Microsoft Azure to authenticate and ingest activity data
Complete the following steps to configure an Application Registration on Microsoft Azure and give it read access to resources in your subscription.
- From your Microsoft Azure portal, go to Azure Active Directory > App Registrations > New Registration:
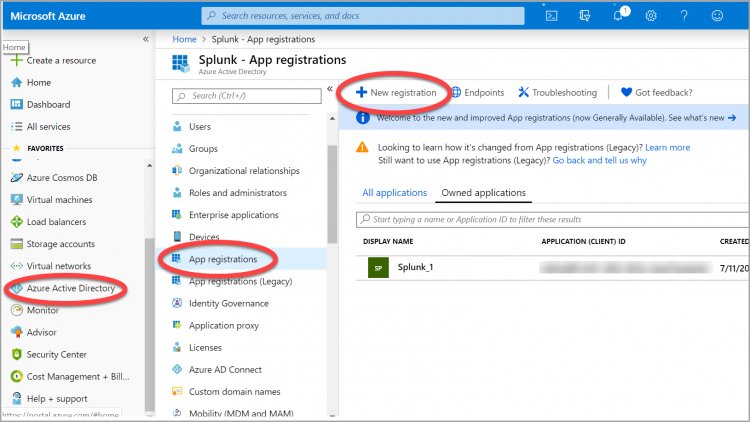
- In the New Registration field, enter a name for the Application Registration.
- Leave the Application type at the default value (Web app/API).
- Leave the Supported account type as the default value.
- Click the Register button.
- In a separate location, note the application ID value. You can think of the application ID as a user ID. The application ID value maps to the Client ID field when you configure Microsoft Azure in Splunk Cloud Platform via the Microsoft Cloud Services add-on.
- Create an application secret. This is comparable to a password or key. To do this, go to Certificates & secrets, and click New client secret:
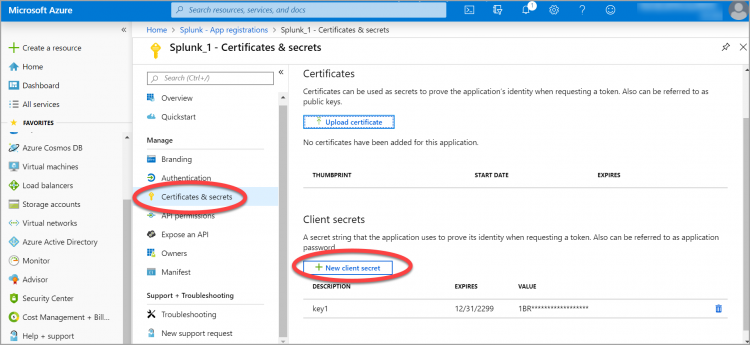
- Enter a name for the secret in the Description field, and select the Never radio button under the Expires field. Click Add.
- In a separate location, copy the value for the secret key from the clipboard as this is the only time it will display. You will need this value later when you configure the add-on to connect to Microsoft Azure. The secret key maps to the Key (Client Secret) value when you configure Microsoft Azure in Splunk via the Microsoft Cloud Services add-on. Note that you can create a new secret if you lose this value.
- Grant the application registration read access to resources in your subscription. Click Subscriptions, and choose the subscription from which you want to ingest data. In this example, the Pay-As-You-Go subscription is selected:
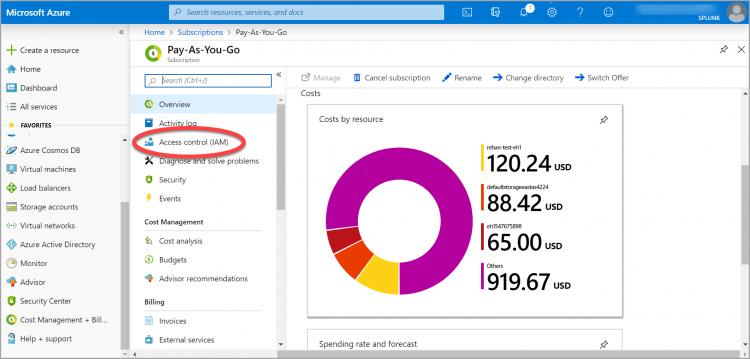
- Click Access control (IAM) > Add > Add role assignment.
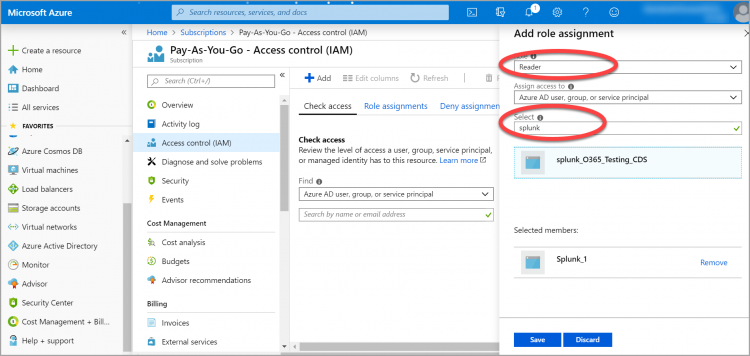
- From the Role dropdown menu, select Reader.
- In the Assign Access to field, leave the default value.
- In the select field, type the name of the Application Registration you just created:
- Click Save
- If you have multiple subscriptions, you can continue to add access to each of the subscriptions you want to include. When you have added all of the subscriptions that you want to include, your Microsoft Azure configuration should be complete.


Step 4: Configure the Splunk Add-on for Microsoft Cloud Services
Complete the following steps to configure the Splunk Add-on for Microsoft Cloud Services and also the necessary inputs.
- Open the Splunk Add-on for Microsoft Cloud Services from the list of available apps.
Victoria Experience customers: Open the app from your search head or search head cluster member instance.
Classic Experience customers: Open the app from your IDM. Log into your IDM instance athttps://idm-<cloudname>.splunkcloud.comwhere<cloudname>represents your Splunk Cloud Platform name. - Go to Apps > Splunk Add-on for Microsoft Cloud Services.
- From the Add-on, select Configuration > Add Azure App Account.
- In the Name field, enter a name for the Microsoft Azure App account.
- In the Client ID field, enter the application ID value that you saved earlier.
- In the Key (Client Secret) field, enter the value for the client secret you saved earlier.
- In the Tenant ID field, enter the Microsoft Azure Directory ID.
You can find the Directory ID in the Azure Portal, by going to Azure Active Directory > Properties. - Click Add.
- Click the Inputs tab to configure the inputs.
- Click Create New Input > Azure Audit.
- Enter a name for the input.
- From the dropdown menu, select the account you created earlier.
- In the Subscription ID field, enter the Azure Subscription ID. You can find this in the Azure Portal by going to All services > Subscriptions.
Copy the value of the Subscription ID field. - Leave the start time value as the default value and the interval at 3600.
- For the index, select the azure-activity index you created earlier.
- Click Add.
Step 5: Confirm data is flowing to your Splunk Cloud Platform instance
Complete the following steps to see if data is flowing to your Splunk Cloud Platform instance.
- From your Splunk Cloud Platform instance, go to Apps > Search and Reporting.
- In the search field, enter index= azure-activity
- For the time range, select Presets > Last 30 days.
- Click the search icon. Events from your Microsoft Azure environment should display.
What's next?
The table lists additional topics of interest in the Splunk Cloud Platform Getting Data In manual.
See also
| For more information about | See |
|---|---|
| Getting, managing, and monitoring Windows data | The The Get Windows data section |
| Testing and troubleshooting data input | The Improve the data input process section |
| Get Amazon Web Services (AWS) data into Splunk Cloud Platform | Get *nix data into Splunk Cloud Platform |
This documentation applies to the following versions of Splunk Cloud Platform™: 8.2.2112, 8.2.2201, 8.2.2202, 8.2.2203, 9.0.2205, 9.0.2208, 9.0.2209, 9.0.2303, 9.0.2305, 9.1.2308, 9.1.2312, 9.2.2403, 9.2.2406, 9.3.2408, 9.3.2411 (latest FedRAMP release)
Feedback submitted, thanks!