Process a subset of data using an Edge Processor
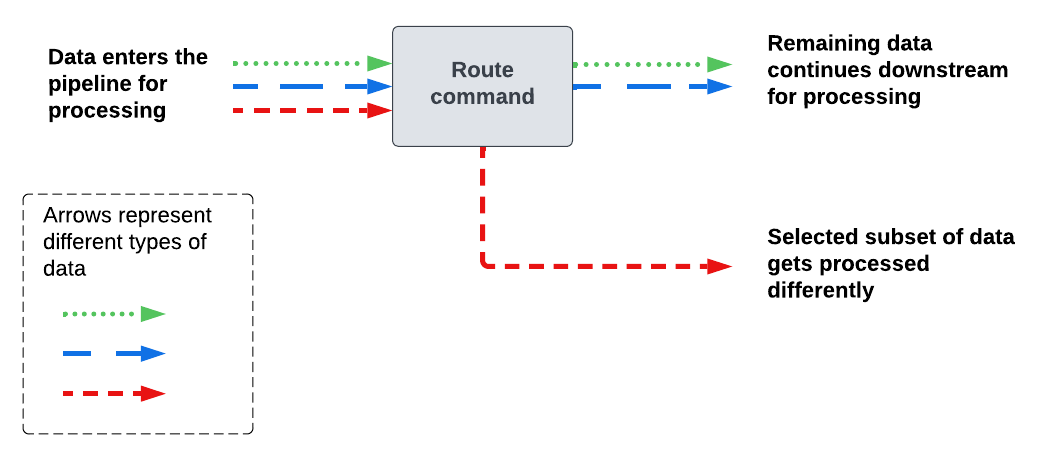
Use the route command when you want to process or route a specific subset of data differently than the rest of the data in the pipeline.
The route command does the following:
- Creates an additional path in the pipeline.
- Selects a subset of the data in the pipeline.
- Diverts that subset of data to the newly created path.
The following diagram shows how the route command sends data to different paths in the pipeline.
Add the route command to a pipeline
- In the Actions section of the pipeline builder, select the plus icon (
 ) and then select Route data.
 - Specify the subset of data that you want to divert to a different pipeline path. To do this, use the options in the Route data dialog box to define a predicate for including or excluding data from the subset:
Option name Description Field The event field that you want the predicate to be based on. Action Whether the data subset includes or excludes the data for which the predicate resolves to TRUE. Operator The operator for the predicate. Value The value for the predicate. For more information about predicates, see Predicate expressions in the SPL2 Search Manual.
- Select Apply.
The pipeline builder adds the followingimportstatement androutecommand to your pipeline, where <predicate> is the SPL2 expression for the predicate that you defined during the previous step:import route from /splunk.ingest.commands
| route <predicate>, [ | into $destination2 ] - In the Actions section of the pipeline builder, select Send data to $destination2. Select the destination that you want to send that subset of data to, and then select Apply.
- (Optional) To process that subset of data before sending it to a destination, you can enter additional SPL2 commands in the space preceding the
| into $destination2expression. - (Optional) Select the Preview Pipeline icon (
 ) to generate a preview that shows what your data looks like when it passes through the pipeline. In the preview results panel, use the drop-down list to select the pipeline path that you want to preview.
By default, the pipeline builder uses the $destination2 variable to represent the destination in route commands. If you add another route command to the same pipeline and you want it to send data to a different destination, you'll need to change the $destination2 variable in the newly added route command to a different SPL2 variable. You can then specify the destination for this route command by selecting the "Send data to" action containing the updated variable.
SPL2 variables must begin with a dollar sign ( $ ) and can be composed of uppercase or lowercase letters, numbers, and the underscore ( _ ) character.
Example: Send different types of logs to different destinations
In this example, your Edge Processor is receiving Cisco syslog data such as the following:
<13>Jan 09 01:54:40 10.10.232.91 : %ASA-3-505016: Module Sample_prod_id3 in slot 1 application changed from: sample_app2 version 1.1.0 state Sample_state1 to: Sample_server_name2 1.1.0 state Sample_state1.
<19>Jan 09 01:54:40 10.10.136.129 : %ASA-1-505015: Module Sample_prod_id2 in slot 1 , application up sample_app2 , version 1.1.0
<91>Jan 09 01:54:40 10.10.144.67 : %FTD-5-505012: Module Sample_prod_id1 in slot 1 , application stopped sample_app1 , version 2.2.1
<101>Jan 09 01:54:40 10.10.219.51 : %FTD-1-505011: Module 10.10.94.98 , data channel communication is UP.
Assume that you want to do the following:
- Send the logs from Cisco Adaptive Security Appliance (ASA) to an index named cisco_asa.
- Send the logs from Cisco Firewall Threat Defense (FTD) to an index named cisco_ftd.
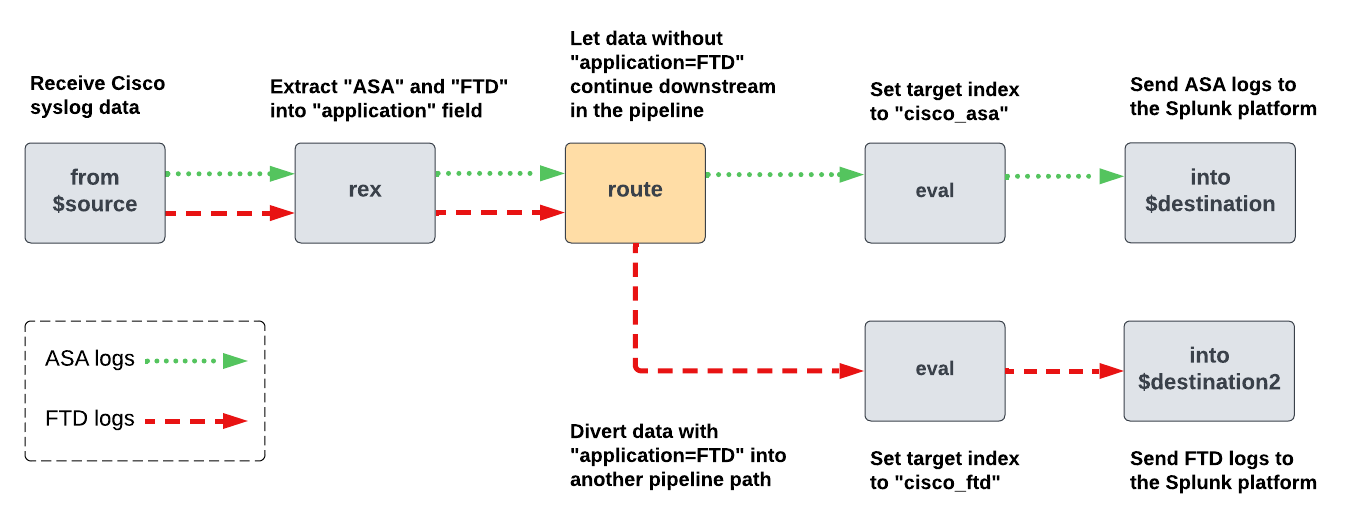
You can achieve this by creating a pipeline that extracts the prefix from each log and differentiates ASA logs from FTD logs. Then, route the ASA logs and FTD logs to separate paths, and use the eval command to assign the appropriate index value to both sets of logs. The following diagram shows the commands that this pipeline contains and how the data gets processed as it moves through the pipeline:
To create this pipeline, do the following:
- On the Pipelines page, select New pipeline. Follow the on-screen instructions to define a partition, optionally enter sample data, and select a data destination. Set the data destination to the Splunk platform deployment that you want to send ASA logs to.
After you complete the on-screen instructions, the pipeline builder displays the SPL2 statement for your pipeline. - Extract the prefix from each log to a field named
application:- In the Actions section, select the plus icon (
 ) and then select Extract fields from _raw.
 - In the Regular expression field, enter the following regular expression:
(?P<application>(ASA|FTD))
- Select Apply.
The pipeline builder adds the following
rexcommand to your pipeline:| rex field=_raw /(?P<application>(ASA|FTD))/
- In the Actions section, select the plus icon (
- Route the logs that have
FTDas theapplicationvalue to another pipeline path:- In the Actions section, select the plus icon (
 ) and then select Route data.
 - In the Route data dialog box, configure the following options and then select Apply.
Option name Enter or select the following Field application Action Include Operator = equals Value FTD The pipeline builder adds the following
importstatement androutecommand to your pipeline:import route from /splunk.ingest.commands
| route application == "FTD", [ | into $destination2 ] - In the Actions section of the pipeline builder, select Send data to $destination2. Select the Splunk platform destination that you want to send the FTD logs to, and then select Apply.
- In the Actions section, select the plus icon (
- (Optional) Select the Preview Pipeline icon (
 ) to generate a preview that shows what your data looks like when it passes through the pipeline. In the preview results panel, confirm the following:
- When the drop-down list is set to $destination, all of the logs have
ASAas theapplicationvalue. - When the drop-down list is set to $destination2, all of the logs have
FTDas theapplicationvalue.
- When the drop-down list is set to $destination, all of the logs have
- To send the FTD and ASA logs to indexes named cisco_ftd and cisco_asa respectively, assign the appropriate
indexvalue to the logs in each pipeline path.- In the SPL2 editor, in the space preceding the
| into $destination2command, enter the following:| eval index="cisco_ftd"
- In the space preceding the
| into $destinationcommand, enter the following:| eval index="cisco_asa"
- In the SPL2 editor, in the space preceding the
You now have a pipeline that routes ASA and FTD logs to different indexes. The complete SPL2 module of the pipeline looks like this:
import route from /splunk.ingest.commands

$pipeline = | from $source | rex field=_raw /(?P<application>(ASA|FTD))/
| route application == "FTD", [
    | eval index="cisco_ftd" | into $destination2
]
| eval index="cisco_asa" | into $destination;
See also
For information about other ways to route data, see Routing data in the same Edge Processor pipeline to different actions and destinations.
| Routing data in the same Edge Processor pipeline to different actions and destinations | Process a copy of data using an Edge Processor |
This documentation applies to the following versions of Splunk Cloud Platform™: 9.0.2209, 9.0.2303, 9.0.2305, 9.1.2308, 9.1.2312, 9.2.2403, 9.2.2406, 9.3.2408 (latest FedRAMP release), 9.3.2411


 Download manual
Feedback submitted, thanks!