Example: Create a new custom badge access model
This example creates custom content to track badge access locations for users. Complete the following steps to follow this example in your own Splunk UBA instance:
- Create a content developer user account.
- Examine a raw event and identify the attributes to track.
- Create a custom cube.
- Create the rare events model.
- Trigger the model to create anomalies in test mode.
- Activate the custom model and migrate test anomalies.
- Create a threat rule using the new anomalies.
- View the new custom badge access threats.
Create a content developer user account
Create a user account with the Content_Developer role. This is the only Splunk UBA role with privileges to create custom content.
- Log in to Splunk UBA as an admin user.
- In Splunk UBA, select Manage > UBA Accounts
- Click New User Account.
- Enter a username such as contentdev.
- Enter and confirm the user's password.
- Select Content_Developer as the role for this user.
- Click OK.
- Log out of Splunk UBA.
Examine a raw event and identify the attributes to track
Suppose your company has multiple buildings in multiple sites equipped with Brivo badge access readers. This example uses the data from the badge readers and track information such as the name of the user and the location where the user attempted to gain access.
The following is a sample event from a Brivo badge access reader:
{"actionTypeId": 2004, "user": {"id": 14572293, "suspended": false, "credentials": [{"id": 18796647, "credentialFormat": {"id": 304, "name": "HID Corporate 1000 48-bit"}, "referenceId": "70161", "accountId": 1542417, "size": 48, "effectiveFrom": "2019-08-08T03:40:27Z", "fieldValues": [{"id": 106, "value": "70161", "name": "card_number"}, {"id": 107, "value": "4340", "name": "facility_code"}], "encodedCredential": "4010f4022423"}], "groups": [{"id": 12971487, "name": "SF 250B - ALL ACCESS 24/7"}, {"id": 11454889, "name": "SF 250B - Garage"}], "lastName": "Manger", "firstName": "Louis", "customFields": [{"id": 578736, "value": "EMC", "fieldType": "TEXT", "fieldName": "Company"}, {"id": 589295, "fieldType": "TEXT", "fieldName": "Job Title"}, {"id": 578737, "fieldType": "TEXT", "fieldName": "Address 1"}, {"id": 578738, "fieldType": "TEXT", "fieldName": "Address 2"}, {"id": 587605, "value": "EMCbuildingmaintenance@yahoo.com", "fieldType": "TEXT", "fieldName": "Email"}, {"id": 589296, "fieldType": "TEXT", "fieldName": "Reason for Access"}]}, "description": "User Entry", "userId": 14572293, "objectName": "1F @ Brannan (main entrance)", "siteName": "250B Acme SF (Basement PNL)", "id": 1298420228, "occurred": "2019-08-08T03:40:27.831Z", "siteId": 12490054, "objectId": 12490246, "objectType": "ACCESS_POINT"}
In the example cube, we want to track the user name, user ID, site name, and entry location. In the raw event, we can find a userId field to extract, but there is no single field for user name. There are separate firstName and lastName fields. To get a better idea how to to define the attribute keys we need to extract the correct values and populate our cube, you can examine the existing badgeaccess cube in Splunk UBA.
- Make sure you are logged in to Splunk UBA as a user with content developer privileges.
- Select System > Cubes.
- In the URL, add
?systemimmediately following the host name or IP address. For example:https://uba-001.example.com/?system#Y2FzcGlkYS5jdWJlcy5jdWJlRGV0YWlsc1ZpZXc=
- Select the
badgeaccesscube to view its details.
Examine the existing badgeaccess cube in Splunk UBA to see how specific attributes and attribute keys. The following attributes and their keys are highlighted in the image. We will use the same attributes and keys later when we create a new cube:
- The user ID is held by the
userIdattribute, which has the attribute keyview.*.user.uuid. - The user name is held by the
userNameattribute, which has the attribute keyview.*.user. - The name of the site is held by the
siteNameattribute, which has the attribute keyevent.attribute#siteName. - The entry location is held by the
entryLocationattribute, which has the attribute keyevent.attribute#objectName. - A count of the number of unique events is kept using the
event.formatattribute key.

Create a custom cube
Perform the following steps to create our custom cube:
- Log in to Splunk UBA as a user with Content_Developer privileges, such as
contented, created earlier in this example. - Select System > Cubes.
- Click New Cube.
- Configure the cube properties.
- Enter badgeAccessTracking as the name of the cube.
- Enter Track badge access per user as the description.
- Enter 1 as the version.
- Configure a retention interval of 3 months and a refresh interval of 1 hour.
- Leave Null as the view type, because Splunk UBA does not have any existing views related to badge access.
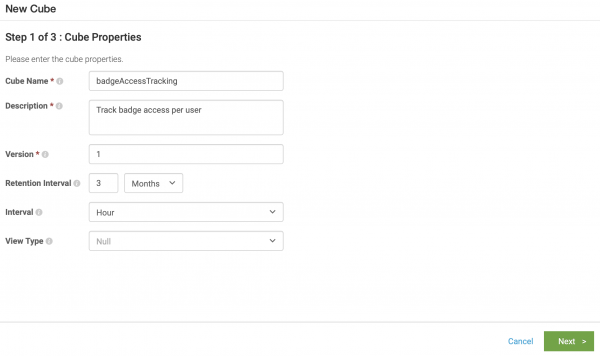
- Click Next.
- Configure the attributes to store in the cube.
- Enter the following attributes and relevant information. These are the attributes identified earlier in Examine a raw event and identify the attributes to track.
Name Category Attribute Key Function Description userId Dimension view.*.user.uuid None User's ID. userName Dimension view.*.user None User's Name. siteName Dimension event.attribute#siteName None Name of the site. entryLocation Dimension event.attribute#objectName None Location at the site where entry was attempted. numEvents Measure event.format COUNT Total number of entry attempts.
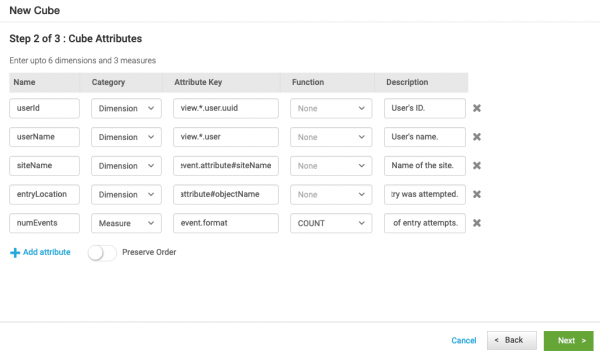
- Click Next.
- Enter the following attributes and relevant information. These are the attributes identified earlier in Examine a raw event and identify the attributes to track.
- Configure aggregation filters to drop invalid events. Use the following expression to drop any events that do not have an entry location:
entryLocation != null
- Click OK.


The new cube appears on the custom cubes page in Splunk UBA.

Below is an example of the cube being populated with some data.
day | userId    | userName         | siteName                      | entryLocation        | numEvents
----+-----------+------------------+-------------------------------+----------------------+-----------
1   | 14572293  | louis manager    | 250B Acme SF (Basement PNL)   | Elev CAB 2           | 3
1   | 14572239  | enrique manager  | 250B Acme SF (Basement PNL)   | Elev CAB 2           | 2
2   | 14572293  | louis manager    | 250B Acme SF (Basement PNL)   | Elev CAB 1           | 2
2   | 14572239  | enrique manager  | 250B Acme SF (Basement PNL)   | Elev CAB 2           | 2
3   | 14572293  | louis manager    | 250B Acme SF (Basement PNL)   | Elev CAB 1           | 3
3   | 14572239  | enrique manager  | 250B Acme SF (Basement PNL)   | Elev CAB 2           | 4
4   | 14572293  | louis manager    | 250B Acme SF (Basement PNL)   | Elev CAB 1           | 4
4   | 14572239  | enrique manager  | 250B Acme SF (Basement PNL)   | Elev CAB 2           | 3
4   | 14572293  | louis manager    | 250B Acme SF (Basement PNL)   | Basement S Stairway  | 1
Create the rare events model
Perform the following steps to create a new rare events model:
- Make sure you are logged in to Splunk UBA as a user with Content_Developer privileges.
- Select System > Models.
- Click New Custom Model.
- Select Rare Events Model and select the Create new model radio button.
- Click Next.
- Select the new cube called
badgeAccessTrackingand verify the all the attributes are present.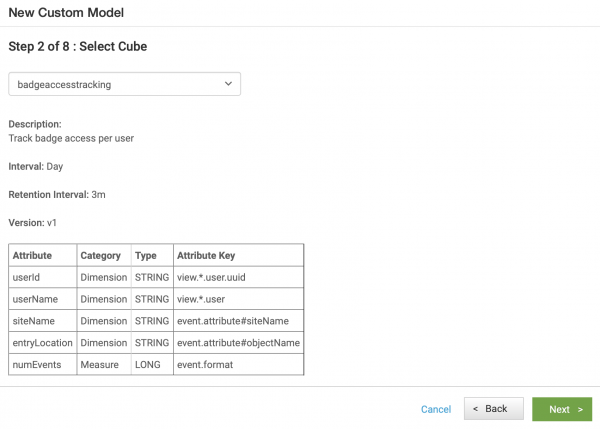
- Click Next.
- Configure the tracking features.
- Select
entryLocationas the field anduserNameas the conditional. This means the model tracks the rarity ofentryLocationfor any givenuserName. - Select
userNameto display as columns for evidence. - Select
userIdas the participant. Generated anomalies with rare values and identical participants are grouped together.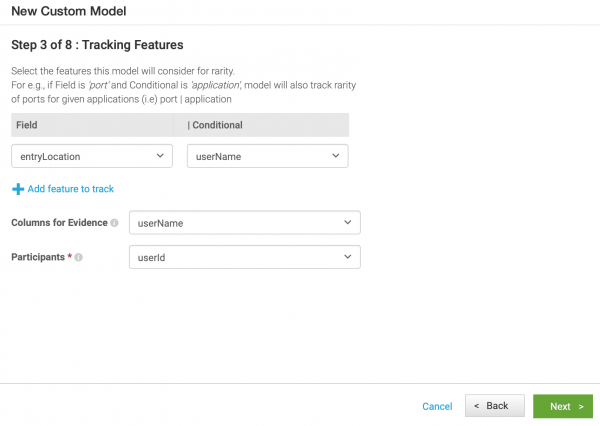
- Click Next.
- Select
- Configure the attribute display names. Enter a desired user-friendly name for each of the attributes used in the mode.
- Click Next.
- Configure the attributes for the model.
- Enter a model name that is be stored internally by Splunk UBA, such as BadgeAccessTracking.
- Enter a user-friendly name for the model, such as Example Badge Access Tracking.
- Enter a description for the model, such as This model tracks user access per site.
- Specify a version number for the model in the format
x.x, such as1.0. - Click Next.
- Configure the model parameters.
- Enter 30 as the rare threshold, meaning that 1 occurrence out of 30 is considered rare.
- Enter 1 as the count threshold since we only defined one tracking feature (
entryLocationas the field anduserNameas the conditional). - Configure 3 months as the amount of time the model looks back when analyzing events. Since we configured the cube to store 3 months worth of data, configure the model look back at all 3 months worth of data.
- Click Next.
- Configure the attributes for the anomaly that this model generates.
- Specify an anomaly name, such as Example Rare Badge Access.
- Enter a description. For example, Rare badge access was detected.
- Select Badge Access as the category.
- Click Next.
- Customize the anomaly field display names.
- Click OK.


Look for a message in Splunk UBA indicating that the model was created successfully. Verify that the model exists on the Custom Models page.

Trigger the model to create anomalies in test mode
Trigger the model to make it run once, and generate anomalies in test mode:
- Make sure you are logged in to Splunk UBA as a user with content developer privileges.
- In Splunk UBA, select System > Models.
- Click Custom Models.
- Hover over the new Example Badge Access Tracking model, click the hamburger (
 ) icon and select Trigger.
 - Click OK to confirm that you want to trigger the model.
To see if the model generated any anomalies, perform the following steps:
- In Splunk UBA, select Explore > Anomalies.
- Select Actions > View Test Mode Anomalies.
If your model generated any anomalies, they are listed here.

Activate the custom model and migrate test anomalies
Test mode anomalies are not consumed by any part of Splunk UBA. In order to make them accessible to threat rules and generate threats, activate the custom model and migrate the test mode anomalies to be live anomalies:
- Make sure you are logged in to Splunk UBA as a user with content developer privileges.
- In Splunk UBA, select System > Models.
- Click Custom Models.
- Hover over the new Example Badge Access Tracking model, click the hamburger () icon and select Activate.
- Select Move anomalies to Active Mode to migrate the test mode anomalies generated by this model to live anomalies.
- Click OK to confirm that you want to activate the model.
Verify that the test mode anomalies are migrated:
- Select Explore > Anomalies.
- Verify that your anomalies appear on this screen.

Create a threat rule using the new anomalies
Perform the following steps to create a new threat rule using the new badge access anomaly. See Create a custom threat with a threat rule for more information about the workflow. perform the following steps:
- In Splunk UBA, select Explore > Threats.
- Click on the Custom Threats (
 ) icon.
 - Click New Threat Rule.
- Select User as the participant.
- Click Next.
- Configure the User Filters.
- Configure an anomaly count of greater than or equal to 1.
- Click Next.
- Configure an anomaly count of greater than or equal to 1.
- Configure the Threat Conditions.
- Select Example Rare Badge Access as the anomaly type from the drop-down list and enter a count of 1.
- Specify an Anomalies Interval of 1 and a Max Threat Duration of 30 days.
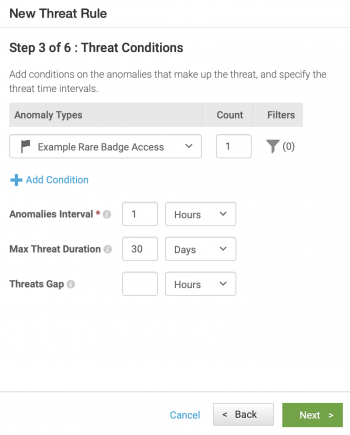
- Click Next.
- Configure the Anomaly Processing.
- By default, threat rules process anomalies starting from when it is activated and going forward. Click Process anomalies in the past and configure a past duration of 30 days. This means that the rule processes anomalies from this point forward, and also looks back on anomalies generated in the past 30 days.
- Click Next.
- Configure threats generated by this threat rule.
- Use the slider to select a custom score for the threat, such as 5.
- Click Create a New Custom Threat Type and enter a threat name, such as Example Rare Badge Access.
- Select Internal as the threat category, because we are examining the behavior of internal users.
- Enter a description for the threat, such as Suspicious badge activity by a user.
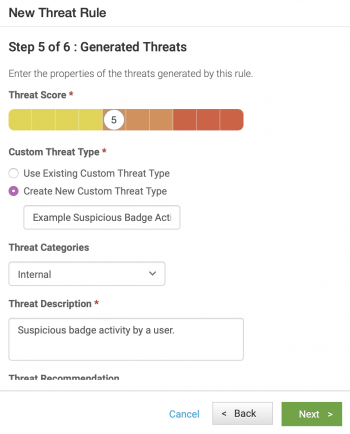
- Click Next.
- Enter a name and description for the rule. An example name might be Example Suspicious or Rare Badge Access.
- Click OK.
- Verify that your custom threat rule appears on the Custom Threats page.
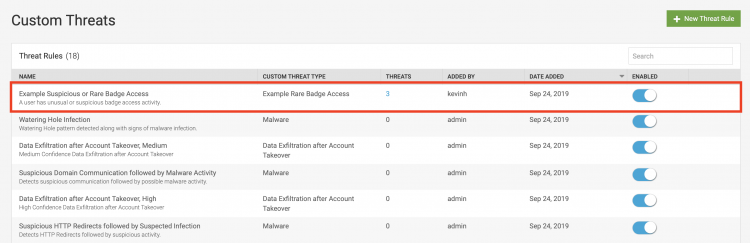
In this example, we can see that our threat rule has generated three threats.


View the new custom badge access threats
Perform the following steps to verify that the threats are visible to all users on this Splunk UBA system:
- Log in to Splunk UBA as a user who is not a content developer, such as an admin.
- Select Threats from the Splunk UBA home page, or select Manage > Threats.
- Verify that the new threat is visible in the list of threats. In our example, our new threat is called Example Rare Badge Access.
- Click on the threat name Example Rare Badge Access.

| Edit anomaly scoring rules |
This documentation applies to the following versions of Splunk® User Behavior Analytics: 5.0.1, 5.0.2, 5.0.3, 5.0.4, 5.0.4.1, 5.0.5, 5.0.5.1, 5.1.0, 5.1.0.1, 5.2.0, 5.2.1, 5.3.0, 5.4.0, 5.4.1, 5.4.1.1, 5.4.2, 5.4.3
Feedback submitted, thanks!