Upgrade Splunk UBA prerequisites
Upgrading to Splunk UBA version 5.4.3 requires Splunk UBA version 5.4.2 or 5.4.1.1. See How to install or upgrade to this release of Splunk UBA for upgrade path information.
- If you are running a version lower than 5.1.0, you must first upgrade to version 5.1.0, then upgrade to version 5.2.0 or 5.3.0, then upgrade to version 5.4.0, then upgrade to version 5.4.1, then upgrade to version 5.4.2, and then upgrade to version 5.4.3.
- If you are running a version lower than 5.0.5, you must first upgrade to version 5.0.5, then upgrade to version 5.1.0, then upgrade to version 5.2.0 or 5.3.0, then upgrade to version 5.4.0, then upgrade to version 5.4.1, then upgrade to version 5.4.2, and then upgrade to version 5.4.3.
Pre-upgrade tasks
Before you upgrade, perform the following tasks:
To connect to Splunk using the connector.splunk.protocol, the only valid value is TLSv1.2 . If you have a different value in place for that field, it is ignored and the Splunk connection configuration uses TLS v1.2.
- In RHEL Linux environments:
- Ensure that Splunk UBA has access to RHEL repositories.
- When installed on RHEL 8.x operating systems, Splunk UBA uses a 2048 bit RSA encryption key. The Splunk platform that communicates with Splunk UBA must also use a 2048 bit encryption key. See Red Hat Enterprise Linux 8.x cryptographic policies.
- Review the Known issues as well as What's new for this release in the Release Notes manual for issues, enhancements, and changes that might need to be addressed before upgrading.
- The software update contains two archive files approximately 1.1G and 4.8G. The total file size after extraction is 9.1G. Verify that you have enough free space in /home/caspida to store the extracted installer files.
- Backup your system. See Prepare to backup Splunk UBA in Administer Splunk User Behavior Analytics.
- Make sure your system is running normally by using the
uba_health_check.shshell script.See Check system status before and after installation for more information about the script./opt/caspida/bin/utils/uba_health_check.sh
- When you upgrade Splunk UBA to version 5.4.0, the Splunk UBA Monitoring App as present on UBA nodes is also upgraded to the latest app version of 1.1.4. This monitoring app upgrade overwrites files in the
/opt/splunk/etc/apps/Splunk_UBA_Monitor/default/directory.
If you made any changes to these files, backup your changes before starting the UBA upgrade process. You can later apply those changes back.As a best practice, make changes in the local directory (
/opt/splunk/etc/apps/Splunk_UBA_Monitor/local/) and not the default directory. - If your caspida account user has restricted sudo access, follow the steps in Enable all sudo access for the caspida account to temporarily provide sudo access privileges.
- After the upgrade is complete, follow the steps in Restrict sudo access for the caspida account to re-secure your caspida user.
Verify Postgres Collate and Ctype values
Perform the following steps to verify the values of Collate and Ctype:
Run these commands on the Postgres node. For a 20-node deployment, that is node 2. For non-20-node deployments, that is node 1.
- Check the Collate and Ctype values in a database. Confirm the values are
en_us.UTF-8.
Run the following command:psql -d caspidadb -c "\l"
- If the values are correct, you are done.
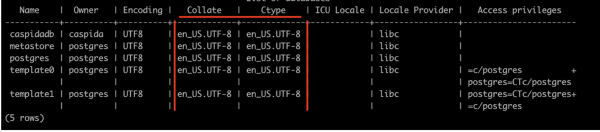
The following image shows an example of correct Collate and Ctype values:

If your Collate and Ctype configuration is not set to en_us.UTF-8, perform the following steps before proceeding with a UBA upgrade. Taking these steps avoids potential data corruption issues in the Postgresql database on your current UBA version:
These steps must be performed on the affected version of UBA where the Postgres Collate and Ctype configuration is not set to en_us.UTF-8.
- Run the following command to stop UBA and all services on the management node of the version of UBA where the Postgres Collate and Ctype configuration is not set to
en_US.UTF-8:/opt/caspida/bin/Caspida stop-all
- Perform the following steps to extract and use the data migration script from the UBA 5.4.3 package on the database node as per your deployment:
- Download and extract UBA 5.4.3 upgrade package in /home/caspida/:
$ tar xvzf /home/caspida/splunk-uba-software-upgrade-package_543.tgz
Splunk-UBA-Platform-5.4.3-20250606-26774242.tgz
Splunk-UBA-Platform-5.4.3-20250606-26774242.tgz.md5sum
uba-ext-pkgs-5.4.3.tgz
uba-ext-pkgs-5.4.3.tgz.md5sum
- Extract the UBA-Platform-5.4.3 build into a temporary folder in /home/caspida/ directory:
mkdir -p /home/caspida/tmp/
tar xfvz Splunk-UBA-Platform-5.4.3-20250606-26774242.tgz -C /home/caspida/tmp/
- Copy the
migrate_psql_collate_ctype.shscript from the above tmp directory into /opt/caspida/bin/ directory:cp /home/caspida/tmp/bin/migrate_psql_collate_ctype.sh /opt/caspida/bin/
- Provide executable permission to the
migrate_psql_collate_ctype.shscript for data migration:chmod u+x /opt/caspida/bin/migrate_psql_collate_ctype.sh
- Download and extract UBA 5.4.3 upgrade package in /home/caspida/:
- Update locale settings on your system:
System Steps RHEL/OEL 1. Update the /etc/locale.conf file with the following configuration: LANG="en_US.UTF-8" LC_ALL="en_US.UTF-8" LC_CTYPE="en_US.UTF-8"
2. Run the following command to source /etc/default/locale:
source /etc/locale.conf
Ubuntu 1. Update the /etc/default/locale file with the following configuration: LANG="en_US.UTF-8" LC_ALL="en_US.UTF-8" LC_CTYPE="en_US.UTF-8"
2. Run the following command to source /etc/default/locale:
source /etc/default/locale
- Once the UBA 5.4.3 migration script is inside the /opt/caspida/ directory , perform data backup of Postgres database using the
migrate_psql_collate_ctype.shscript:Run this script on the database host only. You can identify your postgres database.host from the deployment configuration file - /opt/caspida/conf/deployment/caspida-deployment.conf.
$ /opt/caspida/bin/migrate_psql_collate_ctype.sh -b
This creates a backup file named psql-backup-[BACKUP_DATE] under the /home/caspida/ directory. For example:
psql-backup-22_Apr_2024-17-49-12 - Verify the size of the backup file using the following command:
ls -lrth /home/caspida/ | grep psql-backup
- Perform restore from the backup file created in Step 4 using the
migrate_psql_collate_ctype.shscript: - Check the Collate and Ctype values in a database. Confirm the values are
en_us.UTF-8. Run the following command and check if the output contains correct configuration for the Collate and Ctype in the output:psql -d caspidadb -c "\l"
- Once, confirmed that the configuration values are correct, start UBA and verify any potential issues with the system:
/opt/caspida/bin/Caspida start-all
$ /opt/caspida/bin/migrate_psql_collate_ctype.sh -r /home/caspida/<your-backup-file>
Validate the UMASK value
Ensure the UMASK value of the root user is set to 0002 or 0022, or grant read permissions for newly created files and directories to the caspida user.
Complete the following steps to validate the UMASK value:
- Check the UMASK value of the root user by running the following command. The value must be 0002 or 0022:
umask
- Verify the UMASK value in the
/etc/login.defsfile:grep -i "^UMASK" /etc/login.defs
The umask value specified in
/etc/login.defsapplies as the default for all users. - Validate the permissions for new files and directories:
- As the caspida user, create a new file or directory using sudo to observe the permissions:
sudo touch testfile.txt
sudo mkdir testdirectory
- Next, check the permissions of the created files and directories. The read permission for
caspida(other)users is required:ls -l testfile.txt ls -ld testdirectory
To set the required umask value, edit the /etc/login.defs file and set the UMASK value to 022.
If the caspida user does not have read permissions, update the UMASK value accordingly. Failure to provide the required permission to the caspida user will result in a UBA installation or upgrade failure.
Instructions to upgrade your Splunk UBA deployment
After satisfying the prerequisite requirements, go to one of the following:
- Upgrade a single node AMI or OVA installation of Splunk UBA
- Upgrade a single node RHEL installation of Splunk UBA
- Upgrade a single node OEL installation of Splunk UBA
- Upgrade a distributed AMI or OVA installation of Splunk UBA
- Upgrade a distributed RHEL installation of Splunk UBA
- Upgrade a distributed OEL installation of Splunk UBA
Upgrade multiple Splunk UBA clusters that are using warm standby
If you have two Splunk UBA clusters running in a warm standby configuration, perform the following tasks to upgrade both clusters. Links to documentation in the Administer Splunk User Behavior Analytics manual are provided. In this example, the original primary system is called System A and the standby system is called System B.
- Verify that both the System A and System B are configured for warm standby and are running as expected. See Verify that the primary and standby systems are synchronized .
- Manually trigger a sync between System A and System B. See Synchronize the primary and standby systems on-demand.
- Perform a failover from System A to System B. See Failover to a standby Splunk UBA system.
- Switch the roles of both systems to reflect the failover. See Change the role of both systems to switch the primary and standby systems.
- Failover from System B back to System A. See Failover to a standby Splunk UBA system.
- Switch the roles of both system again to reflect the second failover operation. See Change the role of both systems to switch the primary and standby systems.
- Run the
uba_health_check.shscript. See Check system status before and after installation in the Install and Upgrade Splunk User Behavior Analytics manual. - Use the health monitor to verify that both Splunk UBA systems are up and running.
- Upgrade the primary system (System A) to this release. Follow the upgrade instructions for your operating system.
- Upgrade the standby system (System B) to this release. Follow the upgrade instructions for your operating system.
- Check
/var/log/caspida/UpgradeStatus-<release>.propertieson both systems to verify that the upgrade succeeded. See Verify a successful upgrade of Splunk UBA in the Install and Upgrade Splunk User Behavior Analytics manual.
| Secure the default account after installing Splunk UBA | Upgrade a single node AMI or OVA installation of Splunk UBA |
This documentation applies to the following versions of Splunk® User Behavior Analytics: 5.4.3
Feedback submitted, thanks!