Install the App
Install the App on each Splunk indexer and search head in your environment using the same user account that you used to install Splunk on your systems.
Before you install the App you must have:
- Splunk indexers or search heads installed on one or more systems in your environment.
- Sideview utils installed on your search heads.
- Splunk App for VMware downloaded from Splunkbase to a location in your environment.
To install Splunk App for VMware
- Transfer the App package file
splunk_app_vmware-1.0.2-138653.zipto a temporary location on each indexer and search head in your environment. Create a temporary directory, for example/tmpon *nix machines orC:\Windows\Tempon Windows machines. - Unzip the App package in the temporary directory. This creates a new
"etc"directory.
To install the App on each dedicated indexer in your environment:
- If you are running both search heads and indexers on the same Splunk instance, Go to the next section "To install the App on each search head (or combined indexer and search head) in your environment:"
- Copy all of the apps in the
etc/deployment-appsfolder onto each of the indexers. ($SPLUNK_HOME/etc/apps). Use recursive copy to copy all of the files and all of the sub-directories.:etc/apps/deployment-apps/Splunk_TA_vcenter/…Splunk_TA_vmware/…
- Look in
$SPLUNK_HOME/etc/appsand verify that all of the apps were copied correctly. - Go to
$SPLUNK_HOME/etc/apps/Splunk_TA_vcenter/default. - Look at your
inputs.conffile and check that it is set up as follows:- [script://.\bin\SetHost.bat]
- disabled = true
- Restart Splunk on each indexer. For both Windows and Unix instructions, see "Start and stop Spunk" in the Splunk Admin Manual.
- Now that the App is installed you must configure each of your Splunk indexers to listen for data on a (forwarding / receiving) port. See "Set up receiving" in the Splunk product documentation.
To install the App on each search head (or combined indexer and search head) in your environment:
- Copy the contents of the
appsdirectory in the temporaryetc/appsfolder into theappsdirectory of your Splunk install ($SPLUNK_HOME/etc/apps). Use recursive copy to copy all of the files and all of the sub-directories.etc/apps/DA-VMW-HierarchyInventory/…DA-VMW-LogEventTask/…DA-VMW-Performance/…SA-Utils/…SA-VMW-HierarchyInventory/…SA-VMW-LogEventTask/…SA-VMW-Performance/…Splunk_TA_vcenter/…Splunk_TA_vmware/…splunk_for_vmware/…
- Look in
$SPLUNK_HOME/etc/appsto verify that all apps were copied correctly. - Restart Splunk. For both Windows and Unix instructions, see "Start and stop Spunk" in the Splunk Admin Manual.
- Log into Splunk Web on the search head.
- Open a browser and enter the IP address and port number of the OS hosting your search head: http://<ipaddress:8000/>
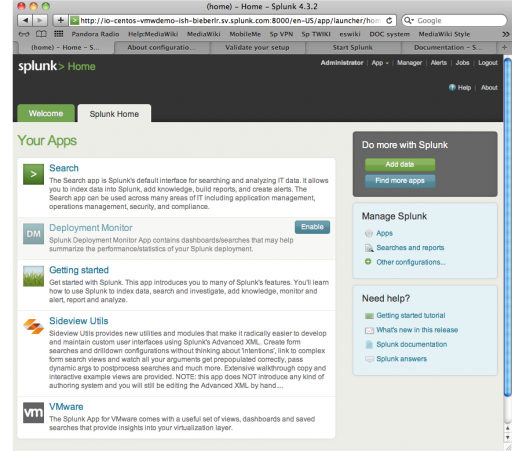
- The Splunk Home page is displayed showing all installed apps. Select Splunk App for VMware from the list. The app is also available from the App menu on the Home screen.
- If this is a first time install, you are automatically redirected to the Setup page. Complete the details and continue.
- If you have not installed Sideview utils you will be informed at this point and you can install it from here. If you need to, click the link and install SideView Utils, then return to the Setup page.
- Click save on the Setup page.
- Now that the App is installed you must configure each of your Splunk indexers to listen for data on a (forwarding / receiving) port. See "Set up receiving" in the Splunk product documentation.
Spunk is almost ready to receive VMware environment data. You must configure your indexers to handle vCenter Server log files. For more information, see Set the timezone for vCenter log files in this manual.
| Install Sideview Utils on your search head(s) | About the Add-on |
This documentation applies to the following versions of Splunk® App for VMware (EOL): 1.0, 1.0.1, 1.0.2

 Download manual
Feedback submitted, thanks!