Create vCenter service accounts
Configure users and roles for vCenter
To create service accounts for the Splunk for VMware solution, you first need to create vCenter users, create roles, and then assign the users to the roles. This topic shows you how you can do this for vCenter.
Create users
A user is required for authentication and is assigned a role in later steps for authorization. The following steps show how to create local users. If you are using ActiveDirectory for authentication on your Windows OS (vCenter) machines and / or your ESX/i hosts, please skip to the "Make users in ActiveDirectory" section below.
Make local users on your Windows OS (vCenter) machines
Perform these steps to create a local user on each of your vCenter machines.
- Log into the Windows OS with an administrator account.
- Open the WindowsStart menu, then click Control Panel.
- In the User Accounts screen, click Add or remove user accounts.
- In the Manage Accounts window, click Create a new account.
- Enter a name for the account (e.g. splunksvc) and select Standard user. Note if you add the new user as Administrator the user will automatically have an Administrator role in vSphere and a lesser role assigned to it will have no effect.
- Click Create Account.
- In the Manage Accounts screen now click on your new user.
- In the Change an Account screen, click Create a password and assign the user a password.
- The new user account is displayed as a Standard user and the account shows that it is Password protected.
- You now have a local Windows user compatible with the vSphere permissions system.
See Microsoft Windows documentation for further information.
Make users in ActiveDirectory
In a VMware environment, you can join your ESX/i hosts to an ActiveDirectory domain for authentication. Service accounts have to be created on all ESX/i hosts for the Splunk for VMware solution to work correctly. If any of your machines are not configured to use AD authentication, then you must create a "local" user on each one (see the relevant sections above for steps on how to do that).
For machines that are participating in an AD domain, you must create a service account in the given domain using the appropriate control panel in Windows Server. Most VMware environments use a single AD domain for authentication. However, if you are using multiple AD domains, then you must create a service account in each domain that your VMware environment is using.
How to create a service account within AD can vary depending upon your specific environment. Detailed steps are beyond the scope of this document. Contact your AD administrator to learn how to do this correctly for your environment. Here is an article that also may be helpful: http://technodrone.blogspot.com/2010/07/esxi-41-active-directory-integration.html.
After you have created the service account(s) in AD, you must create a role and map it to the service account you just created (in AD). The procedure is the same as that for creating local accounts. Follow the instructions in Create roles on each Esx/i host.
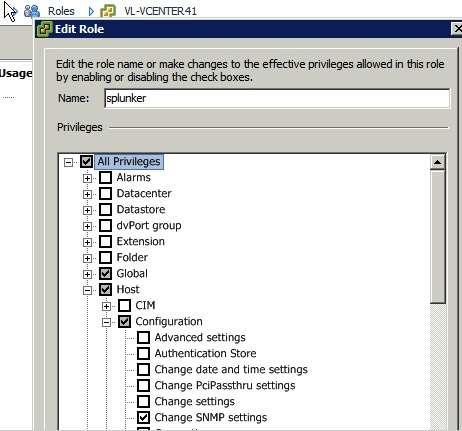
Create roles
You need to create roles on each vCenter machine.
To create a role on vCenter:
- Open up the vSphere client and connect to the vCenter. Log in with administrative privileges.
- Click Home in the path bar.
- Under Administration click Roles.
- Click the Add Role button.
- In the Add new Role dialog, enter a name for the role (e.g. splunkreader).
- Select the appropriate permissions for the role (see Required permissions in vSphere below).
Required permissions in vSphere
The following table lists the permissions for the role you create in vCenter for all of the VMware versions we support (5.0, 5.0 update 1, and 5.1). This is required so that the Forwarder Appliance can collect data from the VC.
| Permission |
|---|
| Global.Diagnostics |
| Global.Licenses |
| Global.Settings |
| Host.Configuration.Change SNMP settings |
| Host.Configuration.Hyperthreading |
| Host.Configuration.Memory configuration |
| Host.Configuration.Network configuration |
| Host.Configuration.Power |
| Host.Configuration.Security profile and firewall |
| Host.Configuration.Storage partition configuration |
| Sessions.View and stop sessions |
| System.Anonymous* |
| System.Read* |
| System.View* |
Click OK and you should see your role in the list of roles. If so, then you're done!
Note: For user-defined roles, the system-defined privileges "System.Anonymous", "System.Read", and "System.View" are always present.
Assign users to roles
- In the vSphere client and connect to the vCenter or ESX/i host that contains the user and role you created and now want to link together.
- Go to the Home->Inventory->Inventory screen on an ESX/i host or the Home->Inventory->Hosts and Clusters screen on a vCenter.
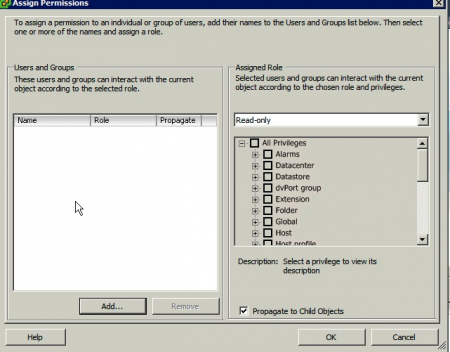
- Right-click on the root object in the tree on the left and click "Add Permission" from the context menu.
- On the left of the Assign Permissions window, under Users and Groups click Add... .
- Select the user you wish to assign a role to (e.g. splunksvc) from the list box and click Add then click OK.
- On the right of the Assign Permissions window, under Assigned Role select the role you wish to assign to the user from the pull down menu (e.g. splunkreader).
- Make sure the Propagate to Child Objects check box is ticked, without it your user will not have all of the necessary permissions.
- Click OK and verify that your user is listed on the permissions tab and has the role you assigned.
Verifying log in credentials
Now that you have have service accounts set up on each VC and ESX/i host in your environment, you can verify that you set up your user credentials correctly for each one. To test that your credentials work correctly on a target machine, you can point the vSphere client at the machine or you can use a web browser to access its Managed Object Browser (MOB).
To validate credentials for a target machine using the MOB, provide the initial URL of that machine (hostname) with /mob appended to the end:
https://<IP or DNS hostname of vCenter server or ESX/i host>/mob
You will be presented with a login dialog box, similar to the one shown here:
In some cases you may need to "add a security exception" in the browser to display the login dialog box. For the specific VC or ESX/i host that you are verifying, enter the corresponding username / password combination for that VC or ESX/i host.
Important: Do this validation step for each VC or ESX/i host that you created a service account for in the steps above. Creating a service account for a VC and validating that it works on the VC does not mean that it will also work on the ESX/i hosts in your environment. VC and ESX/i hosts have completely independent security subsystems. You must do the creation / mapping steps, as shown in this topic, for each VC and ESX/i host independently, and validate each one independently.
The service account credentials (username / password) you use to access the MOB are the same credentials used by the FA to get VMware data. You will use these credentials in your engine.conf and / or credentials.conf file(s) in a later installation step. If the credentials are not properly verified, the solution will not work properly. Although login problems are placed into the solution logs, they are nonetheless a pain to diagnose after the fact. It is much easier to make sure the service account credentials work properly beforehand.
If your login is not successful, then it will simply display the login box again with no further indication of failure. Try re-entering your username / password combination a few times to ensure that a typing error is not preventing you from accessing the MOB. If your login remains unsuccessful, retrace the steps you followed to create the service accounts. Multiple failures usually indicates that there was a problem setting up the credentials when you created the user account, role, or mapping the permissions. Re-trace your creation steps (above) for this particular machine to fix the issue.
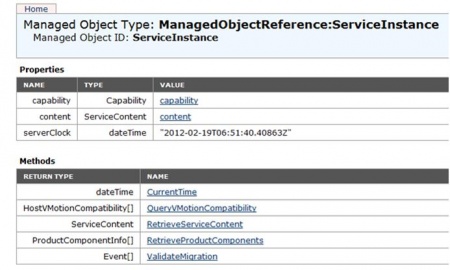
If you are successful logging into the MOB, then a Web page similar to the following is displayed for each VC or ESX/i host:
Congratulations! Your service account is set up correctly! Now just remember to do this for each VC and ESX/i host that you will add to the Splunk for VMware Solution and you will be all set.
Note: You can also test that you created valid user credentials by logging into the VC machine or ESX/i host using the vSphere Client. If you can point the vSphere Client at each machine and log in successfully using the corresponding credentials, then you have correctly set up the service account. If is effectively the same as logging into the target machine's MOB.
| Go to Splunkbase | Install UF or LF on each vCenter machine |
This documentation applies to the following versions of Splunk® App for VMware (EOL): 2.0


 Download manual
Feedback submitted, thanks!