Configure data collection
In Configure Data Collection, configure the data inputs and setup page for your add-on. This page displays a list of data inputs that you have configured for your add-on. Data inputs determine how you will get data into your add-on:
- Using a REST API call
- Running a shell command script
- Using a modular input created from your own Python code
You can also configure a setup page for your add-on.

Once you have added data inputs to your add-on, you can manage them from the Configure Data Collection page. Data inputs you create for your add-on also appear on the Settings > Data Inputs page.
- Notes
- Data inputs must be enabled so that Splunk can start indexing the data from them. You'll need indexed data if you want to perform field extractions and CIM mapping. Data inputs you create are enabled by default.
- For each data input you create, the Add-on Builder creates an input called "TAB_example", which is visible on the Settings > Data Inputs page. Do not modify this input, which is used by the Add-on Builder. Instead, if you want to change settings for the data input, access the options from the Configure Data Collection page in the Add-on Builder.
Add a data input using a REST API
Build the data collection for your add-on to gather data from a REST API that doesn’t require authentication or that uses authentication that can be requested statically in an HTTP header. For more complex authentication, use a modular input created from your own Python code.
- On your add-on homepage, click the Configure Data Collection icon.
- On the Configure Data Collection page, click Add Data.
- On the Choose Input Method page, select Modular input using a REST API.
- On the Data Input Properties tab:
- Enter a name for the source type to create for this data input.
- Enter an input name, title, and description.
- Specify a collection interval indicating how often to retrieve data using this input, in seconds.
- Optionally, click the Data Input Variables tab to specify one or more variables that are required for users to configure your data input.
- Click Next.
- On the Data Input Definition tab:
- Specify a URL for a REST endpoint.
- Select the REST method (GET or POST).
- Optionally, specify REST headers for the REST call.
- If you set up configuration variables, enter sample values for testing the input.
- Click Test to run the REST command and test the data input configuration.
- Click Save to save the data input, then click Finish.
The Create Data Input wizard starts.
For each variable, drag a text field from the Component Library to the center panel, then specify its properties in the Property Editor.
For more about passing parameter values to a variable in a REST URL, a REST header, a REST body, see Use variables in the REST API and shell commands.
The Output section indicates whether the REST command succeeded (sample data is displayed) or failed (the error message is displayed). If your input failed, click < to go back and change settings as needed.
The Add-on Builder displays a summary of the new data input, along with suggested next steps. You must restart Splunk Enterprise before you can perform related activities, such as extracting fields.
Add a data input using shell commands
Get data into your add-on by using a script of shell commands.
- On your add-on homepage, click the Configure Data Collection icon.
- On the Configure Data Collection page, click Add Data.
- On the Choose Input Method page, select Modular input using shell commands.
- On the Data Input Properties tab:
- Enter a name for the source type to create for this data input.
- Enter an input name, title, and description.
- Specify a collection interval indicating how often to retrieve data using this input, in seconds.
- Optionally, click the Data Input Variables tab to specify one or more variables that are required for users to configure your data input.
- Click Next.
- On the Data Input Definition tab:
- Enter the shell commands.
- If you set up configuration variables, enter sample values for testing the input.
- Click Test to run the shell commands and test the data input configuration.
- Click Save to save the data input, then click Finish.
The Create Data Input wizard starts.
For each variable, drag a text field from the Component Library to the center panel, then specify its properties in the Property Editor.
For more about passing parameter values to a variable in a shell command, see Use variables in the REST API and shell commands.
The Output section indicates whether the shell commands succeeded (sample data is displayed) or failed (the error message is displayed). If your input failed, click < to go back and change settings as needed.
The Add-on Builder displays a summary of the new data input, along with suggested next steps. You must restart Splunk Enterprise before you can perform related activities, such as extracting fields.
Add a data input by writing your own code
Use this option to implement your own data collection mechanism using Python code.
- On your add-on homepage, click the Configure Data Collection icon.
- On the Configure Data Collection page, click Add Data.
- On the Choose Input Method page, select Modular input using your own Python code.
- On the Data Input Properties tab:
- Enter a name for the source type to create for this data input.
- Enter an input name, title, and description.
- Specify a collection interval indicating how often to retrieve data using this input, in seconds.
- Click the Data Input Variables tab to specify one or more variables for your data input. At least one variable is required.
- Click the Add-on Setup Parameters tab to create a setup page for your add-on.
- Click Next.
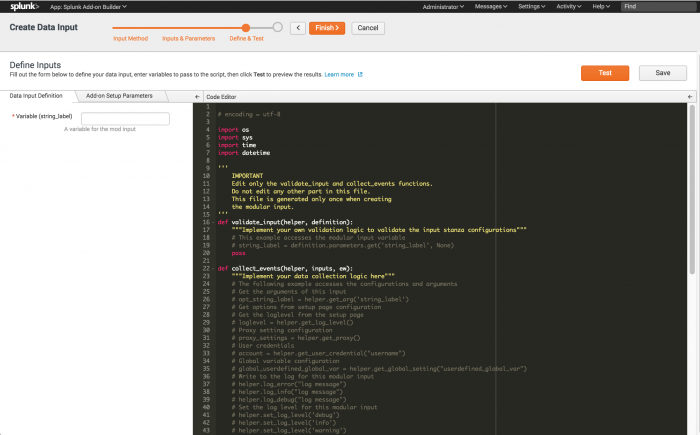
- On the Data Input Definition tab in the Code Editor panel, edit the Python code to create your modular input.
- Add code under the validate_input function to provide validation logic.
- Add code under the collect_events function to add data collection logic.
- Use the helper functions, which are dynamically generated as commented code, as a guide to working with the input parameters you defined in the previous step.
- The autogenerated code contains a working example that generates a random number.
- On the Data Input Definition tab, enter sample configuration values for testing the input.
- If you created a setup page, on the Add-on Setup Parameters tab enter sample values to test the setup page.
- Click Test to run your code and test the data input configuration.
- Click Save to save the data input, then click Finish.
The Create Data Input wizard starts.
For each variable, drag a text field from the Component Library to the center panel, then specify its properties in the Property Editor.
The first time users run your add-on, this setup page prompts user for information that is required by your add-on. The parameters defined on the setup page apply to your whole add-on, not just for this particular alert action. You can select pre-configured options to prompt for proxy settings, a user account, and to add logging information. You can also add custom variables by dragging fields from the Component Library to the center panel panel and specifying field properties in the Property Editor.
For more, see Create a setup page.

The Output section indicates whether your code succeeded (sample data is displayed) or failed (the error message is displayed). If your input failed, modify your code, or click < to go back and change settings as needed.
The Add-on Builder displays a summary of the new data input, along with suggested next steps. You must restart Splunk Enterprise before you can perform related activities, such as extracting fields.
Use variables in the REST API and shell commands
You can pass parameter values to a variable in a REST URL, a REST header, a REST body, and in a shell command.
Following the Mako syntax, use the format ${varname} for the variable. Then, define a modular input variable for varname.
For example, let's say you want to use a URL such as http://localhost:5111/api/task/<taskID>, where <taskID> is a variable value.
When you define the REST API input, on the Inputs & Parameters step, click the Data Input Variables tab and add an input variable for Task ID with the internal name "taskid":

Next, on the Define & Test step when you specify the REST URL, use "http://localhost:5111/api/${taskid}". To test it, use an initial value, such as "t123". The resulting REST URL is "http://localhost:5111/api/task/t123".

Later, when your add-on is installed, in Splunk Web go to Settings > Data inputs and find the data input you created. You'll need to create a new configuration for the input and when you do, you are prompted to specify a value for the "taskid" variable:

Learn more
For more information, see the following Splunk Enterprise documentation:
- Source type naming conventions in the Splunk Add-ons manual.
- Modular inputs overview in the Developing Views and Apps for Splunk Web manual
- How to create modular inputs using Splunk SDK for Python on the Splunk Developer Portal
- Create a setup page for a Splunk app on the Splunk Developer Portal
| Create an add-on | Create a setup page |
This documentation applies to the following versions of Splunk® Add-on Builder: 2.0.0
Feedback submitted, thanks!