Create alert actions
In Create Alert Actions, create and configure alert actions, which appear in Splunk Enterprise for users of your add-on. Alert actions might define third-party integrations, add custom functionality, or support adaptive response actions for Splunk Enterprise Security.

Once you have added alert actions to your add-on, you can manage them from the Alert Action page under Create Alert Actions. Your alert actions also appear on the Settings > Alert Actions page in Splunk Web.
Create an alert action
- On your add-on homepage, click the Create Alert Actions icon.
- On the Alert Actions page, click New Alert Action.
- The Create Alert Action wizard starts.
- On the Alert Action Properties page, enter the properties for this alert action:
- Enter a name, label, and description for this alert action. The label is the friendly name that appears in Splunk Web.
- Optionally, click Upload my icon if you want to add an icon, such as a logo, to this alert action.
- If you want to create an adaptive response action, see Create an adaptive response action for Enterprise Security, below.
- Click Next.
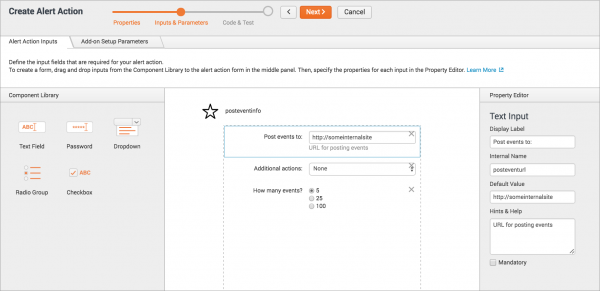
- On the Alert Action Inputs tab, specify one or more input fields for this alert action.
- For each input, drag a field from the Component Library to the center panel, then specify its properties in the Property Editor.
- Click the Add-on Setup Parameters tab to create a setup page for your add-on.
- The first time users run your add-on, this setup page prompts user for information that is required by your add-on. The parameters defined on the setup page apply to your whole add-on, not just for this particular alert action. You can select pre-configured options to prompt for proxy settings, a user account, and to add logging information. You can also add custom variables by dragging fields from the Component Library to the center panel panel and specifying field properties in the Property Editor.
- For more, see Create a setup page in this manual.
- Click Next.
- On the Alert Action Parameters tab, in the Code Editor panel edit the Python code to create your alert action.
- Find the comment
# TODO: Implement your alert action logic here, which indicates where to add your code. - Use the helper functions, which are dynamically generated as commented code, as a guide to working with the input parameters you defined in the previous step.
- On the Alert Action Parameters tab, enter sample values for testing this alert action.
- If you created a setup page, on the Add-on Setup Parameters tab enter sample values to test the setup page.
- Click Test to test your code and the alert action configuration.
- The Output section indicates whether the command succeeded or failed. If your alert action failed, modify your code or click < to go back and change settings as needed.
- Click Save to save this alert action, then click Finish.


Create an adaptive response action for Enterprise Security
An adaptive response action is a type of alert action that is specifically created for Splunk Enterprise Security. An adaptive response action can be triggered from correlation searches or on an ad hoc basis when examining a notable event on the Incident Review dashboard.
You can use the Splunk Add-on Builder to create an alert action that supports adaptive response. Adaptive response actions must conform to the Common Action Model, which is included with the Splunk Common Information Model add-on.
- Note The Splunk Common Information Model add-on version 4.6.0 or later is required by:
- Add-on developers to create adaptive response actions
- End users of your add-on to run adaptive response action
- Download the Splunk Common Information Model add-on from Splunkbase.
- Note The Splunk Common Information Model add-on version 4.6.0 or later is required by:
To create an adaptive response:
- On your add-on homepage, click the Create Alert Actions icon.
- On the Alert Actions page, click New Alert Action.
- The Create Alert Action wizard starts.
- On the Alert Action Properties page, enter the properties for this alert action:
- Enter a name, label, and description for this alert action. The label is the friendly name that appears in Splunk Web.
- Optionally, click Upload my icon if you want to add an icon, such as a logo, to this alert action.
- Select Support as an adaptive response action in Splunk Enterprise Security and fill out the fields as follows:
- For Category, enter the categories the action belongs to, such as "Information Gathering".
- For Task, enter the functions performed by the action, such as "scan".
- For Subject, enter the objects that the action's tasks can be performed on, such as "endpoint.file".
- For Vendor, enter the technology vendor that the action supports.
- For Product, enter the products that the action supports.
- For Version, enter the versions of the product that the action supports.
- Select Support as an ad hoc action if the action supports ad hoc invocation from the Actions menu on the Incident Review dashboard in Splunk Enterprise Security. For help determining whether your action supports ad hoc invocation, see Determine whether your action supports ad hoc invocation on the Splunk Developer Portal.
Then, fill in the related fields as follows: - Optionally, for Custom drilldown, enter a URL to a custom drilldown or view for the link that appears in the detailed view of a notable even on the Incident Review dashboard in Splunk Enterprise Security. If you don't specify a URL, the default URL runs a search for the result events created by this response action.
- For Sourcetype, enter the source type to which to assign the events produced as a result of this response action.
- Click Next.
- On the Alert Action Inputs tab, specify one or more input fields that are required for configuring this alert action.
- For each input, drag a field from the Component Library to the center panel, then specify its properties in the Property Editor.
- Click the Add-on Setup Parameters tab to create a setup page for your add-on.
- The first time users run your add-on, this setup page prompts user for information that is required by your add-on. The parameters defined on the setup page apply to your whole add-on, not just for this particular alert action. You can select pre-configured options to prompt for proxy settings, a user account, and to add logging information. You can also add custom variables by dragging fields from the Component Library to the center panel panel and specifying field properties in the Property Editor.
- For more, see Create a setup page in this manual.
- Click Next.
- On the Alert Action Parameters tab, in the Code Editor panel edit the Python code to create your alert action.
- Find the comment
# TODO: Implement your alert action logic here, which indicates where to add your code. - Use the helper functions, which are dynamically generated as commented code, as a guide to working with the input parameters you defined in the previous step.
- For example Python code showing how to create an adaptive response, see Walkthrough: Create an ES adaptive response action on the Splunk Developer Portal.
- On the Alert Action Parameters tab, enter sample values for testing this alert action.
- If you created a setup page, on the Add-on Setup Parameters tab enter sample values to test the setup page.
- Click Test to test your code and the alert action configuration.
- The Output section indicates whether the command succeeded or failed. If your alert action failed, modify your code or click < to go back and change settings as needed.
- Click Save to save the alert action, then click Finish.
To specify a target in an app outside Enterprise Security, use the format
../<app_context>/<viewname>?<additional drilldown parameters>. For example:
../my_app/my_view?form.sid=$orig_sid$&form.rid=$orig_rid$
To redirect to a custom view within Enterprise Security, use the format
/<viewname>?<additional drilldown parameters>. For example:
/my_view?form.sid=$orig_sid$&form.rid=$orig_rid$

You should also test and validate your response action in Enterprise Security. For more, see Validate your response action in Enterprise Security on the Splunk Developer Portal.
Learn more
For more information, see the following documentation:
- For creating adaptive response actions, see the Adaptive Response Framework on the Splunk Developer Portal
- For creating adaptive response actions, see Use the common action model to build custom alert actions in the Common Information Model Add-on Manual
- For installing the common action model, see Install the Splunk Common Information Model Add-on in the Common Information Model Add-on Manual
| Map to CIM | Validate and package |
This documentation applies to the following versions of Splunk® Add-on Builder: 2.0.0
Feedback submitted, thanks!