Splunk App for Data Science and Deep Learning workflow
The Splunk App for Data Science and Deep Learning (DSDL) lets you to integrate advanced custom machine learning and deep learning systems with the Splunk platform. You can build, test, and operationalize customized models that leverage GPUs for compute intense training tasks.
After installing and configuring DSDL you can follow these high-level steps to use the app for your own business case:
- Launch a new development container
- Open your preferred third-party tool
- Build and iterate the model
- Monitor and manage DSDL
Launch a new development container
Take the following steps to launch a new development container in DSDL:
- From the Configuration tab, select Containers. Come back to this page at anytime to see the number and status of your containers, and to stop or start containers.
Containers can take a few seconds to start and stop.
- Make a selection from the Container Image drop-down menu. There are several pre-built images for specific libraries, including Spark, River or Rapids.
- The Golden Image for CPU and GPU contains most of the recent popular libraries including TensorFlow, PyTorch and others.
- You can choose to build your own image from the public github repository for DSDL. See, https://github.com/splunk/splunk-mltk-container-docker.
- You can choose to make a customized container rather than use a pre-built one. See, https://anthonygtellez.github.io/2020/01/10/Creating-Custom-Containers-DLTK.html.
- Choose the GPU runtime drop-down value. The GPU runtime menu is populated based on the chosen Container Image.
- Choose the Cluster target drop-down value.
- Select Start to create the development container.
Open your preferred third-party tool
Affer the container is running, you can open the third-party tool of your choice. Options include JupyterLab, TensorBoard, MLFlow, and Spark UI . Selecting the third-party tool opens a new browser tab.

Build and iterate the model
Use your preferred third-party tool to load your dataset, choose algorithms and parameters, and build, test, and iterate your machine learning or deep learning model. For more detailed steps, see Develop a model using JupyterLab.
Monitor and manage DSDL
DSDL includes the following pages from which you can monitor and manage your containers and deployment of the app:
| DSDL page | Description |
|---|---|
| Configuration > Containers | An overview of your development and production containers. The dashboard refreshes every 5 seconds. Choose to stop or start any of your containers from this page. |
| Operations > Operations Overview | A visual overview of DSDL app operations including your total container images. |
| Operations > Container Status | An in-depth set of dashboard panels including container activity logs, fit command, apply command, and summary command duration statistics, and an error counter.
You need access to the |
| Operations > Runtime Benchmarks | Informative dashboards on the runtime behavior of DSDL for different dataset sizes. The available benchmarks only profile single-instance DSDL deployments that do not utilize any parallelization or distribution strategies. Use the benchmarks as a baseline for algorithms operating on small to medium sized datasets.
Algorithms and dataset size can result in very different runtime behavior, and is worth investigating on a case-by-case basis. |
Example use case with JupyterLab
To gain familiarity on how to use the Splunk App for Data Science and Deep Learning, you can explore the Notebook examples and how the related pre-built model can be viewed in the Splunk platform.
Perform the following steps to explore one of the Jupyter examples:
- From the Configurations > Containers page, select the JupyterLab button.
- The JupyterLab interface opens in a new tab. Login to JupyterLab with the default password of Splunk4DeepLearning.
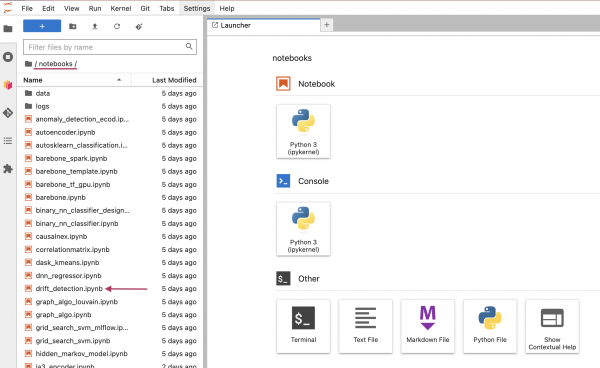
- From the notebooks menu, select the drift_detection.ipynb Notebook.
- In this example Notebook or any of the other pre-built Notebooks, you can interactively run the code cells and create additional cells for any additional code you want to test or develop. This can also include visualizations or any other functionality available in Python libraries or JupyterLab.
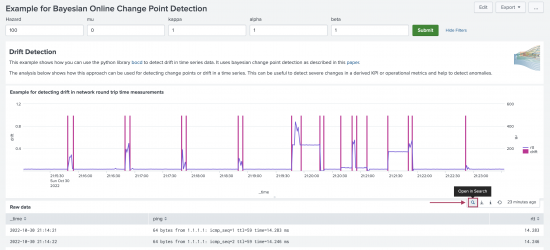
- Navigate back to the tab for your Splunk platform instance and select Examples > Data Mining > Example for Bayesian Online Change Point Detection.
- Select Submit.

- On this dashboard you can see how the Drift Detection algorithm is working on the sample data. On the Raw Data panel you can see some sample data of ping events with the numeric field
rttextracted. This field contains measures of ping round-trip times. The Drift Detection algorithm is applied to this target variable. - From the Example for detecting drift in network round trip time measurements panel, select the Open in Search icon. This opens a new tab where you can view the underlying SPL.
- The SPL shows how the Drift Detection algorithm is integrated into the search pipeline. The first six lines perform all the necessary data preprocessing. The
| fit MLTKContainerstatement passes the dataframe over to the container to run thealgo=drift_detectionwith the given parameters. The additional columndriftgets added to the search results and contains the detected drifts with a simple binary 0 or 1 mark.


| Leverage provided examples of the Splunk App for Data Science and Deep Learning | Develop a model using JupyterLab |
This documentation applies to the following versions of Splunk® App for Data Science and Deep Learning: 5.0.0, 5.1.0, 5.1.1, 5.1.2
Feedback submitted, thanks!