Identity Management
The asset and identity system used by the Splunk App for Enterprise Security leverages information from multiple lookup lists. At search time, the app correlates events with customer-defined sources of asset or identity information using the "automatic lookups" capability in Splunk.
Automatic lookups can be based on a dynamic script that runs at the time of the search, or against static lookup tables that already exist on the search head. Because script-based automatic lookups are expensive in terms of performance, the Splunk App for Enterprise Security takes a hybrid approach and populates static lookup tables at intervals with information derived from external data sources.
This asset/identity correlation system allows any lookup table defined on the Splunk search head to be incorporated into a merged, optimized asset or identity lookup table file that is then used to perform automatic lookups.
Browse to Configure > Identity Management to review the list of configured assets and identities.
See "Add fields from external data sources" in the Splunk documentation for details on configuring automatic lookups. Enterprise Security includes predefined automatic lookups for asset and identity correlation - these should not be modified.
Click the list name to view the Identity Manager Settings for this list. The source column in this table shows the location of the list file. Click Enable / Disable or Clone next to the list name to enable / disable a list or clone an existing list.
Assets list
The currently available assets can be viewed in Security Domains > Identity > Asset Center in the Splunk App for Enterprise Security.
The assets lists provides external information about the devices on your system, such as the asset priority, owner, and business unit; the geographic location of the asset; and the asset DNS and Windows machine name. Some of these fields, such as latitude (lat), longitude (long), and priority are used for dashboard charts and to calculate the urgency of notable events. Other fields, such as business unit and category, are used by the filters at the top of the domain dashboards. You can search on any of these fields from the asset list and use them while you are investigating events.
When an event contains a field that Enterprise Security identifies as belonging to a host or device, Enterprise Security looks up the device in the asset list and generates new fields that contain the information from the asset list. The asset information provides Enterprise Security with contextual information about the systems involved in an event or related to a notable event that can allow a security analyst or incident investigator to easily identify additional asset information such as asset priority, categories, business unit, owner, and other information. Administrators are encouraged to populate the asset list by either building an automated capture from an existing asset database or to simply populate the file manually.
For more information about how the Assets list is used in Splunk for Enterprise Security, see Asset Management in the User Manual.
Assets list location
Assets lists are located under the identity correlation supporting add-on:
$SPLUNK_HOME/etc/apps/SA-IdentityManagement/lookups/
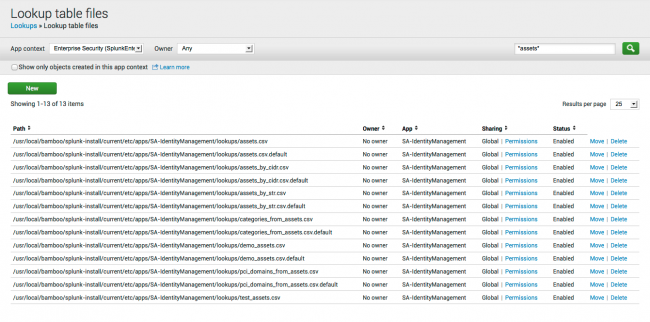
To view the location of the assets in your deployment, go to Settings > Knowledge > Lookups from Splunk Home. Search for "*assets*". The currently available assets are displayed.
Asset fields
The first line of an assets file (like assets.csv) lists all of the asset fields:
Note: This default set of column headers must be in any asset file you use.
The following table describes each field:
| Field | Description | Example |
|---|---|---|
| ip | IP address (can be a range). | 2.0.0.0/8,1.2.3.4, 192.168.15.9-192.169.15.27 |
| mac | The MAC address of the host (can be a range). | 00:25:bc:42:f4:60, 00:25:bc:42:f4:60-00:25:bc:42:f4:6F |
| nt_host | The Windows machine name of the host | ACME-0005 |
| dns | The DNS name of the host. | acme-0005.corp1.acmetech.com |
| owner | The name of the user who owns or uses the host | b.franklin |
| priority | The priority of the host. | Must be one of the following: unknown, informational, low, medium, high or critical |
| lat | The latitude of the asset. | 41.040855. |
| long | The longitude of the asset. | 28.986183. |
| city | The city in which the asset is located | Chicago |
| country | The country in which the asset is located | USA |
| bunit | The business unit of the asset | emea |
| category | One or more categories for the asset. To specify multiple categories for an asset, use a vertical bar. To use this field, you must set up the category list. | server |
| pci_domain | Not used with Enterprise Security. | See Configure assets in the Splunk App for PCI Compliance Installation and Configuration Manual. |
| is_expected | Indicates whether events from this asset should always be expected; if set to true, then an alert will be triggered when this asset quits reporting
events. |
true (leave blank to indicate "false") |
| should_timesync | Indicates whether this asset must be monitored for time-syncing events | true (leave blank to indicate "false") If true, then an alert will be triggered if the host has not performed a time-sync event (such as a NTP request) |
| should_update | Indicates whether this asset must be monitored for system update events | true (leave blank to indicate "false") |
| requires_av | Indicates whether this asset must have anti-virus software installed | true (leave blank to indicate "false") |
Category list
The category list specifies a list of categories that can be used for the category field in the assets list. The category list can be any set of categories you choose. Common examples are compliance and security standards (such as PCI) governing the asset, or functional categories (such as server, domain_controller, and so on).
Create your assets list
To create your assets list:
1. Populate a comma-separated value (CSV) file containing the asset information. This can be done by exporting data into CSV format from a existing source.
Important: The CSV file must use Unix line endings.
2. Add the file to your deployment using the Identity Manager Settings.
3. Update the list periodically in order to ensure that the Splunk App for Enterprise Security has up-to-date information.
An automatically updating asset list will keep the asset data current and can accommodate formatting requirements. Automatic asset updates can be done by connecting to an external asset database using the DB Connect app or through scripted inputs that manage and import asset data from other sources. The implementation details depend on the technology that contains the asset information and is beyond the scope of this document.
Splunk automatically loads the assets list at search time. See "Changes to Assets and Identities" topic in the Enterprise Security User Manual for more information about the Asset and Identity correlation system.
Add a new assets list
After you create your assets list CSV file, you need to add it to the Splunk App for Enterprise Security.
To add a new assets list to the app:
1. From within the Splunk App for Enterprise Security, go to Configure > Identity Management > Identity Manager.
2. Click New.
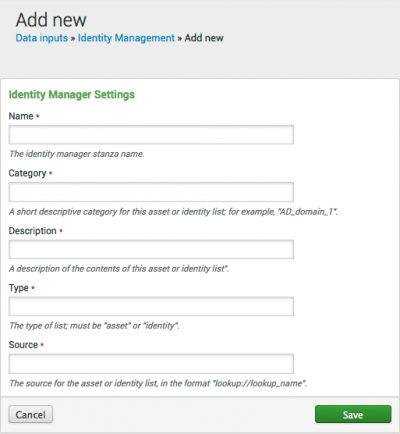
Add the information about the list to the fields in Identity Manager Settings.
3. Click Save when you are done adding the information.
Set permissions
Set the permissions for your new asset list to make it visible in the the app. You need to set permissions in both the lookup table file and the lookup table definitions.
To set the lookup table file permissions:
1. Go to Settings > Lookups > Lookup table files.
2. Click "Permissions" next to the lookup name.
3. Set the permissions so the list visible to all apps and everyone can read the list.
4. Click Save to save your changes.
Now set the lookup table definitions permissions:
1. Go to Settings > Lookups > Lookup definitions.
2. Click "Permissions" next to the lookup name.
3. Set the permissions so the list visible to all apps and everyone can read the list.
4. Click Save to save your changes.
The permissions are now "Global" for your asset list lookup file.
Edit an existing assets list
Use the Lookup editor in Lists and Lookups to edit an existing assets list.
To edit an existing assets list from Lists and Lookups:
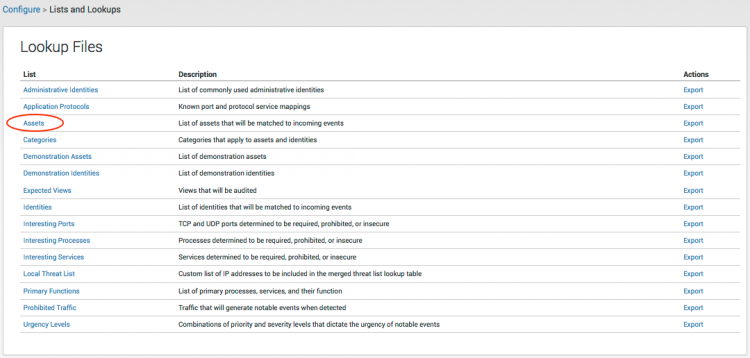
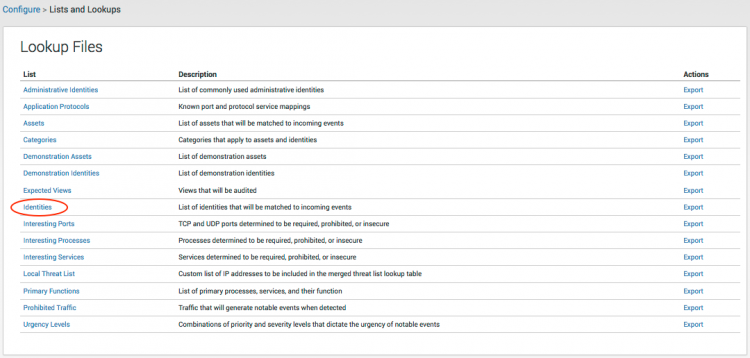
1. In the Splunk App for Enterprise Security, go to Configure > Data Enrichment and click Lists and Lookups.
2. Click the name of the assets list you want to edit.
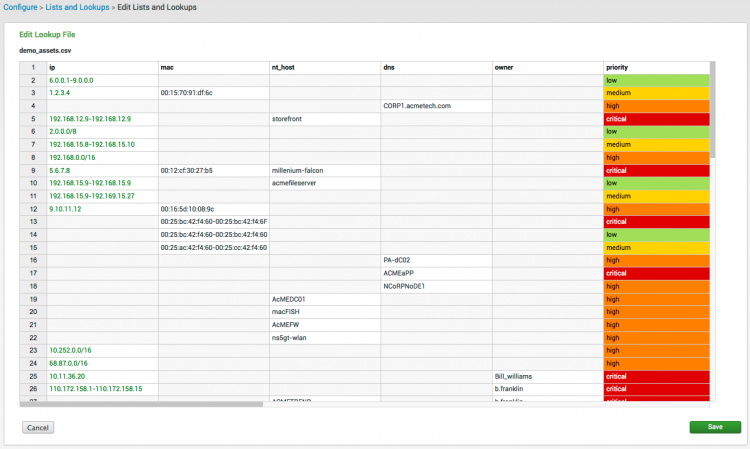
The CSV file opens as a table in the Lookup editor.
3. Use the scroll bars to look through the columns and rows of the table. Click in any cell of the table to add or replace content.
4. Click Save when you are finished.
You can also edit the assets list from Identity Management:
1. In the Splunk App for Enterprise Security, go to Configure > Identity Management.
The current list of lookup files for assets and identities for Enterprise Security is displayed.
2. In the "Source" column, click on the link for the file you want to edit.
3. The Lookup editor displays the CSV file in table format. Use the scroll bars to look through the columns and rows of the table. Click in any cell in the table to make changes.
4. Click Save when you are finished.
Define multi-homed hosts
What is a multi-homed host? It's a single host machine with multiple IP addresses and multiple MAC addresses. The Splunk App for Enterprise Security does not support defining multi-homed hosts using a pipe-separated syntax in the ip field in the asset list.
You can define multi-homed hosts by defining each IP address on a single line of the assets.csv file. During the de-duplication process, if the "dns" field remains constant across multiple asset records, the second and subsequent occurrences of the "dns" field will be discarded during the expansion process. This will raise an error in the logs, but the error should be benign because the asset record is actually identical to a previous asset record. There is no net loss of asset information.
The end result is for a lookup to succeed on each possible "key" field in the asset table - IP, DNS, nt_host, and MAC address. You can check to see whether this is working properly by conducting a manual lookup for each "key" field of an asset that you are concerned about.
For instance, if I defined a host with DNS name "MYHOST" and IP addresses 10.10.10.10 and 20.20.20.20, as shown below, there are actually four "key" values: both IP addresses, and two occurrences of "myhost". The one in bold would end up being discarded, but since it is identical with the previous one and all other fields in both records are identical. We still have all the information needed to construct the lookups for use in Splunk searches.
ip,dns,…
10.10.10.10,myhost,…
20.20.20.20,myhost,…
Identities list
Identities can be viewed in Security Domains > Identity > Identity Center in the Splunk App for Enterprise Security
The Identities lists provides information about the users on your system, such as the screen or login name, first and last name, and email address. Some of these fields, such as priority, watchlist, and endDate are used for dashboard charts and to calculate the urgency of notable events associated with identities. Other fields, such as business unit and category, are used by the filters at the top of the domain dashboards. You can search on any of these fields from the identity list and use them while investigating events.
When an event contains a field that the Splunk App for Enterprise Security identifies as belonging to a specific identity, the app looks up the identity in the identities list and generates new fields that contain the information from the identities list. The identity information provides the Splunk App for Enterprise Security with contextual information about the identities involved in an event or related to a notable event that can allow a security analyst or incident investigator to easily identify additional identity information such as priority, categories, business unit, watchlist, and other information. Administrators are encouraged to populate the identities list by either building an automated capture from an existing identity database or to simply populate the file manually.
For more information about how the Identities list is used in the Splunk App for Enterprise Security, see "Identity correlation" in the User Manual.
Identities lists locations
The Identities lists are located under the identity correlation supporting add-on:
$SPLUNK_HOME/etc/apps/SA-IdentityManagement/lookups/
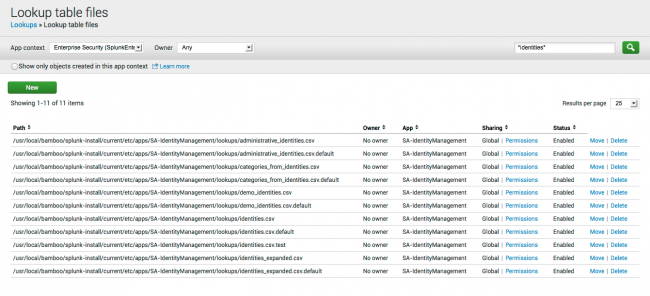
To view the location of the assets in your deployment, go to Settings > Knowledge > Lookups from Splunk Home. Search for "*identities*". The currently available assets are displayed.
Identities fields
The first line of the identities file (like identities.csv) lists all of the identities fields:
Note: This default set of column headers must be in any identities file you use.
The following table describes the fields:
| Column | Description | Examples |
|---|---|---|
| Identity (key) | Pipe-delimited list of usernames representing the identity | system | manager, admin | ESadmin, PS | BD |
| prefix | Prefix of the identity | Mr., Mrs., Ms., Dr. |
| nick | Nickname of the identity | Bobby, Spud, Dr. Z |
| first | First name of the identity | Gordon |
| last | Last name of the identity | Trisler |
| suffix | Suffix of the identity | Jr., Esq., M.D. |
| Email address of the identity | accounting@acmetech.com, gntrisler@acmetech.com | |
| phone | Telephone number of the identity | +1 (800)555-8924 |
| phone2 | Secondary telephone number of the identity | +1 (800)555-7152 |
| managedBy | Username representing manager of the identity | lietzow.tim, a.koski |
| priority | Priority of the identity | Value can be "low," "medium," "high," or "critical"; for instance, CEO would be "critical" |
| bunit | Business unit of the identity | emea, americas |
| category | Category of the identity; can be a pipe-delimited list |
intern, officer, pip, pci | secure, default | privileged |
| watchlist | Is the identity on a watchlist? | Value can be "true" or "false" |
| startDate | Start/Hire date of the identity | %m/%d/%Y %H:%M |
| endDate | End/Termination date of the identity | %m/%d/%Y %H:%M |
Category list
The category list specifies a list of categories that can be used for the category field in the identities list. The category list can be any set of categories you choose. Common examples are compliance and security standards (such as PCI) governing the identities, or functional categories (such as officer, domain_controller, and so on).
Create your identities list
To create your identities list:
1. Populate a comma-separated value (CSV) file containing the identity information. This can be done by exporting data into CSV format from a existing source.
Important: The CSV file must use Unix line endings.
2. Add the file to your deployment using the Identity Manager Settings.
3. Update the list periodically in order to ensure that the Splunk App for Enterprise Security has up-to-date information.
An automatically updating identity list will keep the user identities data current and can accommodate formatting requirements. Automatic identity updates can be done by connecting to an external identity repository such as Active Directory, or through scripted inputs that manage and import user data from other sources. The implementation details depend on the technology that contains the information and is beyond the scope of this document.
Splunk automatically references lookups at search time. See "Changes to Assets and Identities" topic in the Enterprise Security User Manual for more information about the Asset and Identity correlation system.
Add a new identities list
After you create your identities list CSV file, you need to add it to the Splunk App for Enterprise Security.
To add a new identity list to the app:
1. From within the Splunk App for Enterprise Security, go to Configure > Identity Management > Identity Manager.
2. Click New.
Add the information about the list to the fields in Identity Manager Settings.
3. Click Save when you are done adding the information. The list will now appear in the list of files shown in the Identity Manager.
Set identity list permissions
Set the permissions for your new identity list to make it visible in the the app. You need to set permissions in both the lookup table file and the lookup table definition.
To set the lookup table file permissions:
1. Go to Settings > Lookups > Lookup table files.
2. Click "Permissions" next to the lookup name.
3. Set the permissions so the list visible to all apps and everyone can read the list.
4. Click Save to save your changes.
Now set the lookup table definitions permissions:
1. Go to Settings > Lookups > Lookup definitions.
2. Click "Permissions" next to the lookup name.
3. Set the permissions so the list visible to all apps and everyone can read the list.
4. Click Save to save your changes.
The permissions are now "Global" for your identity list lookup file.
Edit an existing identities list
Use the Lookup editor in Lists and Lookups to edit an existing identities list.
To edit an existing identities list from Lists and Lookups:
1. In the Splunk App for Enterprise Security, go to Configure > Data Enrichment and click Lists and Lookups.
2. Click the name of the identities list you want to edit.
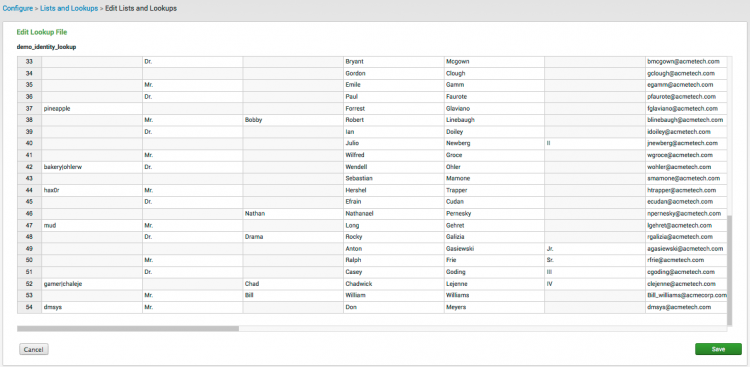
The CSV file opens as a table in the Lookup editor.
3. Use the scroll bars to look through the columns and rows of the table. Click in any cell of the table to add or replace content.
4. Click Save when you are finished.
You can also edit the identities list from Identity Management:
1. In the Splunk App for Enterprise Security, go to Configure > Identity Management. The current list of lookup files for assets and identities for Enterprise Security is displayed.
2. In the "Source" column, click on the link for the file you want to edit.
3. The Lookup editor displays the CSV file in table format. Use the scroll bars to look through the columns and rows of the table. Click in any cell in the table to make changes.
4. Click Save when you are finished.
Integrate new sources of asset and identity information
Assets and identities no longer have be in either assets.csv or identities.csv files; multiple lists of assets and identities can be used with the app. Two empty files are defined and ready to receive your information; the "static_assets" and "static_identities" lists. These can be manually edited to include new asset or identity information. More lists can also be added.
To enable a new source of asset or identity information in the Splunk App for Enterprise Security:
1. Create a lookup file to contain the asset or identity information. This lookup file can be empty initially if you plan to populate with information later using a scheduled search, or edit it manually with the Lookup table editor. For details, see the topics "Create your assets list" or "Create your identities list".
Use this CSV header line for asset information:
Use this CSV header line for identity information:
identity,prefix,nick,first,last,suffix,email,phone,phone2,managedBy,priority,bunit,category,watchlist,startDate,endDate
To review and manage the lookup table files manually, browse to the Lookups manager in Settings > Lookups > Lookup table files
2. Upload your new lookup file. The CSV file must be uploaded to create a new lookup table file. See "Add a new assets list" or "Add a new identities list" for details.
3. Set sharing permissions on the lookup table file to "Global".
To do this:
- a. From the Splunk UI, go to Settings > Lookups > Lookup table files
- b. Click "Permissions" under the "sharing" column
- c. Click the radio button be sure that the lookup table appears in "All Apps".
- d. Be sure users can read the lookup table (only the appropriate roles - normally
admin,ess_analyst,ess_admin,ess_user).
- e. Save the permissions.
4. Set sharing permissions on the lookup table definitions to "Global".
To do this:
- a. From the Splunk UI, go to Settings > Lookups > Lookup definitions.
- b. Click "Permissions" under the "sharing" column
- c . Click the radio button be sure that the lookup table definition appears in "All Apps".
- d. Be sure users can read the lookup table definition (only the appropriate roles - normally
admin,ess_analyst,ess_admin,ess_user).
- e. Save the permissions.
5. Make a lookup definition that refers to the file you just created, using the lookup definition manager.
To manage the lookup table definitions manually, use the lookup definitions URL:
https://localhost:8000/en-US/manager/SplunkEnterpriseSecuritySuite/data/transforms/lookups
6. Using the Identity Manager, add an "asset" or "identity" input stanza that refers to the new lookup definition. These parameters can be set in the UI using Identity Manager Settings.
To do this:
- a. From the Enterprise Security UI, go to Configure > Identity Manager.
- b. Click the lookup file name to open the Identity Manager Settings.
- c. In the "Type" field, enter "asset" or "identity".
- d. Save your changes.
To set lookup definitions manually, use the Identity Manager URL:
https://localhost:8000/en-US/manager/SplunkEnterpriseSecuritySuite/data/inputs/identity_manager
Here is an example of an identity stanza. The "url" parameter must have the syntax lookup://<lookup definition name>, where <lookup definition name> is the name of the lookup definition you created.
    [identity_manager://my_identities]
    category = my_identities
    description = My identity list.
    disabled = false
    target = identity
    url = lookup://my_identity_lookup
Warning: The name "url" in this stanza does not mean that a remote or web-based location can be used to store asset or identity information - this functionality is not currently supported. Only local lookup table files on the search head can be used to store asset or identity information.
7. Within 5 minutes after you save this stanza, the Identity Manager will merge the information in the "my_identity_lookup" lookup with the merged asset or identity list. To view the progress of this process, view the python_modular_input.log file via the filesystem or in the Splunk internal index.
index=_internal source=*python_modular_input.log
Note: The merge process checks for new input every 5 minutes, but does not perform any work unless an asset or identity table has been modified. Update the lookup table with new information to immediately change the contents of the merged asset/identity lists, or you can disable and then re-enable the corresponding Identity Manager stanza.
Add Active Directory information
Use a similar process create a new lookup file and add Active Directory information to your deployment.
To do this:
1. Create and add a lookup file as a source of asset or identity information. See "Create your assets list" or "Create your identities list" for details. This lookup file will become the target for a scheduled saved search to populate the lookup table file with information derived from Active Directory.
2. Install and configure the Splunk Support for Active Directory app, available separately from SplunkBase.
3. Using the "ldapsearch" command included in the SA-ldapsearch app, construct a search that updates the lookup table file you defined. The exact contents of this search will depend on your specific Active Directory configuration.
Here's an example search:
|ldapsearch domain=<domain_name> search="(&(objectclass=user)(!(objectClass=computer)))"
|makemv userAccountControl
|search userAccountControl="NORMAL_ACCOUNT"
|eval suffix=""
|eval priority="medium"
|eval category="normal"
|eval watchlist="false"
|eval endDate=""
|table sAMAccountName,personalTitle,displayName,givenName,sn,suffix,mail,telephoneNumber,mobile,manager,priority,department,category,watchlist,whenCreated,endDate
|rename sAMAccountName as identity, personalTitle as prefix, displayName as nick, givenName as first, sn as last, mail as email, telephoneNumber as phone, mobile as phone2, manager as managedBy, department as bunit, whenCreated as startDate
|outputlookup my_identity_lookup
Note: This search assigns static values for "suffix", "endDate", "category", "watchlist", and "priority" although in theory these could be derived from a value stored in Active Directory.
To test the Active Directory integration process, disable the Identity Manager stanza that refers to the "my_identity_lookup" lookup definition while you sort out issues with the integration process. This prevents unnecessary merges by the Identity Manager modular input.
| Configure users and roles | Configure lists and lookups |
This documentation applies to the following versions of Splunk® Enterprise Security: 3.1, 3.1.1, 3.2, 3.2.1, 3.2.2, 3.3.0, 3.3.1



 Download manual
Feedback submitted, thanks!