Step 6: Set up a Virtual Index
This step walks you through setting up a simple virtual index. If you would like more in-depth information about virtual index configuration, see "Add or edit a virtual index" in this manual.
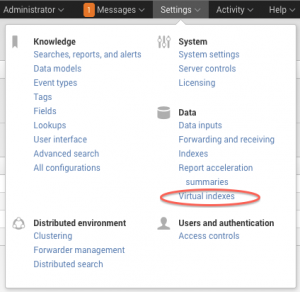
1. Select Manager > Virtual Indexes in the menu bar.
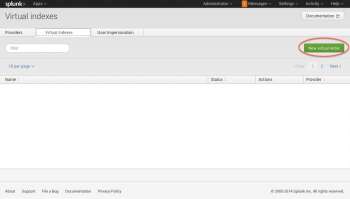
2. Click the Virtual Index tab (if it is not already selected) and click New Virtual Index.
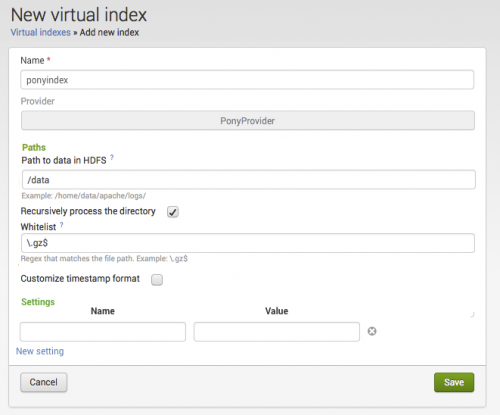
The New Virtual Index page appears:
3. Give your virtual index a Name in this example, we are using "ponyindex."
4. Provide the path to the data that Hunk will be accessing and reporting on. In our example, this is /data.
5. Optionally provide a Whitelist. In this example we are using \.gz$.
6. If you want to recursively process the directory, check the box. This is recommended.
7. Click Save to save your index and return to the Virtual Indexes page.
Note that we won't be using the optional partitioning fields for this example, but if you would like to learn more about them, see Add a virtual index.
| Step 5: Configure an HDFS provider | Step 7: Try a simple data search |
This documentation applies to the following versions of Hunk®(Legacy): 6.0, 6.0.1, 6.0.2, 6.0.3, 6.1, 6.1.1, 6.1.2, 6.1.3, 6.2, 6.2.1, 6.2.2, 6.2.3, 6.2.4, 6.2.5, 6.2.6, 6.2.7, 6.2.8, 6.2.9, 6.2.10, 6.2.11, 6.2.12, 6.2.13, 6.3.0, 6.3.1, 6.3.2, 6.3.3, 6.3.4, 6.3.5, 6.3.6, 6.4.0, 6.4.1, 6.4.2, 6.4.3, 6.4.4, 6.4.5, 6.4.6, 6.4.7, 6.4.8, 6.4.9, 6.4.10, 6.4.11


 Download manual
Feedback submitted, thanks!