Configure alert notifications in Splunk App for Infrastructure
When an alert triggers, it can initialize and send one or more notifications to help you start responding to the alert. Alert notifications include an email notification, or a notification using VictorOps For Splunk.
Before sending an alert notification, you must first configure either or both of the following depending on what type of notifications you are using:
Configure Email Server Settings
When an alert triggers, you can send an email notification to specified recipients with information about the alert. Before you can send an email notification, you must first configure the server settings for your Splunk implementation.
Prerequisites
- You must have administrator privileges.
Steps
- Go to Settings > Server settings.
- Select Notifications.
- In the Email Server Settings section, specify values for the following settings.
- Mail host: The default value is localhost.
- Email security: Select one of the available options.
- Username: Required for SMTP server authentication.
- Password: Required for SMTP server authentication.
- Confirm Password: Confirm your password for SMTP server authentication.
- Click Update Email Server Settings.
Your email notifications server settings is configured. To create an alert and set up an email notification action, go to the Create Alert dialog available from the chart actions on the Analysis Workspace.
Configure VictorOps Settings
VictorOps for Splunk (VictorOps) is an automated incident management software that aligns log management, monitoring, chat tools, and more to automate delivery of alert notifications. When VictorOps is integrated with Splunk App for Infrastructure, you can create and manage alerts to notify a designated person or on-call team with information about a triggered alert.
Prerequisites
- You must have administrator privileges on VictorOps.
- You must have an installed instance of VictorOps. VictorOps is available from Splunkbase at VictorOps For Splunk.
- Integration configured with Splunk App for Infrastructure, as described in this topic, or see the Splunk App for Infrastructure VictorOps Integration Guide which contains similar steps to what is in this section.
- VictorOps admin or user account created.
- Access to API key and Routing Key credentials from VictorOps
Steps
- In VictorOps, retrieve your API Key and Routing Key.
- Go to Settings > Alert Behavior > Integrations > All integrations.
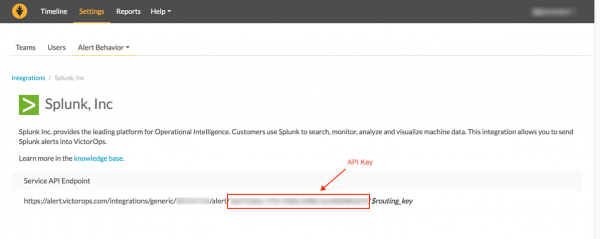
- Scroll to Splunk, Inc and click the icon to enable the integration.
- After the integration is enabled, the Splunk, Inc page displays with the Service API Endpoint information and API key. The API Key is the 32 character key as shown between alert and $routing_key, as shown in the screen below. Copy and save this key.
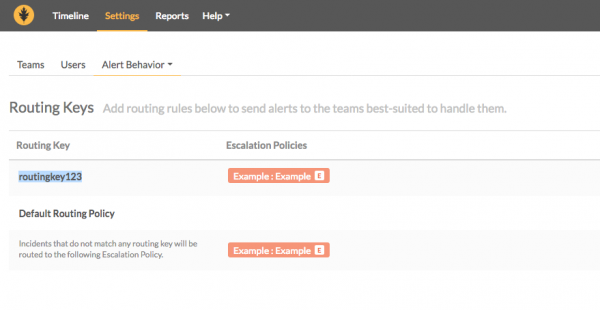
- Go to Settings > Alert Behavior > Routing Keys, and choose the routing key you want to use for this integration. Copy and save this key.
- Store the Splunk VictorOps API Key and Routing Key in Splunk App for Infrastructure.
- In Splunk App for Infrastructure, go to Settings > Notifications > VictorOps Settings.
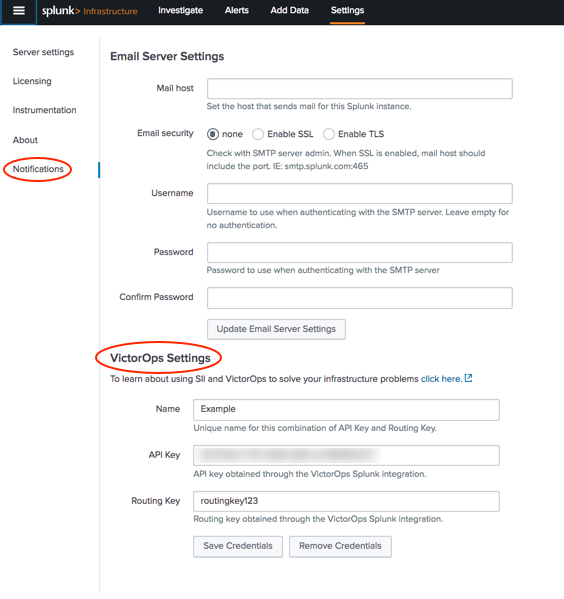
- Enter a unique Name to identify these credentials. Important: You cannot edit the VictorOps credentials name once it is created. If you want to edit this name, you must remove the account and create a new one.
- Enter your Splunk VictorOps API Key.
- Enter your Splunk VictorOps Routing Key.
- Click Save Credentials. A message displays stating Success saving VictorOps settings, and a test notification is sent to your VictorOps timeline.
- (Optional) Verify the authentication of Splunk App for Infrastructure in Splunk VictorOps.
- Go to your Splunk VictorOps timeline and validate a notification from Splunk App fro Infrastructure is displaying, stating Splunk SII, Info: Test verification integration.

- If this notice is not validated, check your API Key and Routing Key and retry saving your credentials. You are now integrated with VictorOps and can create notifications in Splunk App for Infrastructure when creating alerts.


Create and send a VictorOps alert notification
For information about creating and sending an alert using VictorOps, see Create and modify alerts in Splunk App for Infrastructure.
Remove VictorOps credentials
To remove saved VictorOps credentials from the Splunk App for Infrastructure instance, you must use the Remove Credentials button to fully remove them.
- In Splunk App for Infrastructure, go to Settings > Notifications > VictorOps Settings.
- Saved credentials display in the dialog. If you want to remove these credentials, click Remove Credentials.
- On the Remove Credentials dialog, click Remove. The VictorOps credentials are removed and you can add new credentials.
| Stop data collection on Splunk App for Infrastructure | Create and modify alerts in Splunk App for Infrastructure |
This documentation applies to the following versions of Splunk® App for Infrastructure (EOL): 1.2.2, 1.2.3
Feedback submitted, thanks!