Deep dive: Inference externally trained ONNX models with MLTK
In version 5.4.0 and higher of the Machine Learning Toolkit (MLTK), you can upload and inference Open Neural Network Exchange (ONNX) models pre-trained in your preferred third-party tool to MLTK. To learn how to use pre-trained ONNX models in your own Splunk platform instance based on examples, follow these high-level steps:
- Complete the prerequisites.
- Then, choose from the following example deep dives using sample data:
Prerequisites
Complete these steps to ensure your system is correctly set up for following the example deep dives:
- Install the required apps
- Confirm required permissions
- Prepare the sample data
- Set lookup table file visibility to global
- Open a Jupyter Notebook
Install the required apps
Download and install the following apps which are required to use ONNX model inferencing:
- Splunk Machine Learning Toolkit, version 5.4.0 or higher
- Python for Scientific Computing, version 3.1.0, 4.1.0, 4.1.2, or 4.2.0
- Botnet App for Splunk
- Parallel Coordinates - Custom Visualization
If you want to follow the TensorFlow or scikit-learn example deep dives, you must install the TensorFlow or scikit-learn packages if they are not already installed in your environment.
Confirm required permissions
Check that you have the correct capabilities assigned so that you can upload ONNX models. The permissions you need are as follows:
upload_lookup_filesupload_onnx_model_file
To learn more, see ONNX file upload permissions.
Prepare the sample data
The data used by the Botnet App for Splunk is taken from the CTU-13 dataset, created by the Czech Technical University in Prague. This dataset is made up of simulated netflow logs containing normal network traffic, and network traffic that has been generated by different botnets.
Prepare the dataset to use in each example task using the following steps:
- Open the Botnet App for Splunk in your Splunk platform instance.
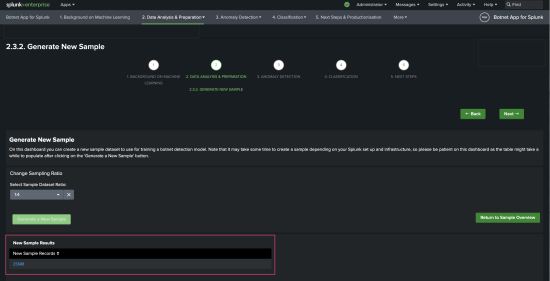
- From the main navigation bar select 2. Data Analysis & Preparation > 2.2 Undersampling > 2.3.2 Generate New Sample.
- Select the sampling ratio of 1:4.
- Select Generate New Sample and confirm that you want to create a new sample.
It might take up to 10 minutes to generate the new sample.
After the sample is created you can see the number of records generated.
- Confirm that the example data is present using the following search:
| inputlookup netflow_botnet_balanced.csv

Set lookup table file visibility to global
To ensure you can search the lookup from MLTK in the examples, set the lookup visibility to global. The lookup is then globally visible across all apps and can be searched from MLTK.
- From the main navigation bar select Settings > Lookups. Select Lookup table files.
- Use the filter field to narrow down the list of lookup table files to find
/Applications/Splunk/etc/apps/botnet-app-for-splunk/lookups/netflow_botnet_balanced.csv. - In the table row for
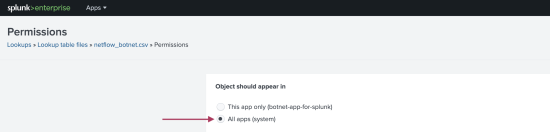
/Applications/Splunk/etc/apps/botnet-app-for-splunk/lookups/netflow_botnet_balanced.csvchoose Permissions. - In the Permissions dialog box under Object should appear in, ensure All apps (system) is selected. If so, the lookup is shared globally. The following image shows the proper selection:

Open a Jupyter Notebook
The final step before you can begin working with these ONNX examples is to open up a Jupyter Notebook. Use this notebook to run the code in the examples.
You must install and set this notebook up in your own environment. Notebooks are not provided with the MLTK app.
Inference an ONNX model using TensorFlow
This example includes the following steps:
- Train the ONNX model.
- Upload the ONNX model in MLTK.
Train the ONNX model
This example trains a model using TensorFlow. Complete the following steps:
- Prepare your data by reading the lookup CSV that was generated in the Botnet App into a Python dataframe. This data is used in all of the examples, so run all of this code in the same notebook:
Change the path to the file to match your own environment.
import pandas as pd import numpy as np df = pd.read_csv('/path/to/splunk/etc/apps/botnet-app-for-splunk/lookups/netflow_botnet_balanced.CSV') print("Raw data contains ", len(df.index), " records") # Replace 1 or 0 with yes or no in botnet column df['botnet_string'] = np.where(df['botnet'] > 0, 'Yes', 'No') - Next, set up your data for processing with a neural network:
from sklearn.model_selection import train_test_split # Removing fields that will not be used for the prediction, such as the future KPI and health score values and the health score levels X = df[['avgBytes','avgDuration','numFlows','sumBytes','uniqueDstIp','uniqueDstPort','uniqueProtocols']] y = df['botnet_string'] # Creating the training and test data sets X_train, X_test, y_train, y_test = train_test_split(X, y, test_size=0.30, random_state=42) from sklearn.preprocessing import LabelEncoder le = LabelEncoder() le.fit(y_train) y_train_enc = le.transform(y_train) y_test_enc = le.transform(y_test) print("Training data contains ", len(X_train.index), " records") print("Test data contains ", len(X_test.index), " records") - Use TensorFlow to train a dense neural network classifier on the data:
from tensorflow.keras import Sequential from tensorflow.keras.layers import Dense # determine the number of input features n_features = X_train.shape[1] # define model model = Sequential() model.add(Dense(7, activation='relu', kernel_initializer='he_normal', input_shape=(n_features,))) model.add(Dense(1, activation='sigmoid')) # compile the model model.compile(optimizer='adam', loss='binary_crossentropy', metrics=['accuracy']) # fit the model model.fit(X_train, y_train_enc, epochs=150, batch_size=32, verbose=0) # evaluate the model loss, acc = model.evaluate(X_test, y_test_enc, verbose=0) print('Test Accuracy: %.3f' % acc) - Save this model as an ONNX file with the following commands:
import tf2onnx
import onnx

onnx_model, _ = tf2onnx.convert.from_keras(model,opset=13)
onnx.save(onnx_model,'nn_botnet.onnx')
Upload the ONNX model in MLTK
Complete the following steps to upload the ONNX model:
- In MLTK, select Models from the main navigation bar.
- Select Upload ONNX model.
- Fill in the required fields:
Field name Input value Model name nn_botnet.onnx Feature variables avgBytes,avgDuration,numFlows,sumBytes,uniqueDstIp,uniqueDstPort,uniqueProtocolsTarget variable botnetModel file Paste in or browse to the nn_botnet.onnx model saved using the code in the previous section. - After the validation check completes, check that you see a success message for the uploaded file. If the validation check fails, follow these troubleshooting steps:
- Modify the maximum model size. You can modify the max value on the Settings tab and selecting Edit Default Settings.
- Check that you have the required permissions. See the Confirm required permissions section to address this.
- You can use the now uploaded model by running the following search from the search bar:
| inputlookup netflow_botnet_balanced.csv | apply onnx:nn_botnetThe
applycommand uses theonnx:prefix to specify that an ONNX model file is being used for inference.
Inference an ONNX model using scikit-learn pipeline
This example includes the following steps:
- Train the ONNX model.
- Upload the ONNX model in MLTK.
Train the ONNX model
This example trains a a scikit-learn pipeline for outlier detection. In this example the Isolation Forest algorithm identifies outliers with a -1 and expected records with a 1.
Complete the following steps:
X = df[['avgBytes','avgDuration','numFlows','sumBytes','uniqueDstIp','uniqueDstPort','uniqueProtocols']]

from sklearn.preprocessing import StandardScaler
from sklearn.decomposition import PCA
from sklearn.ensemble import IsolationForest
from sklearn.pipeline import Pipeline
pipe = Pipeline([('scaler', StandardScaler()),
                 ('pca',PCA(n_components=3)),
                 ('isof',IsolationForest(random_state=0))]).fit(X)

from onnx.defs import onnx_opset_version
from skl2onnx import to_onnx
from skl2onnx.common.data_types import FloatTensorType

initial_type = [('float_input', FloatTensorType([None, 7]))]

onx = to_onnx(pipe, initial_types=initial_type,
              target_opset=15)

with open("pipeline_botnet.onnx", "wb") as f:
    f.write(onx.SerializeToString())
Upload the ONNX model in MLTK
Complete the following steps to upload the ONNX model:
- In MLTK, select Models from the main navigation bar.
- Select Upload ONNX model.
- Fill in the required fields:
Field name Input value Model name pipeline_botnet.onnx Feature variables avgBytes,avgDuration,numFlows,sumBytes,uniqueDstIp,uniqueDstPort,uniqueProtocolsTarget variable botnetModel file Paste in or browse to the pipeline_botnet.onnx model saved using the code in the previous section. - After the validation check completes, check that you see a success message for the uploaded file. If the validation check fails, follow these troubleshooting steps:
- Modify the maximum model size. You can modify the max value on the Settings tab and selecting Edit Default Settings.
- Check that you have the required permissions. See the Confirm required permissions section to address this.
- You can use the now uploaded model by running the following search from the search bar:
| inputlookup netflow_botnet_balanced.csv | apply onnx:pipeline_botnet
Inference an ONNX model using hyperparameter optimization
This example includes the following steps:
- Train the ONNX model.
- Upload the ONNX model in MLTK.
Train the ONNX model
The following example demonstrates how RandomizedSearchCV from scikit-learn can identify the best parameters for a Random Forest classifier. You can use these parameters to predict whether the netflow logs are generated by a botnet.
Perform the following steps:
- Run the following code:
from sklearn.model_selection import RandomizedSearchCV # Number of trees in random forest n_estimators = [int(x) for x in np.linspace(start = 200, stop = 2000, num = 10)] # Number of features to consider at every split max_features = ['auto', 'sqrt'] # Maximum number of levels in tree max_depth = [int(x) for x in np.linspace(10, 110, num = 11)] max_depth.append(None) # Minimum number of samples required to split a node min_samples_split = [2, 5, 10] # Minimum number of samples required at each leaf node min_samples_leaf = [1, 2, 4] # Method of selecting samples for training each tree bootstrap = [True, False] # Create the random grid random_grid = {'n_estimators': n_estimators, 'max_features': max_features, 'max_depth': max_depth, 'min_samples_split': min_samples_split, 'min_samples_leaf': min_samples_leaf, 'bootstrap': bootstrap} print(random_grid) {'bootstrap': [True, False], 'max_depth': [10, 20, 30, 40, 50, 60, 70, 80, 90, 100, None], 'max_features': ['auto', 'sqrt'], 'min_samples_leaf': [1, 2, 4], 'min_samples_split': [2, 5, 10], 'n_estimators': [200, 400, 600, 800, 1000, 1200, 1400, 1600, 1800, 2000]} from sklearn.ensemble import RandomForestClassifier # Use the random grid to search for best hyperparameters # First create the base model to tune rf = RandomForestClassifier() # Random search of parameters, using 3 fold cross validation, # search across 100 different combinations, and use all available cores rf_random = RandomizedSearchCV(estimator = rf, param_distributions = random_grid, n_iter = 100, cv = 3, verbose=2, random_state=42, n_jobs = -1) # Fit the random search model rf_random.fit(X_train, y_train) rf_random.best_params_ from sklearn.metrics import classification_report best_random = rf_random.best_estimator_ print(classification_report(y_test, best_random.predict(X_test), target_names=['No','Yes'])) - Following the use of RandomizedSearchCV, use GridSearchCV to further narrow down the set of parameters and get the best results for the botnet prediction model:
from sklearn.model_selection import GridSearchCV # Create the parameter grid based on the results of random search param_grid = { 'bootstrap': [True], 'max_depth': [10, 20, 30], 'min_samples_leaf': [1, 2, 3], 'min_samples_split': [1, 2, 3], 'n_estimators': [900, 1000, 1100] } # Create a based model rf = RandomForestClassifier() # Instantiate the grid search model grid_search = GridSearchCV(estimator = rf, param_grid = param_grid, cv = 3, n_jobs = -1, verbose = 2) # Fit the grid search to the data grid_search.fit(X_train, y_train) grid_search.best_params_ best_grid=grid_search.best_estimator_ print(classification_report(y_test, best_grid.predict(X_test), target_names=['No','Yes'])) - Save the model with the best parameters in an ONNX format so you can upload the model to the Splunk platform:
from onnx.defs import onnx_opset_version
from skl2onnx import to_onnx
from skl2onnx.common.data_types import FloatTensorType

initial_type = [('float_input', FloatTensorType([None, 7]))]

onx = to_onnx(best_grid, initial_types=initial_type,
              target_opset=15)

with open("rfc_botnet_grid.onnx", "wb") as f:
    f.write(onx.SerializeToString())
Upload the ONNX model in MLTK
Complete the following steps to upload the ONNX model:
- In MLTK select Models from the main navigation bar.
- Select Upload ONNX model.
- Fill in the required fields:
Field name Input value Model name rfc_botnet_grid.onnx Feature variables avgBytes,avgDuration,numFlows,sumBytes,uniqueDstIp,uniqueDstPort,uniqueProtocolsTarget variable botnetModel file Paste in or browse to the rfc_botnet_grid.onnx model saved using the code in the previous section. - After the validation check completes, check that you see a success message for the uploaded file. If the validation check fails, follow these troubleshooting steps:
- Modify the maximum model size. You can modify the max value on the Settings tab and selecting Edit Default Settings.
- Check that you have the required permissions. See the Confirm required permissions section to address this.
- You can use the now uploaded model by running the following search from the search bar:
| inputlookup netflow_botnet_balanced.csv | apply onnx:rfc_botnet_gridPredictions made with this model identify botnets with a yes or a no, rather than a 1 or a 0 as shown in the source data. This is due to the label encoding that occurred when the lookup CSV data that was generated in the Botnet App was read into a Python data frame in an earlier step.
| Deep dive: Create a data ingest anomaly detection dashboard using ML-SPL commands | Troubleshooting the deep dives |
This documentation applies to the following versions of Splunk® Machine Learning Toolkit: 5.4.1, 5.4.2, 5.5.0
Feedback submitted, thanks!