Custom view
The Phantom platform provides the ability for an App author to render the results of an action in a tabular format without writing a single line of rendering code. The author lists the data paths in the output section of an action, specifies the column names and order for each data path of the table view, and Phantom renders the view in the Mission Control.
If the author has used the create_output.py script to generate the output data paths section (which is standard), the script will try to set the contains of the data path on its own. However, if Phantom sees a contains set in any of the table cells, a contextual menu is created to let the Phantom user chain actions.
Phantom also provides a JSON view. The JSON view can be a useful placeholder that supports contextual actions based on the contains specified in the output list of the action in the App JSON. The App author need not even specify the column order or names for this view, only set the type as JSON in the render dictionary.
In complex scenarios (e.g. detonate file), the tabular or JSON view may not be the ideal way to render action results. The data can be displayed, but a custom view may be preferable.
Example: Create a custom view in the Splunk Phantom DNS app
This section will use as an example the Phantom published DNS App that comes pre-installed on the standard Phantom OVA. The source code for the DNS App can be downloaded at the following link:
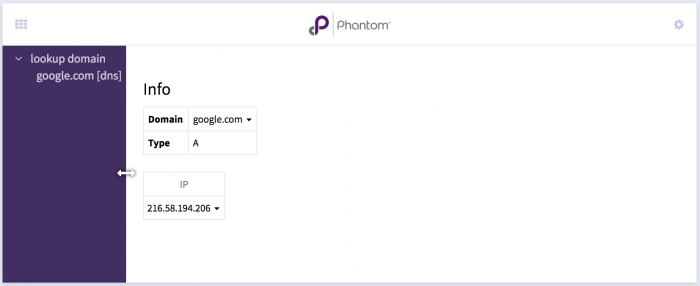
The DNS App uses a custom view to render the results of the lookup domain action. The action results have been separated into multiple tables to present it in a more usable format.
The widget displays two tables. The first table is named Info and displays key value pairs, the second table are IPs that the action returned.
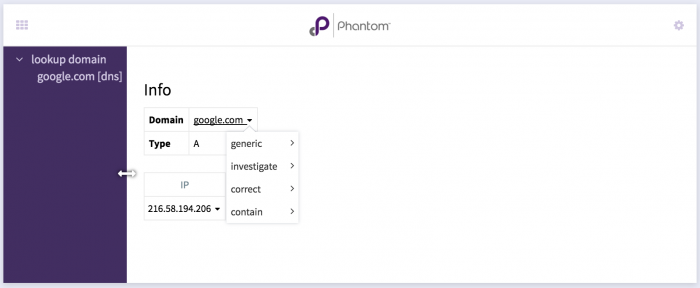
Contextual actions (using contains) can also be implemented in custom views.
Implement a custom view
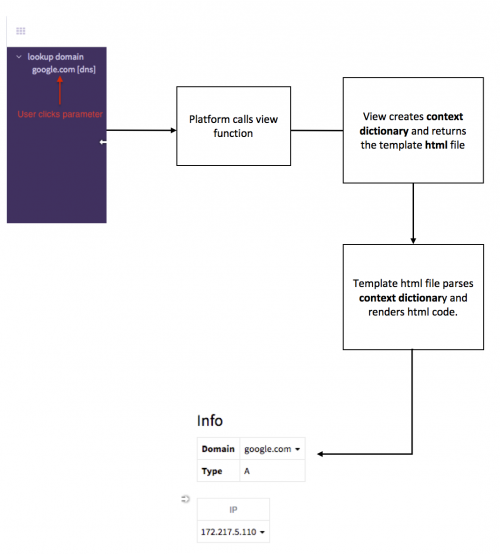
A custom view implementation uses the Django view/template framework. Implementing a custom view is created by the following general steps:
- Specify a custom view function in the render section of the action in the App JSON.
- Implement the view function declared/specified in the App JSON in a Python file. Ideally this file should be separate from the App connector file. This view function should return the Django template html file used to render the result context.
- Implement the Django template HTML file in the App directory.
- Package the view, template,
__init__.pyfile, and other code in the App installer.
Result displayed in the Investigation page:
Render section of the App JSON
Configure a custom view function in the render section of the action in the App JSON.
- Specify type as custom.
- Specify view as the module function. The view value is made up of two parts:
dns_view(python file name)display_ips(function within the python file)
Every action can have its own view function and therefore its own HTML template file.
"render": {
    "type": "custom",
    "width": 10,
    "height": 5,
    "view": "dns_view.display_ips",
    "title": "Lookup Domain"
    },
View Function
The main task of the view function is to create context (basically a Python dictionary) that the template code uses to render data.
View function section of the DNS App.
def display_ips(provides, all_app_runs, context):

    context['results'] = results = []
    for summary, action_results in all_app_runs:
        for result in action_results:

            ctx_result = get_ctx_result(result)
            if (not ctx_result):
                continue
            results.append(ctx_result)
    # print context
    return 'display_ip.html'
In many cases the majority of view function code can stay as is and App authors copy and paste the above function. However, the following items will need to be modified:
- The returned HTML file will be specific to the custom view's action. In this example it is display_ip.html.
- The
get_ctx_result(...)function that is called for every result object will need to be modified. The result object represents every ActionResult object that has been added in the action handler, usually one per action. Theget_ctx_result(..)function converts the result object into a context dictionary by performing the following:- Initializes the
ctx_resultdictionary. - Gets the
paramfrom the result object and sets it to the param key ofctx_result. - Gets the
summaryfrom the result object and sets it to the summary key ofctx_result. - Gets the
datafrom the result object and sets it to the data key ofctx_result. Note that the data is converted from a list to a dictionary.
- Initializes the
The get_ctx_result(...) function defined in the dns_view.py file looks like the following:
def get_ctx_result(result):

    ctx_result = {}
    param = result.get_param()
    summary = result.get_summary()
    data = result.get_data()

    ctx_result['param'] = param

    if (data):
        ctx_result['data'] = data[0]

    if (summary):
        ctx_result['summary'] = summary

     return ctx_result
The function performs the following:
ctx_result['data'] = data[0]
In the action handler one always adds data using the ActionResult::add_data(...) API. This interface always keeps data as a list. To make rendering code in the template easier (by not worrying about loops) and because the App author knows there will always be one item in the data list for the particular action. The get_ctx_result(...) function converts data from a list of one item to a dictionary.
Template file
This is the HTML file that is given to the context dictionary, which it parses using Django template language, and generates the HTML code that is responsible to render the data. In it's most basic form it consists of the following parts (code segments inline):
- Django header blocks to extend the widget template and titles. These are mostly boilerplate code that sets up every apps widget and should be used as is.
javascript {% extends 'widgets/widget_template.html' %} {% load custom_template %} {% block custom_title_prop %}{% if title_logo %}style="background-size: auto 60%; background-position: 50%; background-repeat: no-repeat; background-image: url('/app_resource/{{ title_logo }}');"{% endif %}{% endblock %} {% block title1 %}{{ title1 }}{% endblock %} {% block title2 %}{{ title2 }}{% endblock %} {% block custom_tools %} {% endblock %} - Main Django start block. Specifies the start of the main widget_content block. Use as is.
javascript {% block widget_content %} <!-- Main Start Block --> - Copyright notice. This is optional.
html
<!--
File: ./phdns/display_ip.html

Copyright (c) 2019 Splunk, Inc.
....
-->
- CSS styles. In case the render code requires CSS styling, the DNS App uses its own styling for tables, etc.
html
<style>
...
...
</style>
- Main div start node. Use as is.
html
<div style="overflow: auto; width: 100%; height: 100%; padding-left:10px; padding-right:10px"> <!-- Main Div -->
- Django loop start for each result. Use as is.
javascript {% for result in results %} <!-- loop for each result --> <!------------------- For each Result ----------------------> - Render code for each result.
This is where every result should be rendered. The context that contains the data to render can be accessed in the template code using the result.object.
The DNS App renders two tables. Example code:
     javascript
     <h3 class="wf-h3-style">Info</h3>
     <table class="wf-table-vertical">
     {% if result.param.domain %}
     <tr>
          <td><b>Domain</b></td>
          <td>
               <a href="#" onclick="context_menu(this, [{'contains': ['domain'], 'value': '{{ result.param.domain|escapejs }}' }], 0, {{ container.id }}, null, false); return false;">
     {{ result.param.domain }}

               </a>
          </td>
     </tr>
     <tr>
          <td><b>Type</b></td>
          <td>
               {{ result.param.type }}
     </td>
     </tr>
     {% endif %}
     </table>
Breakdown of the code:
- The first line is the header Info.
- The <table> start tag.
- A Django template if statement.
- A <tr> tag for the first row, which is made up of two cells.
- The Domain text.
- A cell that displays the result.param.domain value, since it is part of the context dictionary it is enclosed in {{...}} braces. There's also an anchor <a> tag placed in the cell, which calls on a javascript function called context_menu(....) on click. This is to show the contextual menu when the user clicks on the value in the cell. The contains of the value is also set in the anchor tag code. It sets the contains to ['domain'] (it's a list), it also sets the value. The rest of the parameters passed to the context_menu(...) function like {{ container.id }} can be used as is. Just change the contains and value.
- The second <tr> tag renders the second row, with two cells.
- Type
- The result.param.type value.
The second table is made up of one column that lists all the IPs that the domain resolves in. The code for this table looks like the following:javascript <!-- IPs --> {% if result.data.ips %} <table class="wf-table-horizontal"> <tr><th>IP</th></tr> {% for curr_ip in result.data.ips %} <tr> <td><a href="#" onclick="context_menu(this, [{'contains': ['ip'], 'value': '{{ curr_ip|escapejs }}' }], 0, {{ container.id }}, null, false); return false;"> {{ curr_ip }} <span class="fa fa-caret-down" style="font-size: smaller;"></span> </a></td> </tr> {% endfor %} </table> <br> {% else %} <p> No IPs in results </p> {% endif %}Breakdown of the code:
- The first if statement only creates the table if IPs are present in the data dictionary
- Next is the table definition.
- The first row sets the header name IP.
- The other rows are added in a loop, for the number of items in the result.data.ips.
- Note the anchor for the contextual actions for each IP are added in its own cell.
- Django loop ends for each result.
javascript {% endfor %} <!-- loop for each result end --> - Main Div end node.
javascript </div> <!-- Main Div --> - Main Django end block.
     javascript
     {% endblock %} <!-- Main Start Block -->
In the blocks described above a custom view really needs to only modify the Render code for each result.
Do not set any colors in your custom views for text or other-wise. Phantom now supports multiple UI themes and doing so may result in improper rendering.
Debugging custom views
- The view functions and template code is executed by uwsgi and therefore all errors are recorded in the
/var/log/phantom/wsgi.logfile. Thewsgi.logis the first place to look is the event of an issue. print <debug_data>is enabled in the view function for debugging purposes. The output is also logged into/var/log/phantom/wsgi.log.- One common error that occurs frequently is a ViewDoesNotExist exception, common reasons are:
- The
__init__.pyfile is missing from the app folder. - uWSGI loads the view as a standard import of a python module's function. If the __init__.py file is not present, the module load fails.
- The view file name does not match the one specified in the json file.
- The function name does not match the one specified in the json file.
- The
| Use data paths to present data to the Splunk Phantom web interface | Tutorial: Use the app wizard to develop an app framework |
This documentation applies to the following versions of Splunk® Phantom (Legacy): 4.8


 Download manual
Feedback submitted, thanks!