Create and debug playbooks in Splunk Phantom using the visual playbook editor
Perform the following tasks to open the visual playbook editor (VPE) and create a new playbook in Splunk Phantom:
- From the Main Menu, select Playbooks.
- Click + Playbook. The VPE opens in a new tab in your browser. The Start and End blocks are populated on the editor. All playbooks must start with the Start block and end with the End block.
- Specify a name for the playbook.
Playbooks in the same folder cannot have the same name. Playbooks in different folders can have the same name. Click the plus and minus icons to zoom in or zoom out.
Add a new block to the playbook
To add a new block to a playbook, drag the half-circle icon attached to any block on the canvas. Release your mouse to create a new empty block connected to the originating block with an arrow.
When you place a new block on the editor, a set of playbook types appears for you to select:
| Playbook type | Description |
|---|---|
| Action | Run an action provided by an app that is installed and configured in Splunk Phantom. For example, you can use the MaxMind connector to geolocate an IP address. |
| Playbook | Run an existing playbook inside your current playbook. |
| API | Perform an action by making an API call. |
| Filter | Filter the results of the previous block. For example, you can separate items that have a specific severity and perform a different set of actions on those items. |
| Decision | Make a decision and perform different actions depending on the results of the previous block. For example, you can exclude all destination IPs that belong to a specific country. |
| Format | Format the results of the previous block. For example, you can gather data, format that data in a specific way, and send an email. |
| Prompt | Require a user to take action before proceeding to the next block. |
| Manual Task | Send a message to a Splunk Phantom user or group that must be acknowledged. |
| Custom Function | Add custom Python code to your playbook to expand the kinds of processing that are performed by the playbook. |
Add an Action block to a playbook
Perform the following steps to add an Action block to a playbook:
- Drag the half-circle icon attached to any existing block in the editor.
- Select Action from the list of block types. Actions available to you in the playbook editor are determined by the apps that are installed and configured in Splunk Phantom.
- Select the action you want to configure, or enter an action name in the search field if you don't see the desired action listed. You can also filter the list of actions by action type.
- Select investigate, generic, correct, or contain.
- Click By App to view a list of configured apps, and select an available action provided by the selected app.
- Select an asset that you want to run the action on. An asset is a specific configuration or instance of an app. In some cases, you may have multiple configurations for a specific app. For example, your environment may have multiple networks separated by firewalls, which require you to configure one instance of a specific app for each network.
- Select the field where you want to perform the asset. For example, an IPS event may have fields like sourceAddress and destinationAddress and the attack signature. When a container is created in Splunk Phantom, it has an artifact with fields for the sourceAddress and destinationAddress from the event.
- Select one of these fields to perform the action on.
- Click Save.
- Enter a comment about this action.
Configure linked parameters
Configure linked parameters in an Action block when you have multiple assets that share parameters with the same name. For example, you might have multiple assets configured that provide an action to create a ticket with a subject parameter. In this case, the word "linked" appears above the subject field, indicating that the field is linked to another field with the same name in a different asset. If you change the value here, the value for the field changes in all assets.
If you need to have the field take separate values, create separate action blocks.
Advanced settings
Follow these steps to configure advanced settings for an Action block:
- Click Advanced Settings.
- Select General Settings, Action Settings, or Join Settings.
| Setting | Description |
|---|---|
| General Settings | Configure settings for this Action block.
|
| Action Settings | Configure the action settings that a user must perform.
|
| Join Settings | You can configure Join settings when you have two blocks with callbacks both calling the same downstream block. Block types with callbacks are Action and Prompt. Configure Join settings from the downstream block. Click the required checkbox if the action in the upstream block must be completed before this downstream block is run. |
Use filters to separate artifacts before further processing
Create conditions in a Filter block to separate a subset of artifacts or action results. Only the artifacts or action results matching the specified condition are passed along to downstream blocks for processing. This is useful when you want to remove items that aren't needed in the flow of the playbook, or you need to separate artifacts because they require different blocks for processing.
For example:
- If an IP address comes from North Korea or Turkey, you can block it.
- If an IP address comes from North America, you can perform an IP reputation lookup.
- If an IP address falls in the 192.168.10.* range, you can to grant access to the user.
Options in a filter aren't related to each other and you can perform multiple actions on an IP address. For example, both the second and third conditions in the example could be true, as an IP address in the 192.168.10.* range could both come from North America and be an internal user who was granted access. The filtered data set is given a named result in the format name="filter_1:condition_1" and passed to the next block for processing.
Create a Filter block in your playbook
To create a Filter block, perform the following tasks:
- Create a new block in the visual playbook editor (VPE).
- Select Filter from the list of block types.
- Click the Select Parameter field and select the parameter you want to filter on. Parameters are made available to the Filter block by upstream blocks.
- Click in the == field and select an operator for the filter.
- Click the Select Value field and select the value you want to match. See Example of creating a filter for an example of how these fields work together.
- (Optional) Click + to add parameters to this condition.
- (Optional) Click Add Condition to create another matching condition for the filter. You can have a maximum of five conditions per Filter block. Each condition has its own downstream path.
Example of creating a filter
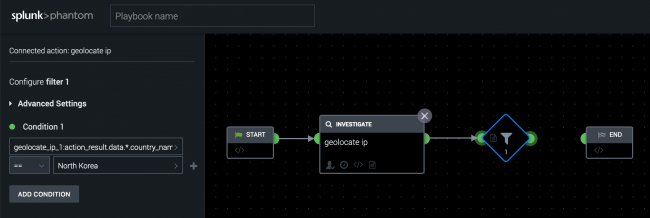
In the following example, you can create a filter to perform a geolocate ip action on a source IP address and block any IP addresses from North Korea. The following image shows the VPE in Splunk Phantom.
- Configure a
geolocate ipaction in the playbook editor. - Drag the half-circle icon on the
geolocate ipaction block in the editor. - Select Filter from the list of block types.
- Click the Select Parameter field and select geolocate_ip_1.
- Select geolocate_ip_1:action_result.data.*.country_name.
- Leave == as the operator, and type North Korea in the Select Value field.
Example of creating a filter with multiple conditions
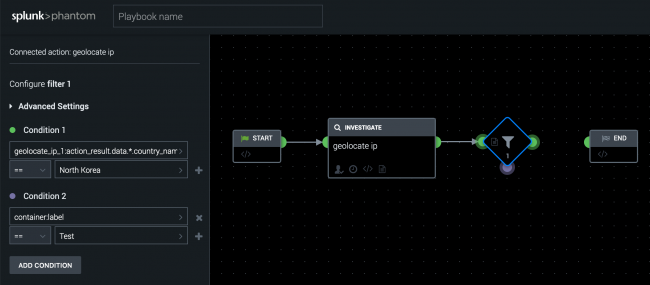
You can create multiple rows within a condition or multiple conditions. The following image shows an example of the VPE in Splunk Phantom.
- Click Add Condition to create a second set of filter conditions, which also adds a second output point on the Filter block.
- In the Select Parameter field, select container properties and choose label.
- Select == as the operator, and enter Test in the Select Value field.
Multiple conditions within a filter block are independent of each other. The results of Condition 1 don't play into the set of inputs for Condition 2. In this example, Condition 1 uses the result from the geolocate ip action, while Condition 2 uses a property of the container. Each condition has its own color to make it easier to identify the separate downstream actions. Green marks the path of Condition 1 and purple marks the path of Condition 2.
Example of filter chaining
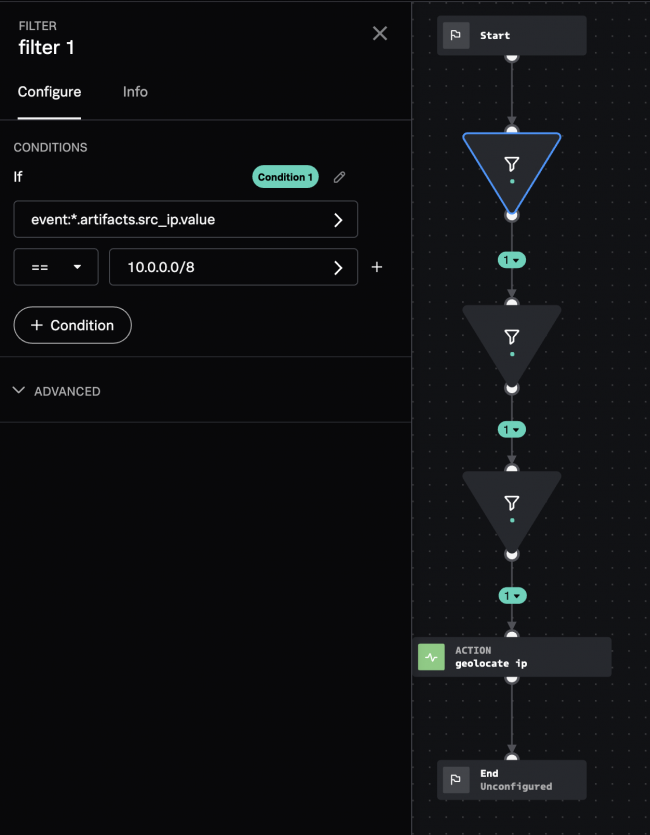
You can also chain multiple filter blocks together to obtain a more specific set of data. The following image shows a chain of filters in the VPE.
For example, to filter out RFC1918 addresses (10.x.x.x, 172.16.x.x-172.31.x.x, and 192.168.x.x) and perform a geolocate ip action on the remaining addresses, perform the following steps:
- From the Start block, create new filter block.
- In the Select Parameter field, select event > src_ip.
- Enter 10.0.0.0/8 in the Select Value field.
- Create a second filter for the 172.16.0.0/12 IP addresses. This filter uses the filtered results from the previous block.
- Create a third filter for the 192.168.0.0/12 IP addresses. This filter uses the filtered results from the previous block.
- Create the
geolocate ipaction block on the remaining IP addresses.
If a filter block eliminates all variables while filtering, the downstream action can't run.
Example of using a custom list in a filter
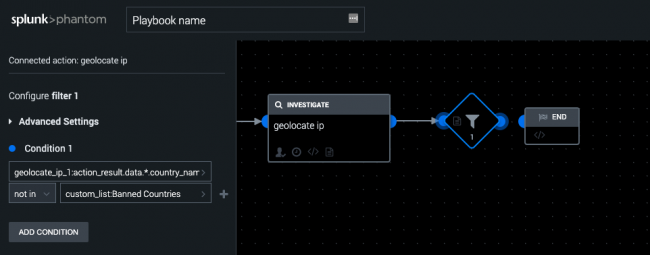
You can use custom lists in your Filter blocks to simplify checking against a fixed set of items. For example, instead of checking the source country of an IP address to see if it is North Korea, you can define a list of countries in a custom list, then check the IP address against all of the countries in the list. You can maintain custom lists using the Splunk Phantom web interface, REST API, and playbook API. See Create custom lists for use in Splunk Phantom playbooks. The following image shows the VPE in Splunk Phantom.
In this example, use a custom list named Banned Countries in a filter by performing the following tasks:
- Configure a
geolocate ipaction in the playbook editor. - Drag the half-circle icon on the
geolocate ipaction block in the editor. - Select Filter from the list of block types.
- Click the Select Parameter field and select geolocate_ip_1.
- Select geolocate_ip_1:action_result.data.*.country_name.
- Leave == as the operator.
- Click in the Select value field and select custom_list:Banned_Countries.
The country name of the source IP address is checked against the countries defined in the Banned Countries custom list.
Use decisions to send artifacts to a specific downstream action
Use a Decision block to change the flow of artifacts by performing IF, ELSE IF, or ELSE functions. When an artifact meets a True condition, it is passed downstream to the corresponding block in the playbook flow. If none of the Decision block conditions are met, the playbook run fails.
In this example, IP addresses found in artifacts are compared against some specific IP address ranges:
- If an IP address is in the 192.168.* range, perform an IP reputation lookup, ELSE IF
- The IP address is in the 172.16.* range, grant access to the user, ELSE
- If the IP address doesn't fall into either of the previous categories, perform a
geolocate ipaction.
The first time an artifact meets a condition, it is passed along to the corresponding downstream block. The artifact is no longer available for evaluation by other ELSE IF or ELSE statements, and cannot be passed to other downstream blocks. You can only perform one action on an artifact based on the condition that is matched first.
Unlike Filter blocks, no named datasets are created for reference later on in the playbook.
Create a Decision block in your playbook
To create Decision block, perform the following tasks:
- Drag the half-circle icon attached to any existing block in the editor.
- Select Decision from the list of block types.
- Click the Select Parameter field and select the parameter you want to compare. Parameters are made available to the Decision block by upstream blocks.
- Click the == field and select an operator for the decision.
- Click the Select Value field and select the value you want to match. See Example of creating decisions for multiple downstream actions for an example of how these fields all work together.
- (Optional) Click Add Else If to create another matching condition for the decision.
- Click Add Else to create the final branch for the decision.
Example of creating decisions for multiple downstream actions
Decision blocks control the program flow based on comparisons of artifact data, notable properties, date functions, and action results. Create if and else if conditions to branch to multiple downstream blocks as a results of the comparisons.
In the following example, start with a Decision block that checks to see if any artifacts are in the notable. The image shows a decision block in the playbook editor.
- Drag the half-circle icon attached to any existing block in the editor.
- Select Decision from the list of block types.
- In the If field, click the Select Parameter field and select a parameter to evaluate. You can choose from the properties provided by the container, event data, date and time options, and custom lists.
- Select container properties from the list of options, and then click artifact_count as the property you want to evaluate.
- Select > as the operator, and enter 0 in the Select Value field.
The blue circle next to the If section corresponds with the blue connector dot on the side of the decision block. All data is passed on to the next block.
Example of creating decisions with multiple statements
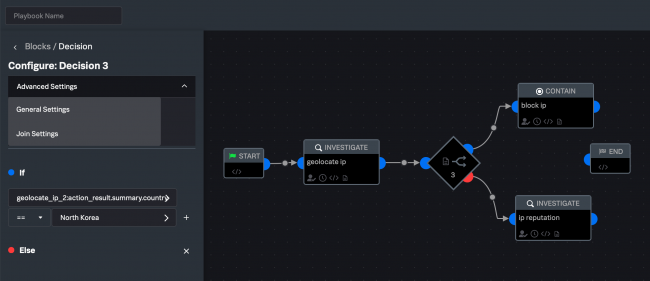
You can create more complex decision blocks with up to five statements. For example, you can perform a geolocate ip action on a source IP address and block the IP if the country is from North Korea. Otherwise, you can perform an ip reputation action on the IP address, as shown in the following screenshot:
Each subsequent statement and downstream block is color coded: blue marks the path of the If statement, and red marks the path of the Else statement. Each statement has its own and only one downstream block.
Customize the format of your playbook content
Use the Format block to craft custom strings and messages from various objects.
You might consider using a Format block to put together the body text for creating a ticket or sending an email. Imagine you have a playbook set to run on new containers and artifacts that does a basic lookup of source IP address artifacts. You want to take the results of that lookup, format the results, and send the information as an email. You craft your playbook so that the action results are available to the format block.
To configure a Format block, perform the following steps:
- Create a new block in the Visual Playbook Editor (VPE).
- Select Format from the list of block types.
- Configure the template parameter variables in the Template Parameters field. The first variable is identified as
{0}, the next as{1}, and so on. You can select any event and container properties. You can also select data from any upstream block. - In the Template field, craft a message using the variables you define.
Example of defining a template
This example defines a template in the following manner:
IP address: {0}
IP address country: {1}
IP address reputation: {2}
The message returned as a result of this template looks like the following:
IP address: 1.2.3.4
IP address country: United States
IP address reputation: Malicious
If multiple events are picked up at the same time, you see the following message:
IP address: 1.2.3.4, 10.11.12.13
IP address country: United States, Turkey
IP address reputation: Malicious
You can wrap %% around a formatting block to make each set of values output on its own line. For example:
%%
The IP address {0} originates from {1}.
%%
Wrapping %% around a formatting block produces results like the following:
The IP address 1.2.3.4 originates from United States.
The IP address 10.11.12.13 originates from Turkey.
Example of using the Python str.format() function to create more advanced templates
More complicated formatting is supported using all the capabilities of the Python str.format() function. The following template demonstrates double curly brackets to support curly bracket escaping, automatic escaping of backslashes and quotes, and centered string alignment with a custom filler character:
JSON Formatting:
{{"notable_id":"{0}","event_count":{1}}}

Backslashes and quotes are escaped:
"ls /Applications/System \Preferences.app/"

Python formatting is supported:
|{0:-^50}|{1:-^50}|
|{2:-^50}|{3:-^{3}{2}{1}{3}{2}{1}50}|
The template produces output as in the following example:
JSON Formatting:
{"notable_id":  "1004", "event_count": 10}

Backslashes and quotes are escaped:
"ls /Applications/System \Preferences.app/"

Python formatting is supported:
|-----------------------1004-----------------------|-----------------------10-----------------------|
|----------------------events----------------------|-------Zeus infection on HQ finance server------|
Require user input to continue running the playbook
You can configure the following types of user input in a playbook:
- A manual task using a Manual Task block that must be acknowledged by a user.
- A prompt using a Prompt block that must be acknowledged by a user. You can configure a specific response type with a Prompt block.
Require user input using the Manual Task block in your playbook
Use a Manual Task block to send a message to a Splunk Phantom user or group that they must acknowledge. This is the same as manually running a task action from the Investigation menu.
To configure a manual task, perform the following tasks:
- Drop a new block onto the playbook editor.
- Click on the block, then select Manual Task from the block types.
- Select an Approver from the drop-down list. If the task is assigned to a group of users, the first user to process it completes the task.
- From the Required response time field, choose the response time in minutes.
- In the Message box, craft a meaningful message so the users receiving the message understand what actions they must take.
Require user input using the Prompt block in your playbook
Use a Prompt block in your playbook to send a message to a user or group that they must acknowledge.
To configure a prompt, perform the following tasks:
- Drop a new block onto the playbook editor.
- Click on the block, and then select Prompt from the block types.
- Select an Approver from the drop-down list. If the task is assigned to a group of users, the first user to process it completes the task.
- From the Required response time field, choose the response time in minutes.
- In the Message box, craft a meaningful message so the users receiving the message understand what actions they must take.
- From the Responses drop-down list, choose the type of response required to complete the task.
Set container parameters using the API block
Use the API block to set parameters of the container it's running in. For example, you can use an API call to set the severity of a container.
Perform the following tasks to configure an API block:
- Drop a new block onto the playbook editor.
- Click on the block, and then select API from the block types.
- Select the API property you want to set. The following table summarizes the properties that you can set:
You can configure multiple API calls in any API block. For example, you can set the label, severity, and status of a container using one API block.Property Description label The label of the container. The drop-down list shows all of the container labels currently available on your Splunk Phantom instance. sensitivity The sensitivity of the container. severity The severity of the container. status The status of the container, such as Resolved. owner The owner of the container. add list One of two API calls that doesn't operate directly on the container. The add listproperty takes two parameters: the list that you want to add to, and the data you are adding. If the list doesn't exist, it is created by Splunk Phantom. You can point the data field to a variable by selecting from the properties, results, and artifacts, or you can type in a fixed string.remove list One of two API calls that doesn't operate directly on the container. The remove listproperty takes a list name as the single parameter, and deletes that list when it has run.pin Pin data to the heads-up display (HUD) in the container. This property takes the following parameters: - Data
- Message
- Pin Type
- Pin Style
add tag The API call used to add a tag to the container. remove tag The API call to remove a tag from the container. add comment The API call used to add a comment to a container. You can either supply a variable or a static string in the input. promote to case The API call used to promote the container to a case. It takes a single parameter, the case template you can pick from a drop-down list. - Click Save to save the settings. A check mark appears next to the API calls that you configured.
Run other playbooks inside your playbook
You can configure your playbook to run another existing playbook. Call one playbook from another playbook to avoid having to copy and maintain code in different places.
To configure your playbook to run another playbook:
- Drop a new block onto the playbook editor.
- Click on the block, then select Playbook from the block types.
- In the Playbook field, select the playbook you want to run from the drop-down list.
- (Optional) Toggle the Synchronous switch on to make this playbook wait for the called playbook to complete running before continuing.
Playbooks differ from action blocks in the following ways:
- The playbook continues to downstream blocks regardless of whether the called playbook is successful.
- The called playbook doesn't return any values that are used in downstream blocks.
- The called playbook doesn't determine the data set, and it operates on the container data with the scope inherited from the caller.
- The called playbook runs independently from the caller. If you wire a series of playbooks to run, they are processed in parallel if the Synchronous switch is left off. See Determine your playbook flow.
Add custom code with the Custom Function block
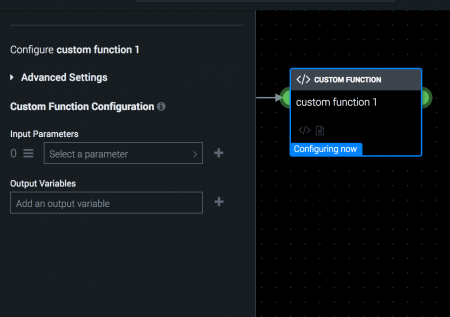
Add custom Python code to a Custom Function block. Custom functions enable you to expand the kinds of processing performed in a playbook, such as adding custom input parameters and output variables.
Functions, parameters, and output variables can all have custom names using the following characters:
- A-Z
- a-z
- 0-9
- Underscores
Setting or changing a custom name changes that custom name in all data paths that use it, including generated and custom code.
Set the name, tooltip, comments and other options for the block in the Advanced Settings > General Settings.
Click the </> icon to open the Python Playbook Editor to add your custom code:
Input parameters
Input parameters represent a data path. You can set a data path from any valid blocks upstream, artifact data, and container data.
To create or remove an input parameter, perform the following steps:
- Click the + icon to add an input parameter. The index of parameters starts at zero.
- Type a name to set the name for or rename the input parameter.
- Click the > icon to set the properties for the input parameter.
You can delete the input parameter by clicking the x icon.
Output variables
Output variables are usable as inputs in other downstream blocks, such as Action, API, Filter, Decision, Format, Prompt, or other Custom Function blocks. The name of an output variable becomes <block_name>__<variable_name> in the auto-generated section of the playbook code. Give your output variables clear and meaningful names in your custom code.
Follow these steps to create or remove an output variable:
- Click the + icon to add an output variable.
- Type a name to set the name for, or rename the output variable.
- Click the x icon to delete an output variable.
See the following example of a custom function:
def format_login(action=None, success=None, container=None, results=None, handle=None, filtered_artifacts=None, filtered_results=None):
phantom.debug('format_login() called')
results_data_1 = phantom.collect2(container=container, datapath=['get_login_history:action_result.data.*.output'], action_results=results)
results_item_1_0 = [item[0] for item in results_data_1]

format_login__login_table = None

################################################################################
## Custom Code Start
################################################################################

# format the output into Jira's markup language for rendering a table
format_login__login_table = "|| output of '/usr/bin/last -a' ||\n"
last_lines = results_item_1_0[0].split('\n')
for line in last_lines:
    format_login__login_table += "| {} |\n".format(line)

phantom.debug("table of logins for jira:")
phantom.debug(format_login__login_table)

################################################################################
## Custom Code End
################################################################################

phantom.save_run_data(key='format_login:login_table', value=json.dumps(format_login__login_table))
enrich_ticket_1(container=container)

return
Determine your playbook flow
The order in which you arrange the blocks and lines in your playbook determine the playbook flow.
Process playbook blocks serially
Serial processing means playbook blocks are performed in the order they are arranged, as shown in the following screenshot:
In this example, the blocks perform as described:
- A
geolocate ipis performed on a source IP address. - When the
geolocate ipaction is finished, alookup ipperforms.
Use serial processing when the operations must happen in a specific order, such as when a downstream block depends on the results from an upstream block.
Processing playbook blocks in parallel
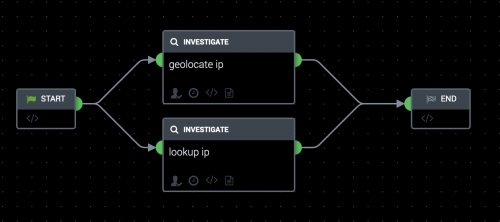
You can also wire blocks to process in parallel, as shown in the following example:
In this case, the geolocate ip and lookup ip actions perform simultaneously, and either action can finish first. You can wire blocks in this manner when you have no dependencies on the completion of either block, or if there are no dependencies between the blocks themselves.
Arranging blocks in a playbook
You can drag blocks around the canvas. Lines connected to boxes automatically arrange themselves when you move blocks around.
Hover over any playbook block and click the trash can icon to delete the block. The corresponding connecting arrow is also deleted.
| Create playbooks to automate analyst workflows in Splunk Phantom | Save a playbook so that Splunk Phantom can access it |
This documentation applies to the following versions of Splunk® Phantom (Legacy): 4.8


 Download manual
Feedback submitted, thanks!