Understanding SPL2 namespaces
A namespace automatically created when you create and save a module.
If you're an SPL2 application developer, it's important to understand how namespaces are defined and used in SPL2. You need to know the namespace for a resource to be able to import that resource into your SPL2 modules.
Namespaces are a way to group a set of related resources in your Splunk instance and identify those namespaces across all Splunk instances.
A namespace ensures that a given set of resources have unique names. For example, you can have resources with the name "threats" in multiple namespaces. Specifying the path to the appropriate namespace ensures that you import the correct resource.
Namespaces can contain nested namespaces, modules, and certain types of datasets like indexes, jobs, and lookups.
Namespaces and the data orchestrator
The Splunk data orchestrator is a new software component that validates and registers the items in a namespace. When SPL2 modules are executed as part of a search or pipeline, the data orchestrator parses and routes SPL2 modules.
There are built-in namespaces in your Splunk instance, such as the namespaces for indexes, lookups, and apps
When you install an SPL2-based app, the namespaces associated with that app are registered in the data orchestrator.
If you use the Splunk extension for VS Code to create SPL2-based apps, you need to identify which app namespace your module is associated with before you run or save the module. When you upload the module, you are registering the namespace for the module in the data orchestrator.
See Set up the Splunk Extension for VS Code to create SPL2-based apps in the Splunk Developer Guide on dev.splunk.com.
Differences between a namespace and a file system
A namespace is a logical container that groups together related resources. Namespaces are about identifying resources.
Your Splunk instance has several built-in namespaces. The dot notation is used to identify a namespace path. For example:
- The built-in namespace for all indexes is:
envs.splunk.<stack_name>.indexes. - The namespaces used by SPL2 start with
envs.splunk.<stack_name>.
A file system is a hierarchical folder structure for storing data. In a file system, files and folders can be moved around, and access permissions can be set for folders. The slash ( / or \ ) notation is used to identify a specific path in the file system. The file system used by Splunk, starts with $SPLUNK_HOME.
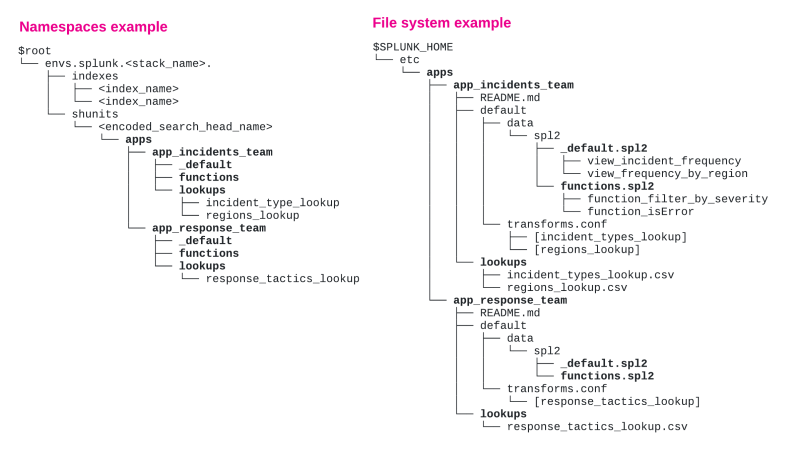
The following diagram shows an example of the differences between the Splunk namespaces and the Splunk file system for a set of SPL2-based apps:
Some namespaces map directly to parts of the $SPLUNK_HOME file system. For example envs.splunk.<stack_name>.shunits.<search_head>/apps/<app_name> maps to $SPLUNK_HOME/etc/apps/<app_name> within the file system on the search head.
Likewise, apps and modules are both namespaces and folders in the file system. For example, when you specify app_indicidents_team._default, you are identifying the _default module under the app_indicidents_team namespace. The _default module equates to the _default.spl2 module in the app_indicidents_team application in the file system.
Not all Splunk resources are supported in the SPL2 namespace system.
Built-in namespaces supported in SPL2
The following table describes the built-in namespaces that are currently supported:
| Namespace | Description |
|---|---|
envs.splunk.<stack_name>
|
The location of your Splunk instance. |
envs.splunk.<stack_name>.indexes
|
The location of all the indexes on your Splunk instance. |
envs.splunk.<stack_name>.shunits
|
The location of the search head units that belong to the stack. This might include an ad-hoc search head, a search head cluster, a Splunk Enterprise Security (ES) search head, and so forth. |
envs.splunk.<stack_name>.shunits.<encoded_search_head_name>
|
The unique encoded name for a search head unit. |
envs.splunk.<stack_name>.shunits.<encoded_search_head_name>.apps
|
The location for all of the built-in and custom apps on your Splunk search head. |
envs.splunk.<stack_name>.shunits.<encoded_search_head_name>.apps.<app_name>.lookups
|
The location for all of the lookups defined in the app on your Splunk search head. |
envs.splunk.<stack_name>.shunits.<encoded_search_head_name>.apps.<app_name>.savedsearches
|
The location for all of the saved searches defined in the app on your Splunk search head. |
How to determine and specify the SPL2 namespace path
You can import resources from modules that are on the same search head unit, either a search head cluster (SHC) or a search head that does not belong to a SHC. You can't import resources between search head units.
To determine the namespace path to specify when you import items into a module, start with the application that you want to import the item into.
You substitute ../ for each component in the namespace path, starting with the level that contains the module where the item resides.
The syntax to import a function from one application into another application is specified using the namespace and module name that are being referenced. For example:
import <function_name> from ../<app_name>.<module_name>
The syntax to import a dataset is specified using the namespace and dataset that are being referenced. For example:
import <dataset_name> from <namespace>
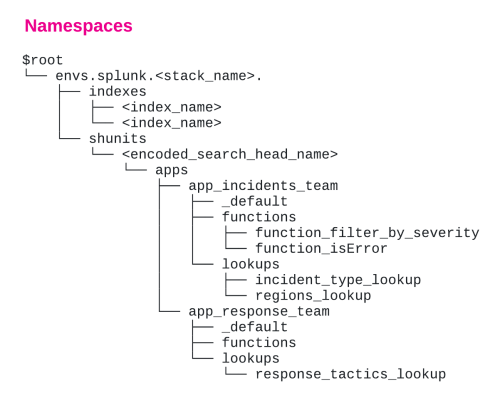
Referring the following diagram, suppose that you want to import the function_isError function from the app_incidents_team application into a module in the app_response_team application.
In this example, because the source and the destination application namespaces are both in the apps namespace, you can specify the relative path to the source functions module in your import statement.
Because imports work at the namespace level, and not the resource level, start at the destination module and namespace, which in this case is the functions module in the app_response_team namespace. You only need to specify ../ in your import statement to change 1 level from the app_response_team namespace level to the apps namespace level.
Then specify the namespace and the module for the source function, which is app_incidents_team.functions.
The import statement in the destination module would look like this:
import function_isError from ../app_incidents_team.functions
Common import statements
The following table shows examples of the SPL2 statements you need to use to import items from outside and inside the current namespace:
| Item | Syntax and example |
|---|---|
| Import a specific index | Syntax
import <index_name> from ../../../../indexes Example import main from ../../../../indexes |
| Import a view from another module in the same app | Syntax
import <view_name> from <module_name> Example import $masked_main from masked_data |
| Import a view from a module in a different app in the same namespace | Syntax
import <view_name> from <namespace_ path>/<module_name> Example import $masked_main from ../my_app/masked_data |
| Import a custom function from another module in the same app | Syntax
import <function_name> from <module_name> Example import mask_pii from functions |
| Import a custom function from a module in a different app in the same namespace | Syntax
import <function_name> from <namespace_path>/<module_name> Example import mask_pii from ../my_app/functions |
For additional import examples, see Importing module items and datasets using SPL2.
Namespace best practices
You can't import an item into a module that has the same name as an item which already exists in the module. To resolve this issue you can import the item using a namespace alias.
When defining a namespace, or a namespace alias, consider the following best practices:
- The name should not start with an underscore ( _ ) character
- Avoid special characters.
- Namespaces share the same naming conventions as field names:
- Names that begin with anything other than a-z, A-Z, or the underscore ( _ ) character must be enclosed in single quotation marks ( ' ).
- Names that contain anything other than a-z, A-Z, 0-9, or the underscore ( _ ) character must be enclosed in single quotation marks ( ' ). This includes the wildcard ( * ) character, the dash ( - ), and the space character.
For more information about namespace aliases, see Importing an item using a namespace alias.
See also
- Related information
- Modules and SPL2 statements
- Create SPL2-based apps in the Splunk Developer Guide on dev.splunk.com
| Scope and precedence importing items | Datasets |
This documentation applies to the following versions of Splunk® Cloud Services: current


 Download manual
Feedback submitted, thanks!