For details, see:
Use decisions to send artifacts to a specific downstream action in your playbook
Use a Decision block to change the flow of artifacts by performing IF, ELSE IF, or ELSE functions. When an artifact meets a True condition, it is passed downstream to the corresponding block in the playbook flow. If none of the Decision block conditions are met, the playbook run fails.
If you wanted to create a playbook to identify whether an IP address is public or private, you could use the following logic in the decision block to identify private IP addresses.
- IF "artifact:*.cef.destinationAddress", "in", "10.0.0.0/8"
- ELSE IF "artifact:*.cef.destinationAddress", "in", "172.16.0.0/12"
- ELSE IF "artifact:*.cef.destinationAddress", "in", "192.168.0.0/16"
- ELSE
geolocate ip
This identifies all private IP addresses and performs a geolocate action on public or invalid IP addresses.
The first time an artifact meets a condition, it is passed along to the corresponding downstream block. The artifact is no longer available for evaluation by other ELSE IF or ELSE statements, and cannot be passed to other downstream blocks. You can only perform one action on an artifact based on the condition that is matched first.
Unlike Filter blocks, no named datasets are created for reference later on in the playbook.
Create a Decision block in your playbook
To create a decision block, perform the following tasks:
- Drag and drop the half-circle icon attached to any existing block in the editor. Select a Decision block from the menu that appears.
- Click the Select Parameter field and specify the datapath for the parameter you want to compare. Parameters are made available to the Decision block by upstream blocks. For details on specifying datapaths, including the now datapath, see Specify data in your playbook.
- (Optional) Create a custom datapath if the datapath you need isn't available. For details on creating a custom datapath, see Custom datapaths in the Specify data in your playbook article.
- in the == field and select an operator for the decision. For a list of available operators, see Operators for conditions in the Use filters in your playbook to specify a subset of artifacts before further processing article.
- In the Select Value field, select the value you want to match. See Example of creating decisions for multiple downstream actions for an example of how these fields all work together.
- (Optional) Select + Else If to create another matching condition for the decision.
- Select Else to create the final branch for the decision.
- Select Done.
You can also configure Advanced settings for a decision block. You can use the Case-sensitive check box to select if you want the conditions evaluation to be case-sensitive, or case-insensitive. The default is case-sensitive. For more information on other Advanced settings, see Advanced settings.
Additionally, you can select the Info tab to create a custom name for the block, add a description for the block, and add a tooltip to the block. See Use custom names.
Example of creating decisions for multiple downstream actions
Decision blocks control the program flow based on comparisons of artifact data, container properties, date functions, and action results. Create if and else if conditions to branch to multiple downstream blocks as a results of the comparisons.
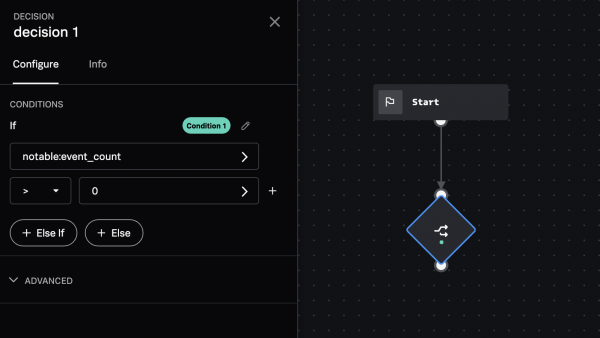
In the following example, start with a Decision block that checks to see if any artifacts are in the container.
- Drag and drop the half-circle icon attached to the start block in the editor. Select a Decision block from the menu that appears.
- In the If field, click the Select Parameter field and select a parameter to evaluate. You can choose from the properties provided by the container, artifact data, and date and time options.
- Select container properties from the list of options, and then click artifact_count as the property you want to evaluate.
- Select > as the operator, and enter 0 in the Select Value field.
Condition 1 corresponds with the green dot on the decision block. All data is passed on to the next block.
Example of creating decisions with multiple statements
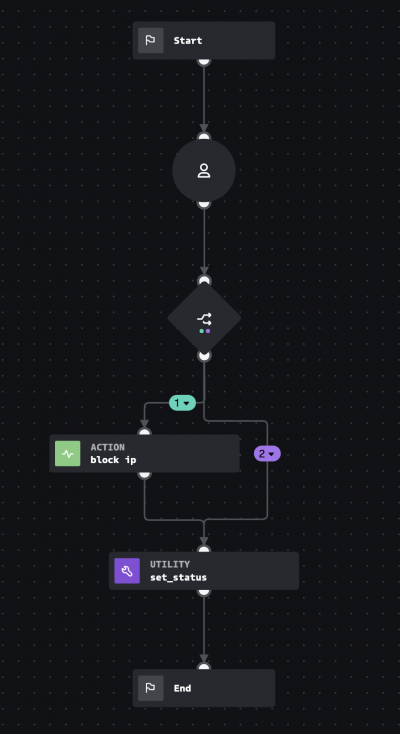
You can create more complex decision blocks with up to five statements. The following example shows a decision based on user input through a prompt block. The prompt block asked a yes/no question on whether to block all IP addresses in the container or not. The decision block checks if the answer is "yes", and if so, all IPs are blocked and the status is set to resolved. Or, if the answer is "no", the status is simply set as resolved and no IP addresses are blocked.
Each subsequent statement and downstream block is color coded: green marks the path of the If statement, and purple marks the path of the Else statement. Each statement has its own and only one downstream block. Different statements can connect to the same or different downstream blocks.
Using decision and filter blocks together
When using decision and filter blocks, the best flow for creating a playbook using these blocks is to use a decision block, then a filter block. A decision block does not create a subset of data like a filter block does and a decision block stops evaluating conditions after the first matched condition. A filter creates a subset of data for each matched condition. For example, you can use a decision block to find out if you have at least one IP address, then use a filter block to create a subset of IPs to do an IP reputation check in a subsequent action.
| Use filters in your playbook to specify a subset of artifacts before further processing | Customize the format of your playbook content |
This documentation applies to the following versions of Splunk® SOAR (On-premises): 6.2.2, 6.3.0, 6.3.1, 6.4.0, 6.4.1


 Download manual
Feedback submitted, thanks!