For details, see:
Use filters in your playbook to specify a subset of artifacts before further processing
Create conditions in a Filter block to gather a subset of artifacts. Only the artifacts matching the specified condition are passed along to downstream blocks for processing. This is useful when you want to remove artifacts that are not needed in the flow if the playbook, or you need to separate artifacts because they require different blocks for processing. For example:
- If an IP address comes from North Korea or Turkey, you can block it.
- If an IP address comes from North America, you can perform an IP reputation lookup.
- If an IP address falls in the 192.168.10.* range, you can to grant access to the user.
Options in a condition aren't related to each other and you can perform multiple actions on an IP address. For example, both the second and third conditions in the example could be true, as an IP address in the 192.168.10.* range could both come from North America and be an internal user who was granted access. The filtered data set is given a named result in the format name="filter_1:condition_1" and passed to the next block for processing.
Create a Filter block in your playbook
To create a filter, perform the following tasks:
- Drag and drop the half-circle icon attached to any existing block in the editor. Select a Filter block from the menu that appears.
- In the Select Parameter field, search for and select the parameter you want to filter on. Parameters are made available to the Filter block by upstream blocks. For details on specifying datapaths, including the now datapath, see Specify data in your playbook.
- (Optional) Create a custom datapath if the datapath you need isn't available. For details on creating a custom datapath, see Custom datapaths in the Specify data in your playbook article.
- Select the == field and select an operator for the filter. See the table in the next section for a list of available operators.
- In the Select Value field, search for and select the value you want to match. See Example of creating a filter for an example of how these fields all work together.
- (Optional) Select + Condition to create another matching condition for the filter. You can have a maximum of five conditions per Filter block. Each condition will have its own downstream path.
- Select Done.
You can also configure Advanced settings for a Filter block. You can use the Case-sensitive check box to select if you want the conditions evaluation to be case-sensitive, or case-insensitive. The default is case-sensitive. For more information on other Advanced settings, see Advanced settings.
Additionally, you can select the Info tab to create a custom name for the block, add a description for the block, and add a tooltip to the block. See Use custom names.
Operators for conditions
This table lists the operators that are available for specifying conditions in filter and decision playbook blocks, as well as exit conditions for looped blocks. For details, see Use decisions to send artifacts to a specific downstream action in your playbook and Repeat actions with logic loops.
Mathematical operators, like == (equal to), != (not equal to), and > (greater than) are available, but are not described in this table.
| Operator name | Description | Example |
|---|---|---|
| in | The parameter is present in a list of values | An IP address is present in a list of embargoed countries. |
| not in | The parameter is not present in a list of values | An IP address is not present in a list of embargoed countries. |
| is true | The parameter value is true. Includes the following cases:
|
A sandbox service returns an action that says job_started is True.
|
| is false | The parameter value is falseIncludes the following cases:
|
A ticketing platform says ticket_closed is False.
|
| Is none | The parameter value is null or undefined | A value for a specific reputation detection engine doesn't exist. |
| Matches regex | The parameter matches a python or javascript regex pattern | A URL matches a specific regex format. For true/false evaluations, use Is true or Is false, also described in this table. If you must use a regex pattern for true/false evaluations, prepend an asterisk to the right side of the comparison (for example, *.true).
|
| Is empty | The parameter is an empty array or object. Includes the following cases:
|
A JSON representation of a user profile is empty. |
| is not empty | The parameter is not empty; array or object contains one or more values | A JSON representation of a user profile is not empty. |
| is list | The parameter is a list of values | An action result sometimes returns a single value and sometimes an array of values. |
| is not list | The parameter is not a list of values | An action result sometimes returns a single value and sometimes an array of values. |
Data types for filter blocks
Filter blocks filter 5 types of data repositories:
- Artifacts
- Action results
- Custom function results
- Playbook inputs
- Playbook outputs
If you are using something other than one of these 5 repository types, you might choose to use a decision block instead. Alternatively, you can convert your data into a custom function result and then pass that result into the filter block.
Example of creating a filter
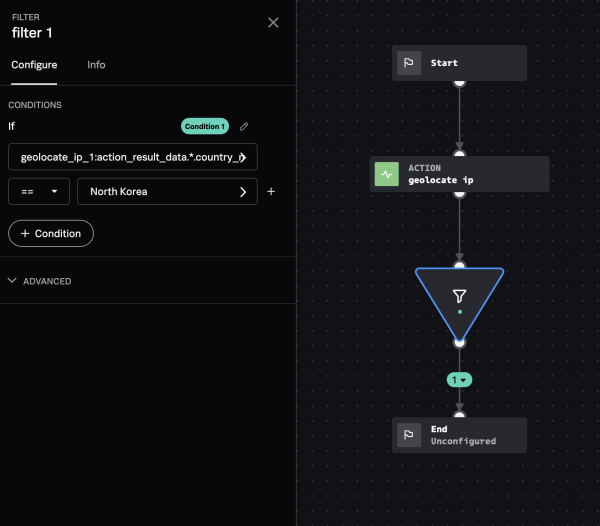
In the following example, you can create a filter to perform a geolocate ip action on a source IP address and block any IP addresses from North Korea.
- Configure a
geolocate ipAction block in the playbook editor. For more information on configuring an Action block, see Add an action block to your playbook. - Drag and drop the half-circle icon attached to the Action block in the editor. Select a Filter block from the menu that appears.
- In the Select Parameter field, select geolocate_ip_1.
- Select geolocate_ip_1:action_result_data.*.country_name. Leave == as the operator, and type North Korea in the Select Value field.
Example of creating a filter with multiple conditions
You can create multiple rows within a condition or multiple conditions.
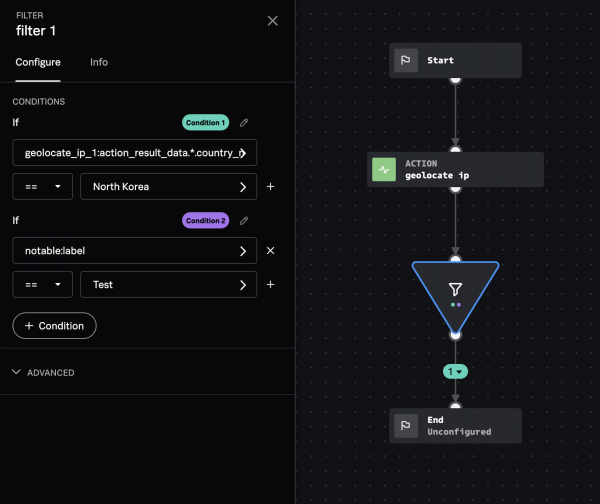
- Select + Condition to create a second set of filter conditions.
- In the Select Parameter field, select artifacts and then label.
- Select == as the operator, and enter Test in the Select Value field.
Multiple conditions within a filter block are independent of each other. The results of Condition 1 don't play into the set of inputs for Condition 2. In this example, Condition 1 uses the result from the geolocate ip action, while Condition 2 uses a property of the artifact. Each condition has its own color to make it easier to identify the separate downstream actions; green marks the path on Condition 1, and purple marks the path of Condition 2. If you want to edit the Condition 1 and 2 labels, select the pencil icon next to the label names. You can connect different condition paths to the same or different downstream blocks.
Example of filter chaining
You can also chain multiple filter blocks together to obtain a more specific set of data.
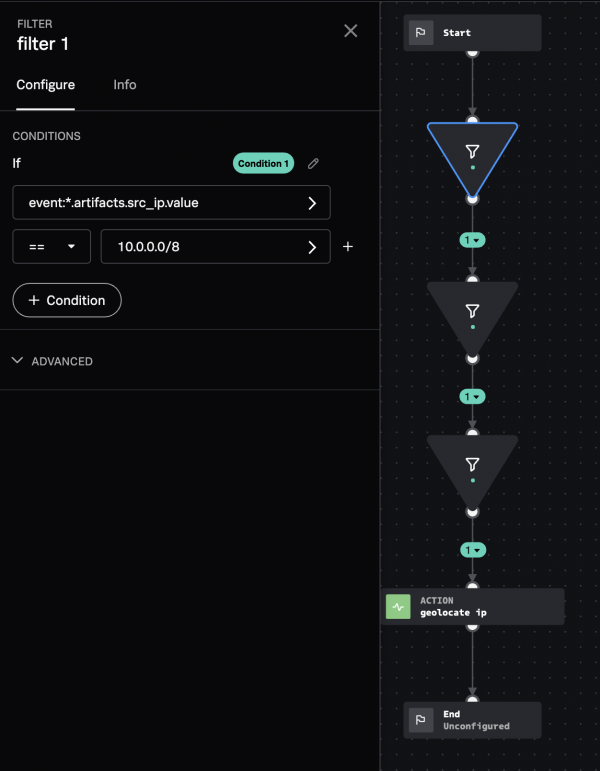
For example, to filter out RFC1918 addresses (10.x.x.x, 172.16.x.x-172.31.x.x, and 192.168.x.x), and then perform a geolocate ip action on the remaining addresses, perform the following steps:
- Drag and drop the half-circle icon attached to any existing block in the editor. Select a Filter block from the menu that appears.
- In the Select Parameter field, select event > src_ip.
- Enter 10.0.0.0/8 in the Select Value field.
- Create a second filter for the 172.16.0.0/12 IP addresses. This filter uses the filtered results from the previous block.
- Create a third filter for the 192.168.0.0/12 IP addresses. This filter uses the filtered results from the previous block.
- Create the
geolocate ipaction block on the remaining IP addresses.
If a filter block eliminates all variables while filtering, the downstream action can't run.
Example of using a custom list in a filter
You can use custom lists in your Filter blocks to simplify checking against a fixed set of items. For example, instead of checking the source country of an IP address to see if it is North Korea, you can define a list of countries in a custom list, then check the IP address against all of the countries in the list. See Create custom lists for use in playbook comparisons for more information about how to create and maintain custom lists.
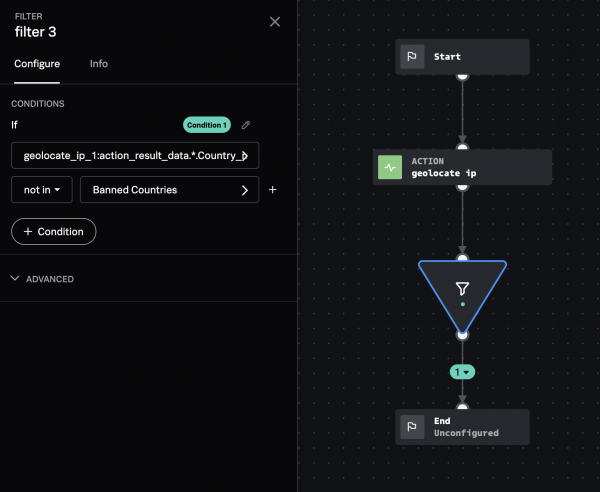
In this example, use a custom list named Banned Countries in a filter by performing the following tasks:
- Configure a
geolocate ipaction in the playbook editor. - Add a Filter block.
- In the Select Parameter field and select geolocate_ip_1.
- Select geolocate_ip_1:action_result_data.*.country_name.
- Use "in" or "not in" as the operator.
- In the Select Value field, select custom lists, then select Banned_Countries.
The country name of the source IP address is checked against the countries defined in the Banned Countries custom list.
The matching that occurs between artifact data and custom list items is exact matching and is case sensitive with no partial matches.
| Add functionality to your playbook in using the Utility block | Use decisions to send artifacts to a specific downstream action in your playbook |
This documentation applies to the following versions of Splunk® SOAR (On-premises): 6.2.1, 6.2.2, 6.3.0, 6.3.1, 6.4.0, 6.4.1


 Download manual
Feedback submitted, thanks!