Select time ranges to apply to your search
Use the time range picker to set time boundaries on your searches. You can restrict a search with preset time ranges, create custom time ranges, specify time ranges based on date or date and time, or work with advanced features in the time range picker. These options are described in the following sections.
Note: If you are located in a different timezone, time-based searches use the timestamp of the event from the Splunk instance that indexed the data.
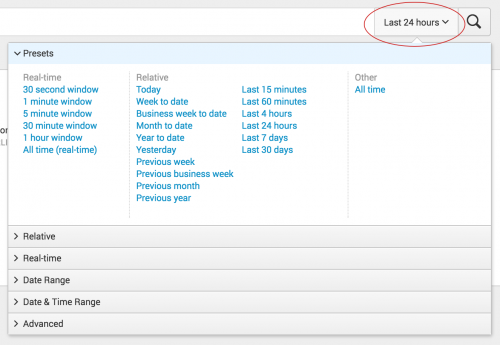
Select from a list of Preset time ranges
The time range picker includes many built-in time ranges options that are already defined in the times.conf file. You can select from a list of Real-time windows, Relative time ranges, and search over All Time.
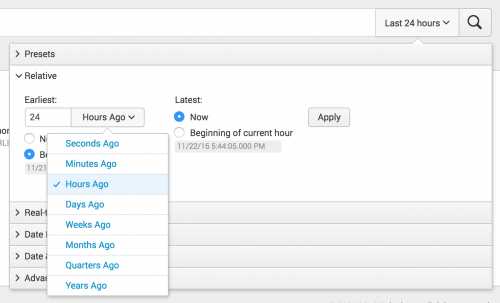
Define custom Relative time ranges
Use Relative time range options to specify a custom time range for your search that is relative to Now or the Beginning of the hour. You can select from the list of time range units, "Seconds ago", "Minutes ago", and so on.
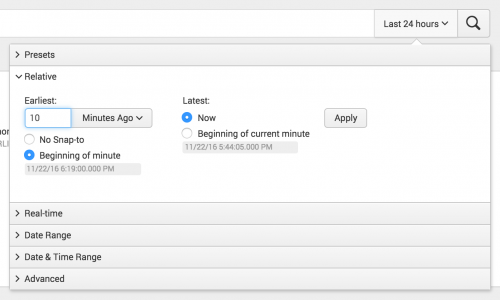
By default, Earliest is set to No Snap-to and Latest is set to Now. If you specify the snap-to option for Earliest or Latest, the time range will snap to beginning of the time frame that you select. For example, if you select Minutes Ago, the Earliest snap to value is Beginning of minute.
The preview boxes below the fields update to the time range as you set the time ranges.
To learn more about relative time ranges, see Specify time modifiers in your search.
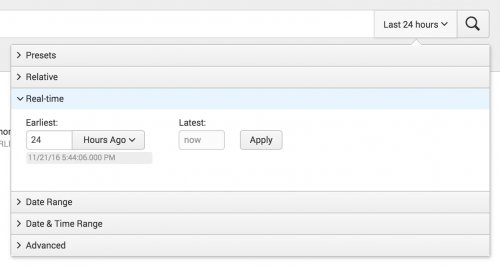
Define custom Real-time time ranges
The Real-time option enables you to specify a custom start time for the time range window for a real-time search.
To learn more about time ranges for real-time searches, see Specify real-time time range windows in your search.
Define custom Date ranges
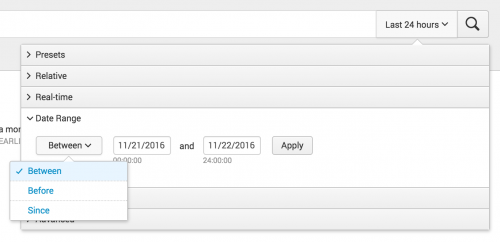
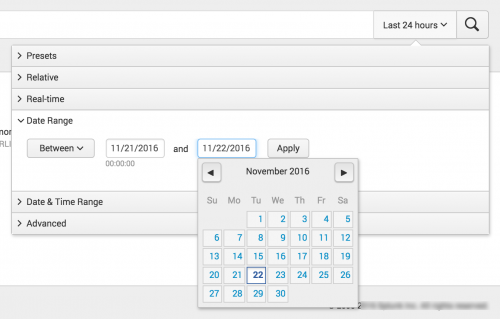
Use the Date Range option to specify custom calendar dates in your search. You can choose among options to return events: Between a beginning and end date, Before a date, and Since a date.
For these fields, you can type the date into the text box or select the date from a calendar.
Define custom Date & Time ranges
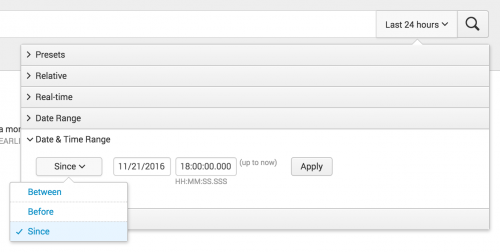
Use the Date & Time Range option to specify custom calendar dates and times for the beginning and ending of your search.
You can type the date into the text box or select the date from a calendar.
Use Advanced time range options
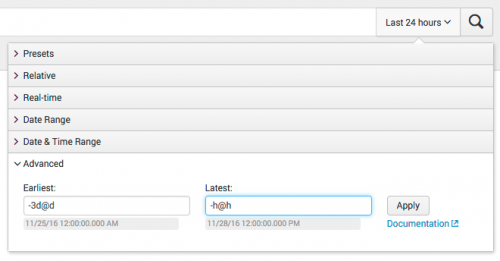
Use the Advanced option to specify the earliest and latest search times. You can write the times in UNIX time or relative time notation, such as -3d@d. The UNIX time value you type is converted to local time.
The UNIX time or relative time that you specify is displayed as a timestamp under the text field so that you can verify your entry.
Customize the list of Preset time ranges
You can customize the set of time ranges that appear in the Presets list the time range picker in Splunk Web. You can create a time range based on an existing time range, or you can hide time ranges.
Create a time range based on an existing time range
The easiest way to create a new time range is to use an existing time range as the basis for a new time range. For example, the Relative time range list contains the Last 15 minutes time range. You want to create a time range for the last 30 minutes. You start by creating a duplicate, or clone, of the Last 15 minutes time range. In the clone, you change the Earliest setting from -15min to -30min.
- From the Settings menu, under the Knowledge list select User interface.
- In the User Interface window, select Time ranges.
- Locate the time range that you want to use.
- In the Actions column click Clone.
- A copy of the specifications for the time range appear. Make the changes to the time range specifications and click Save.
The new time range appears in the Relative list in the Presets menu.
Create a new Preset time range
You can create a new time range for the Presets menu. For example, you want to create a time range that shows searches yesterday from the hours of 12:00 to 15:00. You need to specify relative times in the Earliest and Latest fields. In the Earliest field you specify -1d@d+12h. In the Latest field you specify -1d@d+15h.
- From the Settings menu, under the Knowledge list select User interface.
- In the User Interface window, select Time ranges.
- Click New.
- Complete the fields in the Add New window and click Save.
The new time range appears in the Relative list in the Presets menu.
Hide a time range on the Presets list
- From the Settings menu, under the Knowledge list select User interface.
- In the User Interface window, select Time ranges.
- Locate the time range you want to hide. In the Status column click Disable.
Setting default time ranges for the API or CLI
You can set time ranges manually in the times.conf file when you want to specify a time range for a REST API endpoint or for the command line interface (CLI).
Prerequisites
- Only users with file system access, such as system administrators, can change time ranges manually in the
times.conffile. - Review the steps in How to edit a configuration file in the Admin Manual.
Never change or copy the configuration files in the default directory. The files in the default directory must remain intact and in their original location. Make the changes in the local directory.
Steps
- Open the local
times.conffile for the Search app. For example,$SPLUNK_HOME/etc/apps/<app_name>/local. - Create a stanza for the time range that you want to specify. For examples, see the times.conf reference in the Admin Manual.
If you are using Splunk Cloud and want to either hide a time range or create a new time range, open a Support ticket.
Change the default time range
The default time range for ad hoc searches in the Search & Reporting App is set to Last 24 hours. An administrator can set the default time range globally, across all apps. See Change default values in the Admin Manual.
| About searching with time | Specify time modifiers in your search |
This documentation applies to the following versions of Splunk® Enterprise: 7.0.0, 7.0.1, 7.0.2, 7.0.3, 7.0.4, 7.0.5, 7.0.6, 7.0.7, 7.0.8, 7.0.9, 7.0.10, 7.0.11, 7.0.13
 Download manual
Feedback submitted, thanks!