Specifying time ranges
Restricting, or filtering, your search criteria using a time range is the easiest and most effective way to optimize your searches.
You can use time ranges to troubleshoot an issue, if you know the approximate timeframe when the issue occurred. Narrow the time range of your search to that timeframe. For example, to investigate an incident that occurred sometime in the last hour, you can use the default time range Last 24 hours, but a better option is Last 60 minutes.
Let's explore the data from the Buttercup Games online store using the different time ranges.
- To start a new search, click Search in the Apps bar.
- To search for a keyword in your events, type
buttercupgamesin the Search bar and press Enter.
buttercupgames
- The keyword is highlighted in the events that are returned.
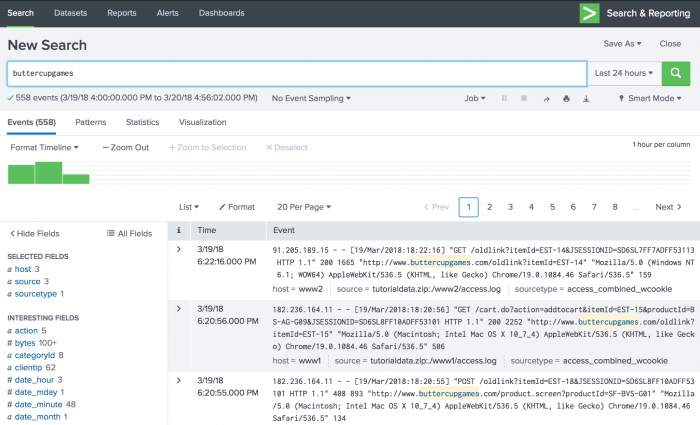

Notice that hundreds of events are returned.
You use the time range picker, which is to the right of the Search bar, to set time boundaries on your searches. The default time range is Last 24 hours. You can restrict the search to one of the preset time ranges, or use a custom time range.
Time ranges and the tutorial data
When you run a search using the tutorial data, if no events are returned, it is probably because you downloaded the tutorialdata.zip file more than one day ago. When you download the ZIP file, timestamps are generated at that moment in time and are added to the data.
The tutorial data for the Buttercup Games store contains events for a seven day period. The dates of the events are based on the date that you downloaded the tutorial data file. For example, if you download the file today, the dates for the events begin the previous week. If today is a Wednesday, the events have a timestamp starting the previous Wednesday. The last events are from yesterday. There are no events from today. Searching for events using Today or any time less than the last 24 hours will return no events.
For all of your searches that use the tutorial data files, you need to adjust the search time range based on when you downloaded the tutorial data files. If you downloaded the tutorial data file 3 days ago, there are no events from the last 3 days. Try a different Relative time range, such as Previous week or Last 7 days.
Preset time ranges
The time range picker has many preset time ranges that you can select from.
- Click the time range picker to see a list of the time range options.
- The Presets option contains Real-time, Relative, and Other time ranges.
- Real-time searches display a live, streaming view of events. You can specify a window over which to retrieve events.
- Historical searches display events from the past. You can restrict your search by specifying a relative time range or a specific date and time range.
Because the data for the Buttercup Games online store is a snapshot of historical data, you will not use the '''Real-time''' preset time ranges in this tutorial.
- In the Presets option in the Relative list, click Yesterday.
- The number of events returned should be larger. You changed the time range from Last 24 hours to Yesterday.

Custom time ranges
Use a custom time range when one of the preset time ranges is not precise enough for your search.
Specify relative time ranges
You can use the Relative option to specify a custom time range.
- Open the time range picker.
- To run a search over the last two days, select the Relative time range option.
- For Earliest, type
2in the field, and select Days Ago from the drop-down list. - For Latest, the default is Now. Select Beginning of today.
- Click Apply.
The timestamps that appear below the radio buttons adjust based on your selections in the Relative list of time ranges.
As mentioned before, if no events are returned, select a different time range, such 4 Days Ago or 1 Week Ago.

Specify date and time ranges
You can also use the Date Range and Date & Time Range options to specify a custom time range.
- Use Between to specify that events must occur between an earliest and latest date.
- Use Before to specify that events must occur before a date.
- Use Since to specify that events must occur after a date.
You use the Date Range option to specify dates. The following screen image shows the calendar that you can use to select a date.

You use the Date & Time Range option when you want to specify both a date and a time. The following screen image shows the "Between", "Before", or "Since" options.

For example, to troubleshoot an issue that took place March 20, 2018 at 10:02 AM, specify the earliest time of 03/20/2018 10:00:00.000 and the latest time of 03/20/2018 10:05:00.000 to show the events immediately before and after the issue took place.
Next step
This completes Part 3 of the Search Tutorial.
You have explored the Search app views and learned how important it is to specify time ranges with your searches. Continue to Part 4: Searching the tutorial data.
See also
Change the default time range in the Search Manual
| Exploring the Search views | Basic searches and search results |
This documentation applies to the following versions of Splunk® Enterprise: 7.1.0, 7.1.1, 7.1.2, 7.1.3, 7.1.4, 7.1.5, 7.1.6, 7.1.7, 7.1.8, 7.1.9, 7.1.10, 7.2.0, 7.2.1, 7.2.2, 7.2.3, 7.2.4, 7.2.5, 7.2.6, 7.2.7, 7.2.8, 7.2.9, 7.2.10
Feedback submitted, thanks!