Search with field lookups
Now that you have defined the prices_lookup, you can see the fields from that lookup in your search results.
Show the lookup fields in your search results
Because the prices_lookup is an automatic lookup, the fields from the lookup table will automatically appear in your search results.
- From the Automatic Lookups window, click the Apps menu in the Splunk bar.
- Click Search & Reporting to return to the Search app.
- Change the time range to All time.
- Run the following search to locate all of the web access activity.
sourcetype=access_* - Scroll through the list of Interesting Fields in the Fields sidebar, and find the
pricefield.
This field is added to your events from the automatic lookup you created. - Click price to open the summary dialog box for that field.
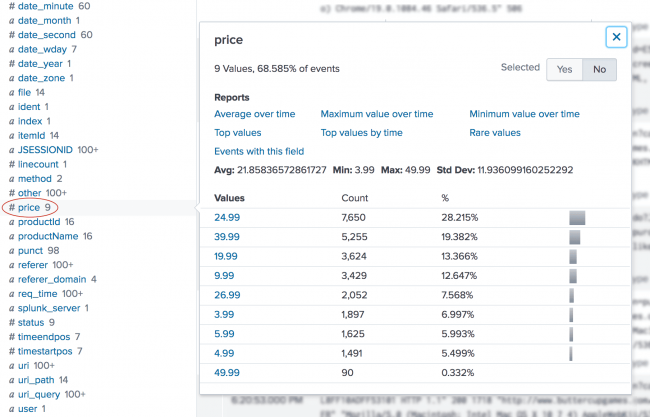
The summary dialog box contains a lot of information about the price field. For example, the price field appears in more than 50% of the events. There are a set of built-in reports that you can access. Several aggregate calculations, such as average, minimum, and standard deviation, are listed along with a count and percentage of how many events each price appears in. - Next to Selected, click Yes. This moves the prices field from the list of Interesting Fields to the list of Selected Fields in the Fields sidebar.
- Close the dialog box.
- Scroll through the list of Interesting Fields in the Fields sidebar, and find the
productNamefield. - Click productName to open the summary dialog box for the field.
- Next to Selected, click Yes.
- Close the dialog box.

Both the price and the productName fields appear in the Selected Fields list and in the search results.
Notice that not every event shows the price and the productName fields.

Search with the new lookup fields
When you setup the automatic lookup, you specified that the productId field in your indexed events corresponds to the productId field in the prices.csv file.
When you run a search, the Splunk software uses that relationship to retrieve, or lookup, data from the prices.csv file.
This enables you to specify the productName and price fields in your search criteria. The product name and price information does not exist in your indexed fields. This information exists in the lookup file, prices.csv.
Example: Display the product names and prices
You can show a list of the Buttercup Games product names and the corresponding prices by using the stats command to output a table that lists the prices by product. The search also uses the AS keyword and the rename command.
- Run the following search.
sourcetype=access_* |stats values(price) AS Price BY productName |rename productName AS "Product Name"

Example: Display the VIP client purchases
In Part 4 of this tutorial about subsearches, you created the following search that returned the product IDs of the products that a VIP client purchased.
sourcetype=access_* status=200 action=purchase [search sourcetype=access_* status=200 action=purchase | top limit=1 clientip | table clientip] | stats count AS "Total Purchased", dc(productId) AS "Total Products", values(productId) AS "Product IDs" BY clientip | rename clientip AS "VIP Customer"
The results of that search are shown in the following image.

The events return the product IDs because that is the only data in your events about the product. However, now that you have defined the automatic lookup, you can return the actual product names.
- Make sure that the time range is set to All time.
- Using the same search, change values(productId) to values(productName).
- Run the search.
sourcetype=access_* status=200 action=purchase [search sourcetype=access_* status=200 action=purchase | top limit=1 clientip | table clientip] | stats count AS "Total Purchased", dc(productId) AS "Total Products", values(productName) AS "Product Names" BY clientip | rename clientip AS "VIP Customer"
- The results, like the previous search, show the purchases by the VIP customer. However, the results are more meaningful because the product names, which are coming from the lookup table, appear instead of the more cryptic product IDs.

Next step
This completes Part 5 of the Search Tutorial.
You have learned how to use field lookups in your searches. As you run more searches, you want to be able to save those searches, or share the searches with other people. Continue to Part 6: Creating reports and charts.
| Enabling field lookups | Save and share your reports |
This documentation applies to the following versions of Splunk® Enterprise: 7.1.0, 7.1.1, 7.1.2, 7.1.3, 7.1.4, 7.1.5, 7.1.6, 7.1.7, 7.1.8, 7.1.9, 7.1.10, 7.2.0, 7.2.1, 7.2.2, 7.2.3, 7.2.4, 7.2.5, 7.2.6, 7.2.7, 7.2.8, 7.2.9, 7.2.10
Feedback submitted, thanks!