Setting tokens from search results or search job metadata
Set tokens from search results or search job metadata to embed search-related information in other searches or visualizations. For example, embedding search job metadata such as a job's start time and status can help you confirm whether your application is returning expected outcomes.
Search results vs search job metadata
Choices for search results and search job metadata differ. Search results depend on what's returned by the search, and the results are the data fields that come back. Search job metadata options are finite.
For example, you can set a token for a search result accessing a table column called count using the syntax $search name:result.<field>$.
$Activity by Sourcetype:result.count$
When setting tokens for search job metadata, you can only use the options available such as resultCount or startTime. Use the syntax $search name:job.<metadata option>$.
$Activity by Sourcetype:job.resultCount$
$Activity by Sourcetype:job.startTime$
For a list of the search job metadata options, see Search job metadata options.
Setting tokens
- Select your visualization so that it highlights blue.
- Navigate to the Data Configurations section of the Configuration panel.
- Click on the edit icon (
 ) next to the visualization's data source name.
 - In the Edit Data Source panel, check the box for Use search results or job status as tokens.
- Click Apply & Close.
- Navigate to the Source Editor and set a token using the token syntax
$search name:job.[option]$.
Search job metadata options
The following options are available for setting a token from search results.
| Option | Description |
|---|---|
| $search name:job.startTime$ | Initial time a search job starts. Returns the date and time. |
| $search name:job.resultCount$ | Number of results returned. Returns an integer. |
| $search name:job.messages$ | List of error and debug messages. The messages are case-sensitive. If there are no messages, the result will be blank. |
| $search name:job.hasResults$ | Indicates whether the search has results. Returns a true or false. |
| $search name:result.<field>$ | Returns the first result for the specified field. |
| $search name:job.status$ | Indicates the status of the job. Returns done, queued, in progress, or failed. |
| $search name:job.done$ | Indicates whether the job is done. Returns a true or false. |
| $search name:job.failed$ | Indicates whether the job has failed. Returns a true or false. |
| $search name:job.inProgress$ | Indicates whether the job is in progress. Returns a true or false. |
| $search name:job.queued$ | Indicates whether the job is queued. Returns a true or false. |
Example of setting a token from search job metadata
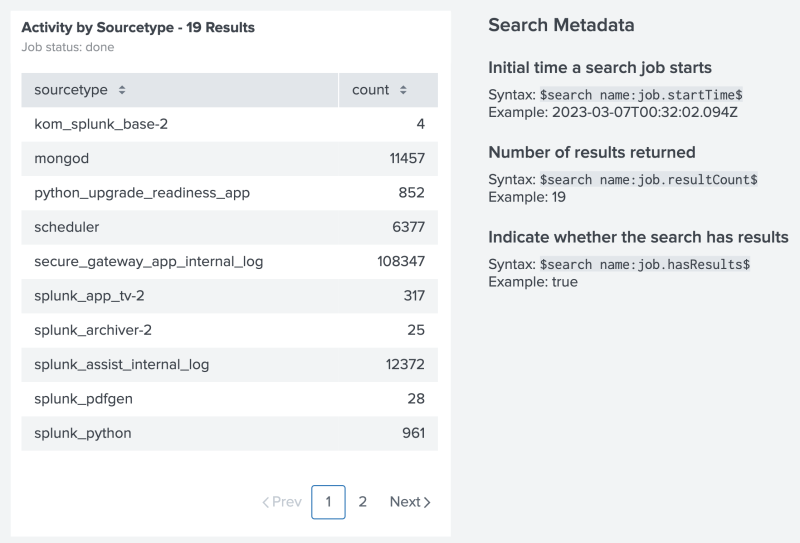
The following example shows a table and Markdown text. The Markdown text uses tokens to display results from the table's search.
Source code example
The following is a source code example of setting a token from search results. All search-based tokens use search name to identify the data source, followed by the specific metadata or result you want to use. Notice how the example's search name is the title of the table's data source, Activity by Sourcetype. The search name also supports spaces in the name.
Select Expand to see the full source code example.
{
   "visualizations": {
       "viz_DQ5Uav96": {
           "type": "splunk.markdown",
           "options": {
               "markdown": "## Search Metadata\n\n### Initial time a search job starts\nSyntax: `$search name:job.startTime$`  \nExample: $Activity by Sourcetype:job.startTime$\n\n### Number of results returned\nSyntax: `$search name:job.resultCount$`  \nExample: $Activity by Sourcetype:job.resultCount$\n\n\n### Indicate whether the search has results \nSyntax: `$search name:job.hasResults$`  \nExample: $Activity by Sourcetype:job.hasResults$\n\n### Returns the first result for the specified field\nSyntax: `$search name:result.<field>$`  \nExample: $Activity by Sourcetype:result.count$\n\n"
           }
       },
       "viz_VMfhcGEg": {
           "type": "splunk.table",
           "dataSources": {
               "primary": "ds_m45g5mF6"
           },
           "title": "Activity by Sourcetype - $Activity by Sourcetype:job.resultCount$ Results",
           "description": "Job status: $Activity by Sourcetype:job.status$"
       }
   },
   "dataSources": {
       "ds_6a7rby54": {
           "type": "ds.search",
           "options": {
               "query": "| savedsearch user_activity user=$user$"
           },
           "name": "User Activity"
       },
       "ds_m45g5mF6": {
           "type": "ds.search",
           "options": {
               "query": "index=_internal \n| stats count by sourcetype",
               "enableSmartSources": true
           },
           "name": "Activity by Sourcetype"
       }
   },
   "defaults": {
       "dataSources": {
           "ds.search": {
               "options": {
                   "queryParameters": {
                       "latest": "$global_time.latest$",
                       "earliest": "$global_time.earliest$"
                   }
               }
           }
       },
       "visualizations": {
           "global": {
               "showLastUpdated": true
           }
       }
   },
   "inputs": {
       "input_global_trp": {
           "type": "input.timerange",
           "options": {
               "token": "global_time",
               "defaultValue": "-24h@h,now"
           },
           "title": "Global Time Range"
       }
   },
   "layout": {
       "type": "absolute",
       "options": {},
       "structure": [
           {
               "item": "viz_DQ5Uav96",
               "type": "block",
               "position": {
                   "x": 460,
                   "y": 30,
                   "w": 360,
                   "h": 490
               }
           },
           {
               "item": "viz_GUphmtL8",
               "type": "block",
               "position": {
                   "x": 830,
                   "y": 30,
                   "w": 330,
                   "h": 550
               }
           },
           {
               "item": "viz_VMfhcGEg",
               "type": "block",
               "position": {
                   "x": 20,
                   "y": 30,
                   "w": 410,
                   "h": 490
               }
           }
       ],
       "globalInputs": [
           "input_global_trp"
       ]
   },
   "description": "",
   "title": "Setting token values from search results or search metadata"
}
Set and evaluate tokens for specific conditions
In Simple XML, you might have used token event handlers to set individual tokens, add eval logic to specific fields, or to conditionally match token values. To achieve similar token handling in Dashboard Studio, you can include token eval or condition logic in a Splunk Search Processing Language (SPL) search and then set tokens directly from search results or search job metadata.
For example, say you have a token representing kilometers per hour speed (km/h). You want to use the km/h speed in your dashboard and also want to use a converted miles per hour (mph) speed. In Simple XML, you might have used the eval event handler to convert km/h to mph. In Dashboard Studio, you can put the speed conversion logic into an SPL search and then set the search result as a token you can use throughout your dashboard.
Source code example
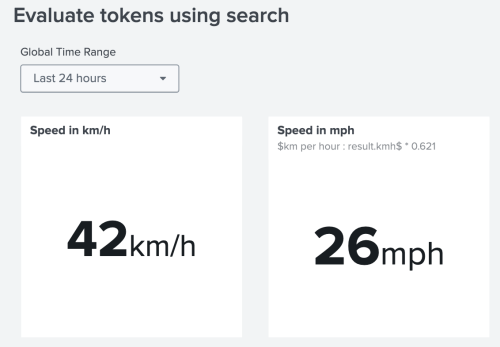
The following image is an example of using a token in Dashboard Studio to convert kilometers per hour to miles per hour. Immediately following the image is an SPL search that converts kilometers per hour to miles per hour using a set token.
Notice how the single value visualization for speed in miles per hour uses the token $km per hour:result.kmh$ in its SPL search:
| makeresults\n| eval speed_in_mph = $km per hour:result.kmh$ * 0.621\n| table speed_in_mph.
Select Expand to see the full source code example.
{
    "visualizations": {
        "viz_F0Z9jsFU": {
            "type": "splunk.singlevalue",
            "title": "Speed in km/h",
            "dataSources": {
                "primary": "ds_eZ6LtdAT"
            },
            "options": {
                "unit": "km/h"
            }
        },
        "viz_p4tcz9dd": {
            "type": "splunk.singlevalue",
            "dataSources": {
                "primary": "ds_RopRdHUj"
            },
            "title": "Speed in mph",
            "options": {
                "unit": "mph"
            },
            "description": "$km per hour : result.kmh$ * 0.621"
        }
    },
    "dataSources": {
        "ds_eZ6LtdAT": {
            "type": "ds.search",
            "options": {
                "query": "| makeresults\n| eval kmh=random()%100",
                "enableSmartSources": true
            },
            "name": "km per hour"
        },
        "ds_RopRdHUj": {
            "type": "ds.search",
            "options": {
                "query": "| makeresults\n| eval speed_in_mph = $km per hour:result.kmh$ * 0.621\n| table speed_in_mph"
            },
            "name": "kmh to mph"
        }
    },
    "defaults": {
        "dataSources": {
            "ds.search": {
                "options": {
                    "queryParameters": {
                        "latest": "$global_time.latest$",
                        "earliest": "$global_time.earliest$"
                    }
                }
            }
        }
    },
    "inputs": {
        "input_global_trp": {
            "type": "input.timerange",
            "options": {
                "token": "global_time",
                "defaultValue": "-24h@h,now"
            },
            "title": "Global Time Range"
        }
    },
    "layout": {
        "type": "absolute",
        "options": {
            "width": 1440,
            "height": 960,
            "display": "auto"
        },
        "structure": [
            {
                "item": "viz_F0Z9jsFU",
                "type": "block",
                "position": {
                    "x": 10,
                    "y": 10,
                    "w": 250,
                    "h": 250
                }
            },
            {
                "item": "viz_p4tcz9dd",
                "type": "block",
                "position": {
                    "x": 290,
                    "y": 10,
                    "w": 250,
                    "h": 250
                }
            }
        ],
        "globalInputs": [
            "input_global_trp"
        ]
    },
    "description": "",
    "title": "Evaluate tokens using search"
}
| Linking interactions | Embed user and environment details with environment tokens |
This documentation applies to the following versions of Splunk Cloud Platform™: 8.2.2203


 Download manual
Feedback submitted, thanks!