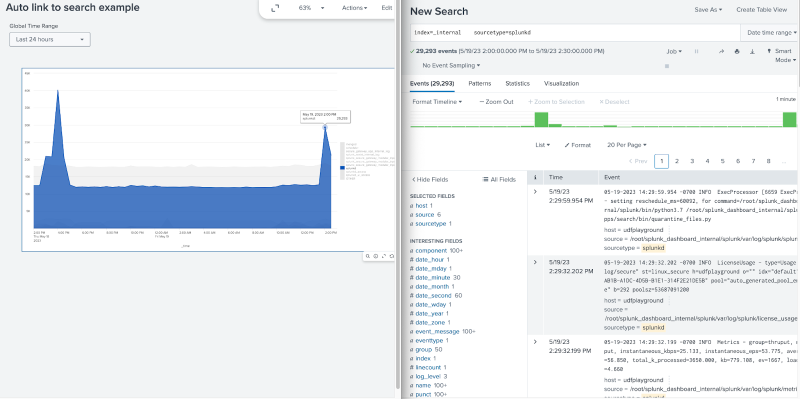
Investigate data deeper by linking to a search
Link from your dashboard to search pages for further analysis of data details. For example, suppose atypical behavior appears on a visualization of a monitoring dashboard. If the visualization is linked to a search, you can select the deviating data point to open a search that uses the dashboard context as a starting point.
Linking to a search
To link to a search, complete the following steps:
- Select the object you want to link to a search. Selected objects highlight with a blue border. Objects include visualizations, images, and text.
- Navigate to the Interactions section of the Configuration panel.
- Select + Add Interaction.
- Select Link to search from the On click dropdown list.
- Select Auto or Custom from the Search options.
- An Auto search is based on an existing search. Auto searches are the default unless a visualization has no associated search.
- If no searches are available, Custom becomes the default search. You can write a new SPL query with a Custom search. For more details, see Custom search.
- (Optional) Select Open in a new tab, if you want to keep your dashboard and search results in separate open tabs.
- Select Apply.
Custom search
With Custom search, you can enter your linked search SPL query and time range. If the visualization has an existing search, the time range defaults to Auto, which uses the same time range associated with the existing search. You can override the time range by specifying a static time range or selecting a time range input.
Custom search tokens
You can enter any predefined token in a custom search. Dashboard Studio supports three predefined tokens:
- name
- value
- row.<fieldname>.value
For more details about tokens, see Setting tokens on a visualization click.
Custom time range options
Custom link to search has three time range options:
- Auto matches the time range to the visualization's existing search time range. If no time ranges are available, the Auto option is inactive.
- Static provides a selection of typical time ranges and ways to customize time ranges. You can select a time range from the Time range dropdown list.
- Input sets the time range by interactive dashboard inputs. You can select an input from the Time range dropdown list. If no time range inputs are available, the Input option is inactive.
Auto linked search results
The results for an Auto linked search vary depending on the object associated with the search. For example, a search linked to a bubble map bases its results on the geographic boundaries of the circle selected. A search linked to an area chart bases its results on the selected data point and the timestamp associated with that data point. A search linked to a table bases its results on the selected cell of the table.
Example of an Auto link to search
The following is an example of an Auto link to search that shows how a data point on an area chart can link to search results that open on a separate tab.
Source code
You can see the link to search in the eventHandlers section of the dashboard definition.
{
   "visualizations": {
       "viz_rwLX0WFU": {
           "type": "splunk.area",
           "options": {},
           "dataSources": {
               "primary": "ds_h3Q1Keuz"
           },
           "eventHandlers": [
               {
                   "type": "drilldown.linkToSearch",
                   "options": {
                       "type": "auto",
                       "newTab": true
                   }
               }
           ]
       }
   },
   "dataSources": {
       "ds_h3Q1Keuz": {
           "type": "ds.search",
           "options": {
               "query": "index=_internal  \n|  timechart count by sourcetype"
           },
           "name": "Search_1"
       }
   },
   "defaults": {
       "dataSources": {
           "ds.search": {
               "options": {
                   "queryParameters": {
                       "latest": "$global_time.latest$",
                       "earliest": "$global_time.earliest$"
                   }
               }
           }
       }
   },
   "inputs": {
       "input_global_trp": {
           "type": "input.timerange",
           "options": {
               "token": "global_time",
               "defaultValue": "-24h@h,now"
           },
           "title": "Global Time Range"
       }
   },
   "layout": {
       "type": "absolute",
       "options": {
           "width": 1440,
           "height": 960,
           "display": "auto"
       },
       "structure": [
           {
               "item": "viz_rwLX0WFU",
               "type": "block",
               "position": {
                   "x": 60,
                   "y": 50,
                   "w": 1340,
                   "h": 640
               }
           }
       ],
       "globalInputs": [
           "input_global_trp"
       ]
   },
   "description": "",
   "title": "Auto link to search example"
}
| Linking interactions | Setting tokens from search results or search job metadata |
This documentation applies to the following versions of Splunk Cloud Platform™: 9.1.2308, 9.1.2312, 9.2.2403, 9.0.2305

 Download manual
Feedback submitted, thanks!