Take action on anomalies with anomaly action rules
Create anomaly action rules to identify a set of anomalies so that you can delete them, change the risk score, or add them to a watchlist. Rules can apply to past anomalies or to new ones. If you apply a rule to future anomalies, the rule is applied immediately after an anomaly is created. Only admins can create anomaly action rules. You can view anomalies deleted by anomaly action rules on the Anomalies Table. See Delete anomalies in Splunk UBA.
Anomaly action rules can change the threats that exist in your environment, causing some to disappear as they are no longer valid, others to change score, and more. See Splunk UBA adjusts threats after you take action on anomalies.
Create an anomaly action rule in Splunk UBA
Set up an anomaly action rule to delete anomalies, change the risk score, or add anomalies to a watchlist based on a filter that you define.
- Select Explore > Anomalies to open the anomalies table.
- Click the Anomaly Action Rules icon and click New Anomaly Action Rule.
- Step 1 of 3: Rule Action.
- Select a Rule Action to be taken for the anomalies that match the filter conditions. Choose to add anomalies to a watchlist, delete anomalies permanently or move them to the trash to suppress them, or change the score of an anomaly to an absolute score or by adjusting the score.
- Select a Rule Scope based on whether you want only future anomalies or future and existing anomalies to be affected by the rule.
- Click Next.
- Step 2 of 3: Anomaly Filters
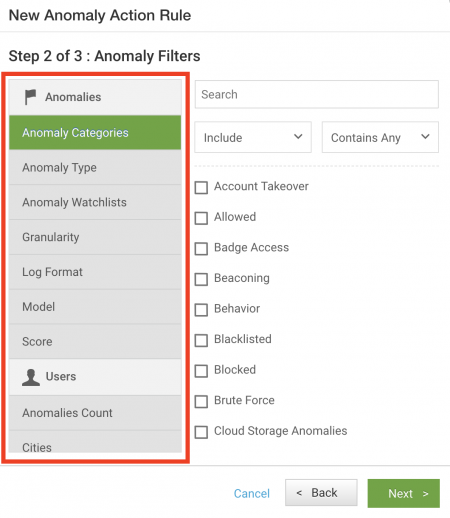
- Select the Anomaly Filters that identify the selection of anomalies you want to take action on. The section on the left contains the main entities for which you can filter: Anomalies, Users, Accounts, Devices, Apps, and Domains. You can select multiple entity categories to create an AND condition. For example, you can create a rule to filter on specific anomaly types and anomaly score. To filter on anomaly types OR anomaly score, create separate rules with anomaly types in one rule, and anomaly score in the other.

- Additional filters are available:
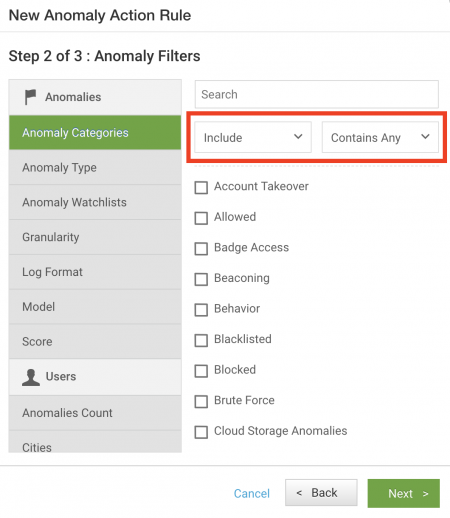
- Select Include to create a filter that will match a specific condition.
- Select Exclude to create a filter using a NOT equivalent, to exclude conditions.
- Select Contains Any to create a filter using an OR equivalent, to match any one of a set of conditions.
- Select Contains All to create a filter using an AND equivalent, to match all specified conditions.

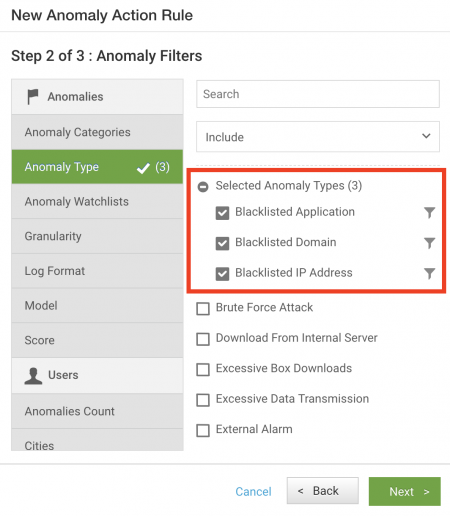
- You can drill down further to refine your filter. For example, select Anomaly Type, then select Blacklisted Application, Blacklisted Domain, and Blacklisted IP Address using an OR match, so that the rule can be triggered upon matching any one of these anomaly types.

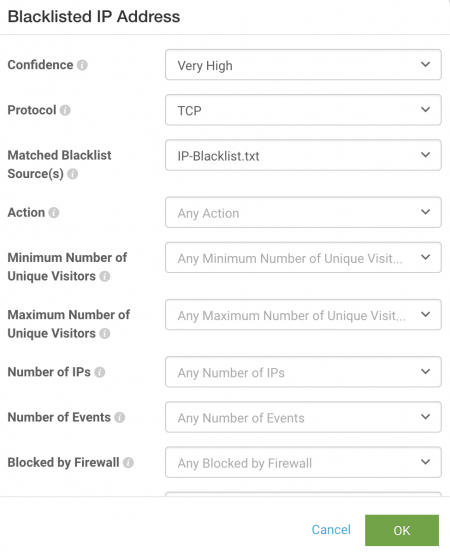
Click on the filter ( ) icon to further filter the anomaly type. For example, for Blacklisted IP Address, you can define a set of AND conditions for Confidence, Protocol, and Matched Blacklist Sources. Any fields not specified are ignored and not considered as part of the rules.

- Click OK.
- Select the Anomaly Filters that identify the selection of anomalies you want to take action on. The section on the left contains the main entities for which you can filter: Anomalies, Users, Accounts, Devices, Apps, and Domains. You can select multiple entity categories to create an AND condition. For example, you can create a rule to filter on specific anomaly types and anomaly score. To filter on anomaly types OR anomaly score, create separate rules with anomaly types in one rule, and anomaly score in the other.
- Step 3 or 3: Rule Properties. Specify a name and brief description for your rule.
- Click OK.
You can create multiple rules to make changes to anomalies, but rules cannot take overlapping actions because the order in which rules are applied is not enforced. For example, you cannot create a rule that adds all users in a specific department to a watchlist, then create a second rule that uses that watchlist to raise the risk score for some users on the watchlist, because there is no way to guarantee that the rules take action in any particular order.
Change the risk score of an active employee with an anomaly action rule
For example, you can set up an anomaly action rule to change the risk score of an active employee with a land speed violation anomaly where the current location is the United States to a low score.
- Select Explore > Anomalies to open the anomalies table.
- Click Actions > New Anomaly Action Rule.
- Select a Rule Action of Change Anomalies Score to change the score of the anomalies that match the filter conditions.
- Select a score of 4.
- Select a Rule Scope of Apply to Future Anomalies based on whether you want only future anomalies or future and existing anomalies to be affected by the rule.
- Select the Anomaly Filters that identify the selection of anomalies you want to take action on.
- Select a filter of Anomaly Type, then select an anomaly type of Land Speed Violation.
- Select the filter icon next to Land Speed Violation and specify a current location of the United States.
- Leave the current location option with the default setting to include anomalies with that location and click OK.
- Add an HR Status filter and select the checkbox for Active users.
- Click Next.
- Type a rule name of US-based land speed violations and a rule description of "Lowers the score of land speed violation anomalies for active employees in the US."
- Click OK to save the rule.
Modify an existing anomaly action rule
After you create an anomaly action rule, you can modify it in Splunk UBA on the web. You can disable it, edit it, clone it to create a similar rule, or delete it.
View existing anomaly action rules to make changes.
- In Splunk UBA, select Explore > Anomalies.
- Click the icon for Anomaly Action Rules.
- Hover over the rule you want to modify, and click the appropriate icon:
Anomaly action rules and threat revalidation
When you create or edit anomaly action rules, revalidation for the threat rules in your system is triggered. If your anomaly action rules are set to look at historical anomalies, then the threat rules will also consider anomalies up to a period of 3 months from the oldest anomaly that was updated. This may cause older anomalies that are closed to become relevant again.
For example, consider the timeline in the following scenario:
| Date | Action |
|---|---|
| May 1 | Anomalies A1, A2, and A3 exist in the system. |
| May 10 | You create a threat rule called TR1. This threat rule is set to evaluate anomalies starting from May 10, so anomalies A1, A2, and A3 are not considered. |
| June 15 | You create an anomaly action rule called AAR1. |
The creation of anomaly action rule AAR1 triggers threat revalidation, which causes threat rule TR1 to look back 3 months from the oldest anomaly that was updated and overrides the property of the threat rule to look for anomalies from May 10 onwards. If any one of the anomalies A1, A2, or A3 apply to the threat rule, they are picked up again and included in the new threat generated on June 15 or 16, depending on when the threat rule was triggered and how long it took to run.
Create rules based on anomaly types or anomaly categories
Anomalies have both types and categories. Types are specific descriptive names of anomalies, while categories are generic descriptions for anomalies. Multiple anomaly types can share a category, and one anomaly type can have multiple categories. Create an anomaly action rule or a custom threat with either anomaly types or anomaly categories, depending on how specific you want the rule or threat to be.
Limits for anomaly actions in Splunk UBA
Splunk UBA defines the following limits when taking action on anomalies, such as changing the score, moving to or removing from a watchlist, deleting anomalies, restoring anomalies from the trash, or any anomaly action rules affecting existing anomalies:
- In 10 and 20 node clusters, you can perform a single anomaly action that includes up to 200K anomalies
- In clusters of 7 nodes or fewer, you can perform a single anomaly action that includes up to 100K anomalies
If you are performing an anomaly action such as deleting anomalies that exceeds an anomaly action limit, examine the following to find an appropriate resolution.
- Filter the anomalies based on anomaly score. For example, you may choose to only keep anomalies with a higher score. If you need to change the way the anomaly is scored, you can modify the anomaly scoring rules. See Customize anomaly scoring rules in Administer Splunk User Behavior Analytics.
- Use anomaly action rules to set an absolute limit for thresholds and only generate anomalies for actions which exceed those thresholds. For example, do not generate any anomalies if the amount of data transferred is less than 1GB. See take actions on anomalies with anomaly action rules in Administer Splunk User Behavior Analytics.
- Examine the anomaly details to see if there are a large number of anomalies generated by a specific property. For example, supposed you are examining a large number of Excessive Data Transmission anomalies. Group the anomalies by individual devices and see if there are any destination IP addresses with a large number of anomalies. If there are, create an anomaly action rule to ignore anomalies to these destinations.
- Perform other filtering based on anomaly metadata, such as whether or not the anomaly is part of a peer group, or the number of unique destinations involved. This type of metadata is involved in the score calculation for any anomaly, so you can filter based on this metadata or based on the resulting score.
| Monitor policy violations with custom threats | Customize anomaly scoring rules |
This documentation applies to the following versions of Splunk® User Behavior Analytics: 5.0.0, 5.0.1, 5.0.2, 5.0.3, 5.0.4, 5.0.4.1, 5.0.5, 5.0.5.1, 5.1.0, 5.1.0.1
 Download manual
Feedback submitted, thanks!