Filter events analyzed by Splunk UBA for anomalies
Limit or target the data analyzed by Splunk UBA with filters. You can create two types of filters:
- Event filters to restrict event analysis based on field values. Filtering occurs after the data is added to Splunk UBA, but before Splunk UBA analyzes the data.
- HR data global filter to restrict event analysis to only events that contain users present in the HR data. Filtering occurs before you add data to Splunk UBA and is enabled by default.
For example, you can use filters to exclude all events containing the user name of a penetration testing account or the IP address of a machine used in a malware lab. Event filters apply to all data added to Splunk UBA. If a filter is no longer needed, delete it.
Event filters can only include or exclude the specific fields for a category. For example, you cannot create a filter that excludes events with the user "buttercup" but includes events with the user "daisymug".
Do not create filters that overlap. For example, a filter that includes all events from the AD group "Ponies" but excludes events of the user "buttercup", who is a member of the "Ponies" AD group, will result in unpredictable event filtering, depending on the order of execution of the filters.
Create an event filter
Create event filters after configuring data sources.
- Select Manage > Data Sources.
- Click Event Filters.
- Select a filter type.
- Select the users, devices, AD groups, or event fields to filter.
- Select whether to include or exclude the selected users, devices, AD groups, or event fields.
- Click OK to save your filters.
- Stop and restart the containers, and also sync the cluster in multi-node deployments.
/opt/caspida/bin/Caspida stop-containers
/opt/caspida/bin/Caspida sync-cluster
/opt/caspida/bin/Caspida start-containers
Example: create an event filter involving users
Create a filter to exclude events associated with the user Simon Roma.
- Select Manage > Data Sources.
- Click Event Filters.
- Select a filter type of Users.
- Click Add Users to add a new user filter.
- Search for the user name Simon Roma.
- Check the checkbox next to the user name and click OK.
- Select the Exclude the events for the specified users radio button.
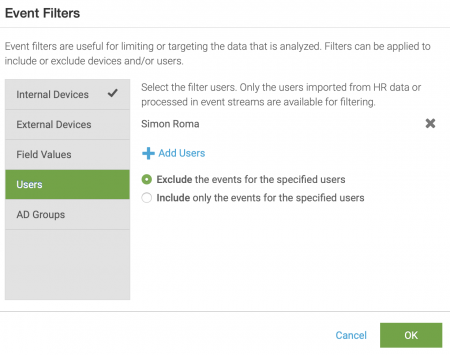
- Click OK to save the filter.
- Stop the containers, synchronize the cluster if needed, then start the containers.

Example: create an event filter involving devices
Create a filter to exclude internal devices in the RFC1918 IP address range.
- Select Manage > Data Sources.
- Click Event Filters.
- Select a filter type of Internal Devices.
- Click Add Internal Devices to add a new user filter.
- Enter the CIDR or IP address of the devices you want to filter. In this example, we will filter the RFC1918 IP address ranges:
- 10.0.0.0/8
- 172.16.0.0/12
- 192.168.0.0/16
- Select the Exclude the events for the specified internal devices radio button.
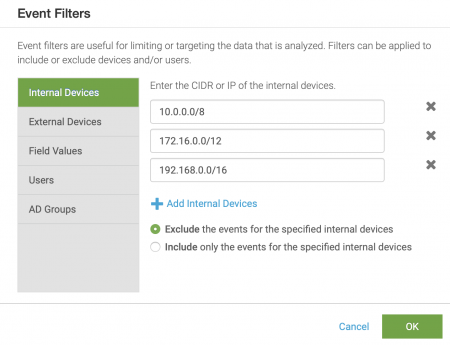
- Click OK to save the filter.
- Stop the containers, synchronize the cluster if needed, then start the containers.

Additional steps required for filters using AD groups
Perform the following additional steps if your event filter uses AD groups:
- Stop the Splunk UBA containers.
/opt/caspida/bin/Caspida stop-containers
- Check your system to see if the
/etc/caspida/local/conf/attribution/Account.jsonexists. If not, copy/opt/caspida/conf/attribution/Account.jsonto/etc/caspida/local/conf/attribution/Account.json. - Edit
/etc/caspida/local/conf/attribution/Account.jsonand change"useInModel": falseto"useInModel": truein following JSON block:{ "name": "userGroups", "sourceNames": ["memberOf","groups"], "properties" : { "type": "ARRAY", "label": "AD Group", "pluralLabel": "AD Groups", "showInDetails": true, "showInFilters": true, "showInGroupBy": true, "useInModel": false } }, - Save your changes to the
Account.jsonfile. - Run the following commands to sync the cluster and restart the containers.
/opt/caspida/bin/Caspida sync-cluster
/opt/caspida/bin/Caspida start-containers
Filter events based on event fields
To filter events based on the fields in the events, you must know the name and value of each field that you want to filter. Any field that appears in the parsed list of fields of an event can be included or excluded using a filter. Use the following table to identify common fields and values that you might want to filter in your data. Work with Splunk Professional Services to add customized field-based filters.
| Field name | Description | Example values |
|---|---|---|
| event.format | name of the event format | WebGateway |
| view.network.source | source IP address | 10.1.2.3 |
| view.network.destination | destination IP address | 172.20.30.40 |
| ad.user.srcuser | source user for an AD data source | jsmith |
| ciscosa.user.destuser | destination user in a Cisco ASA data source | administrators\superuser |
Set the order in which event filters run
Event filters run in the same order every time for every event in a data source until a matching event is found. When a matching event is found, additional filters are not applied to the corresponding event.
By default, event filters are applied in the following order:
- Field values to exclude
- Field values to include
- External devices to exclude
- External devices to include
- AD groups to exclude
- AD groups to include
- Internal devices to exclude
- Internal devices to include
- IP address filters
- Filters defined with regex
- Users to exclude
- Users to include
The order in which event filters run can be set manually by copying properties from the uba-default.properties file and customizing them in the uba-site.properties file.
- Open the
/opt/caspida/conf/uba-default.propertiesand copy thedecorator.filter.precedenceproperty along with all the filters.decorator.filter.precedence=FieldValuesExclude, FieldValuesInclude, ExternalDeviceExclude, ExternalDeviceInclude, GroupExclude, GroupInclude, InternalDeviceExclude, InternalDeviceInclude, IPAddress, Regex, UserExclude, UserInclude
- Open the
/etc/caspida/local/conf/uba-site.propertiesfile and past thedecorator.filter.precedenceproperty and filters into the file. - Set the desired order of the filters.
- Save your changes to the file.
| Add data sources to Splunk UBA in test mode | Why Splunk UBA requires HR data |
This documentation applies to the following versions of Splunk® User Behavior Analytics: 5.0.0, 5.0.1, 5.0.2, 5.0.3, 5.0.4, 5.0.4.1, 5.0.5, 5.0.5.1, 5.1.0, 5.1.0.1, 5.2.0, 5.2.1, 5.3.0, 5.4.0, 5.4.1, 5.4.1.1, 5.4.2, 5.4.3
Feedback submitted, thanks!