Install and configure the Content Pack for Third-party APM
Perform the following high-level steps to install and configure the Content Pack for Third-party APM:
- Install and configure the Splunk add-on for the third-party vendor data you want to see in the content pack.
- Install the content pack.
- Import your third-party APM entities.
- Review and tune KPI thresholds.
Prerequisite
Create a full backup of your ITSI environment in the event you need to uninstall the content pack later. For more information, see the Overview of backing up and restoring ITSI KV store data in the Administration Manual.
Install and configure the Splunk add-on for your third-party vendor
This content pack relies on data collected in Splunk add-ons for three third-party vendors. You can safely install add-ons on all tiers of a distributed Splunk platform deployment, including heavy forwarders, indexers, or search heads.
Download the latest versions of the add-ons from Splunkbase. The following add-ons are available:
Install the content pack
To install the Content Pack for Third-party APM, you must install the Splunk App for Content Packs. To install the Splunk App for Content Packs in your environment, see the Splunk App for Content Pack installation instructions.
After you have installed the Splunk App for Content Packs, perform the following steps to install the content pack:
- From the ITSI or ITE Work menu, choose Configuration > Data Integrations.
- Select Add content packs or Add structure to your data depending on your version of ITSI or ITE Work.
- Select the 3rd Party APM content pack.
- Review what's included in the content pack and then click Proceed.
- Configure the following available settings:
- Choose which objects to install: For a first-time installation, select the items you want to install and deselect any you're not interested in. For an upgrade, the installer identifies which objects from the content pack are new and which ones already exist in your environment from a previous installation. You can selectively choose which objects to install from the new version or install all objects.
- Choose a conflict resolution rule for the objects you install: For upgrades or subsequent installs, decide what happens to duplicate objects introduced from the content pack. Choose from the following options:
- Install as new: Any existing identical objects in your environment remain intact.
- Replace existing: Existing identical objects are replaced with those from the new installation. Any changes you previously made to these objects are overwritten.
- Import as enabled: Select whether to install objects as enabled or leave them in their original state. We recommend that you import objects as disabled to ensure your environment doesn't break from the addition of new content. This setting only applies to services, correlation searches, and aggregation policies. All other objects such as KPI base searches and saved searches are installed in their original state regardless of the option you choose.
- Add a prefix to your new objects: Optionally, append a custom prefix to each object installed from the content pack. For example, you might prefix your objects with
CP-to indicate they came from a content pack. This option can help you locate and manage the objects after installation. - Backfill service KPIs: Optionally backfill your ITSI environment with the previous seven days of KPI data. Consider enabling backfill if you want to configure adaptive thresholding and predictive analytics for the new services. This setting only applies to KPIs, not service health scores.
- When you've made your selections, click Install selected.
- Click Install to confirm the installation. When the installation completes you can view all objects that were installed in your environment. A green checkmark on the Data Integrations page indicates which content packs you've already installed.
Import your third-party APM entities
To import your third-party APM hosts as entities, perform the following steps:
- From the ITSI or IT Essentials Work menu choose Configuration > Entities.
- Select Create Entity > Import from Search.
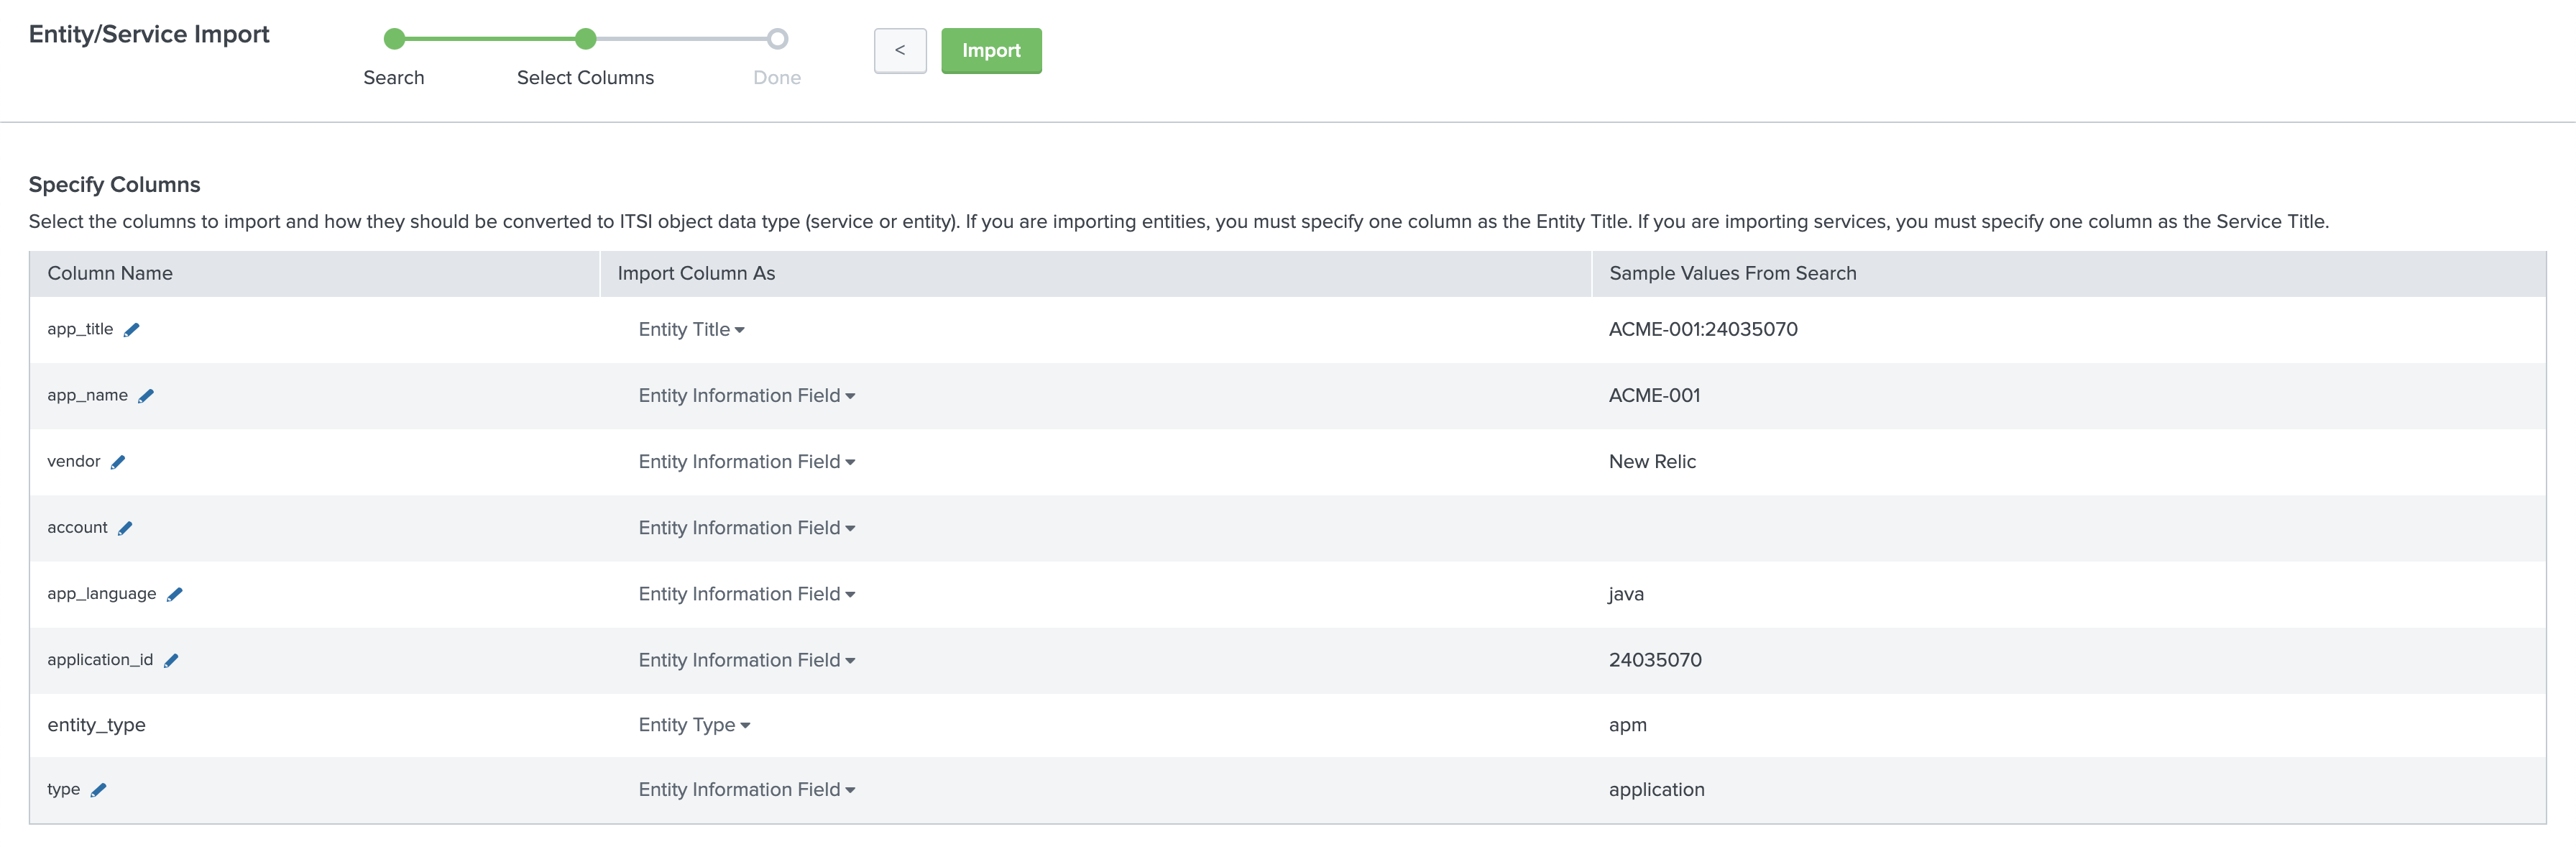
- Paste the following SPL into the Ad hoc Search field and click the search icon to preview your entities:
tag=application tag=inventory tag=apm app_title=*
| stats latest(app_name) as app_name,latest(vendor) as vendor, latest(account) as account, latest(app_language) as app_language, latest(application_id) as application_id by app_title
| eval entity_type = "apm", type="application"
- Click Next.
- On the Entity/Service Import screen, map the following columns:
- app_title = Entity Title
- entity_type = Entity Type
- all other fields = Entity Information Fields
- Click Import.
- Click Set Up Recurring Import and complete the following steps:
- Enter a name for your recurring import.
- Select a schedule.
- Click Submit.

When you've finished importing your entities, go to Service Analyzer > Analyzers > Service Analyzer - APM to see your services and KPIs are now available.

Review and tune KPI thresholds
Aggregate and per-entity thresholds for the KPIs in this content pack have pre-tuned thresholds representing best practices. You can review the KPIs in each service and configure the aggregate and per-entity thresholds values to alternate defaults based on your use case. Some KPIs, such as the Apdex score, have universal best practices for threshold configuration. Others are specific to your deployment.
For instructions on tuning the KPI thresholds, see Configure KPI thresholds in ITSI in the Service Insights Manual.
For a full list of the KPIs included with this content pack, see the KPI reference for the Content Pack for Third-party APM.
KPI alerting
ITSI generates notable events on the Episode Review page based on the alerting rules you configure. Because acceptable application performance varies widely per use case, KPI alerting isn't enabled by default in this content pack. To receive alerts for KPIs when aggregate KPI threshold values change, see Receive alerts when KPI severity changes in ITSI in the Service Insights Manual.
Next step
Once you have installed and configured the Content Pack for Third-party APM you can start using the dashboards and visualizations in the content pack to monitor your applications. For instructions on using the content pack, see Use the Content Pack for Third-party APM.
| Release notes for the Content Pack for Third-party APM | Upgrade to version 1.0.1 of the Content Pack for Third-party APM |
This documentation applies to the following versions of Content Pack for Third-party APM: 1.0.1
Feedback submitted, thanks!