Generate risk notables using risk incident rules
This is the second step in the Isolate threats with risk-based alerting scenario.
Ram configures a default risk incident rule in Enterprise Security to generate notables that match certain risk score thresholds or risk conditions and then, classifies them based on risk level.
Risk incident rules can search for a conditional match based on the risk score assigned to the assets and identities. Assets and identities are the devices and user objects in the network environment. When the risk incident rule finds a match, it generates a risk alert as a notable event, a risk modifier, or both.
- From the home page of Splunk Enterprise Security, Ram selects Configure > Content > Content Management.
- Ram sorts the list of searches by Correlation Search, to view all existing correlation searches.
- Ram selects the default risk incident rule called Risk Notable: Risk Threshold Exceeded For Risk Object Over 24 Hour Period, which uses the risk data model. The search opens in the Edit Correlation Search window.
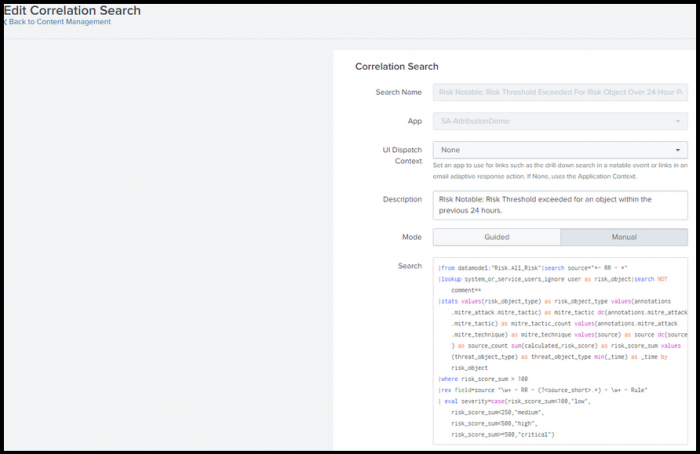
This default risk incident rule helps Ram to identify only those notables whose risk score has exceeded the risk threshold within the previous 24 hours. - Using this risk incident rule, Ram classifies notables into the following risk categories:

- If the risk score for an object is less than or equal to 100 over the last 24 hours, Ram classifies the notables in the low risk category.
- If the risk score is greater than 100 but less than or equal to 250 over the last 24 hours, Ram classifies the notables in the medium risk category.
- If the risk score is greater than 250 but less than or equal to 500 over the last 24 hours, Ram classifies the notables in the high risk category.
- If the risk score is greater than 500 over the last 24 hours, Ram classifies the notables in the critical risk category.
Classifying the notables helps Ram to prioritize the investigation effort on the critical notables and minimize threat.
- Ram can also customize the Search Processing Language (SPL) of the risk incident rule to change specific conditions. For example, if Ram wants to identify risk objects that have a risk score threshold of 200 instead of 100 over the last 24 hours. Using the risk data model and creating risk notables based on MITRE ATT&CK tactics and techniques allows Ram to search through the risk events that created the notable.
Following is an example SPL search that Ram can customize to select risk conditions and adjust risk scores:
|from datamodel:"Risk.All_Risk"|search source="*- RR - *"
|lookup system_or_service_users_ignore user as risk_object|search NOT comment=*
|stats values(risk_object_type) as risk_object_type values(annotations.mitre_attack.mitre_tactic) as mitre_tactic dc(annotations.mitre_attack.mitre_tactic) as mitre_tactic_count values(annotations.mitre_attack.mitre_technique) as mitre_technique values(source) as source dc(source) as source_count sum(calculated_risk_score) as risk_score_sum values(threat_object_type) as threat_object_type min(_time) as _time by risk_object
|where risk_score_sum > 100
|rex field=source "\w+ - RR - (?<source_short>.*) - \w+ - Rule"
| eval severity=case(risk_score_sum<100,"low",
    risk_score_sum<250,"medium",
    risk_score_sum<500,"high",
    risk_score_sum>=500,"critical")
Following is an explanation of the SPL search components:
- The lookup
system_or_service_users_ignorehelps to focus the search to generate risk notables based on specific risk objects and ignore system or service accounts or users. - The
statscommand calculates statistics based on specified fields and returns search results. This helps to identify the information to include in the risk notable to help the analyst. - The
wherecommand specifies the constraint of the search and identifies the risk objects that have an aggregate risk score, which is greater than 100. - The
rexcommand extracts fields using a regular expression. For example, here therexcommand identifies the risk notable or risk rule based on its naming convention.RR - (?<source_short>.*) - \w+ - Rule. This is an example of the naming convention used by risk rules or risk notables in Splunk Enterprise Security: "RR-Access Additional Cloud Credentials in Azure-User" or "RR-Add User to Administrator Group in Azure-User". - The
evalcommand creates new fields in your events by using existing fields and an arbitrary expression. Here, theevalcommand classifies risk events based on their risk score and categorizes them by "medium", "high", or "critical" risk categories.
Next step
Add annotations to enrich risk incident rule search results
See also
For more information on generating risk notables using risk incident rules, see the product documentation:
How to create risk notables using Splunk Enterprise Security
| Assign risk scores to assets and identities | Add annotations to enrich risk incident rule search results |
This documentation applies to the following versions of Splunk® Enterprise Security: 7.3.2, 7.3.3
Feedback submitted, thanks!